Note: This article is for the newly re-designed module. This updated module is in the process of being rolled out and may only be available to some users.
Overview
The Resident Insurance module allows building managers to track residents’ insurance policy information. Residents can submit their policy info to management for approval, and management can send automatically queued emails to residents who meet specific criteria (ex. Do not have a policy on file, policy expires within 30 days). To activate the Resident Insurance module, please have a Security Officer contact BuildingLink Support.
Note: Click on the images to enlarge them.
Table of Contents
- Configuring Insurance Settings
- Customizing Insurance Templates
- Searching and Managing Insurance Policies
- Viewing and Managing Insurance on a Unit
Configuring Insurance Settings
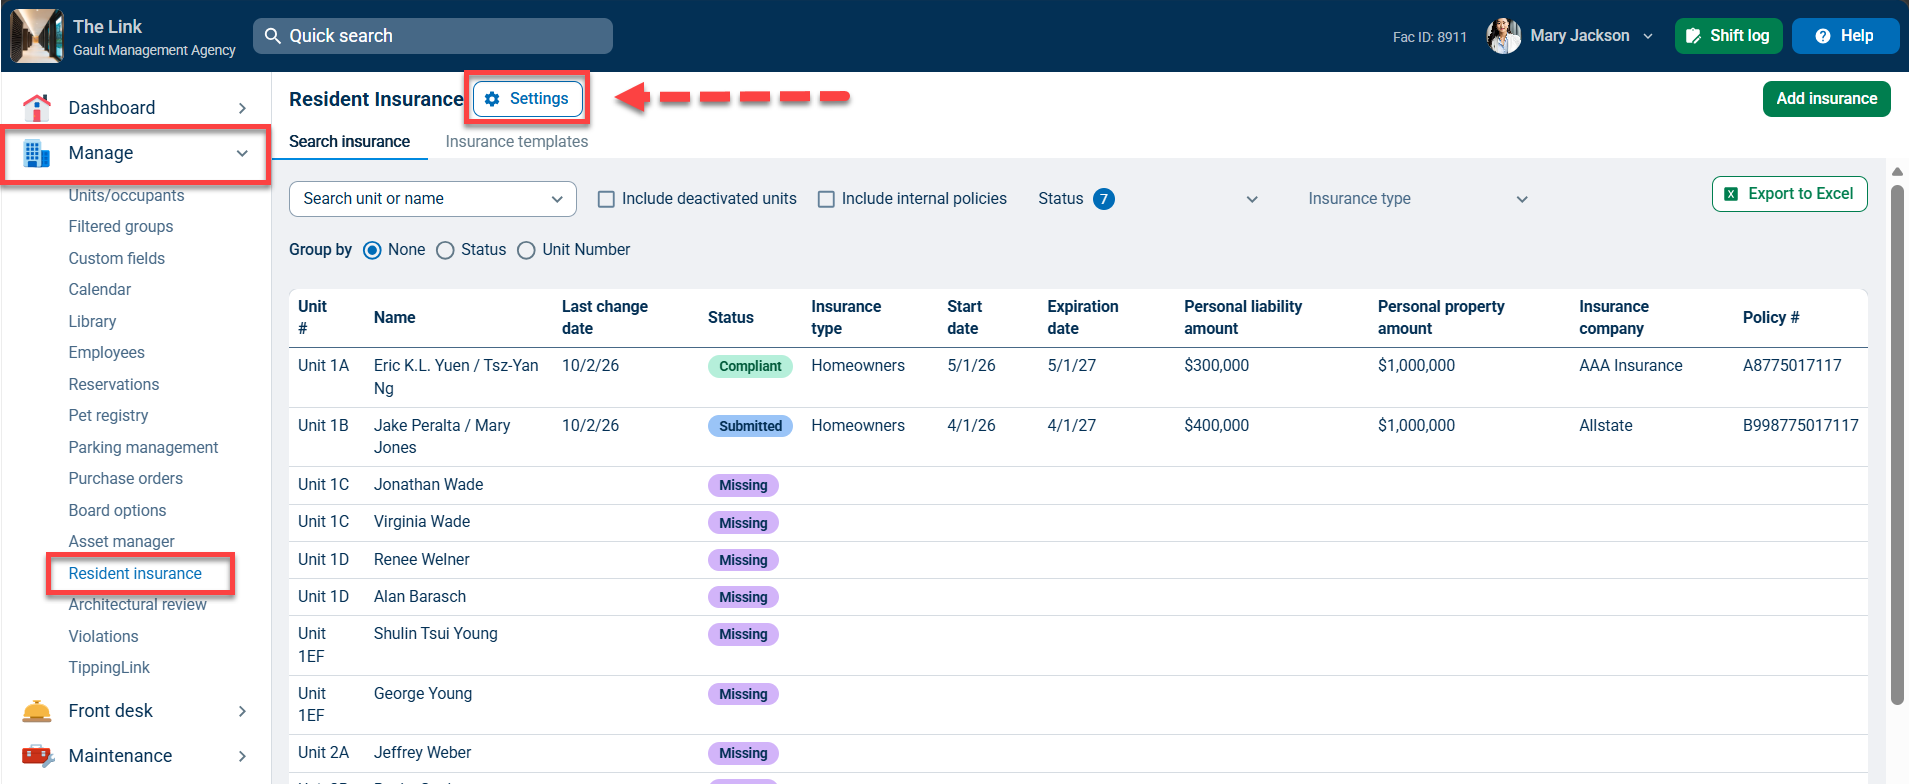
To configure your insurance settings, click the Manage tab and then click Resident Insurance. Click the Settings button at the top of the page.
Renters Insurance and Homeowners Insurance exist by default for every property. You can add Custom Insurance Types if you want to track other policies (e.g., flood insurance, umbrella policies, or property-specific requirements).
Click Add type to add a new custom insurance type to your list. When approving submitted policies, you can add email addresses in the Notifications section to receive notifications when a resident submits an insurance policy for review.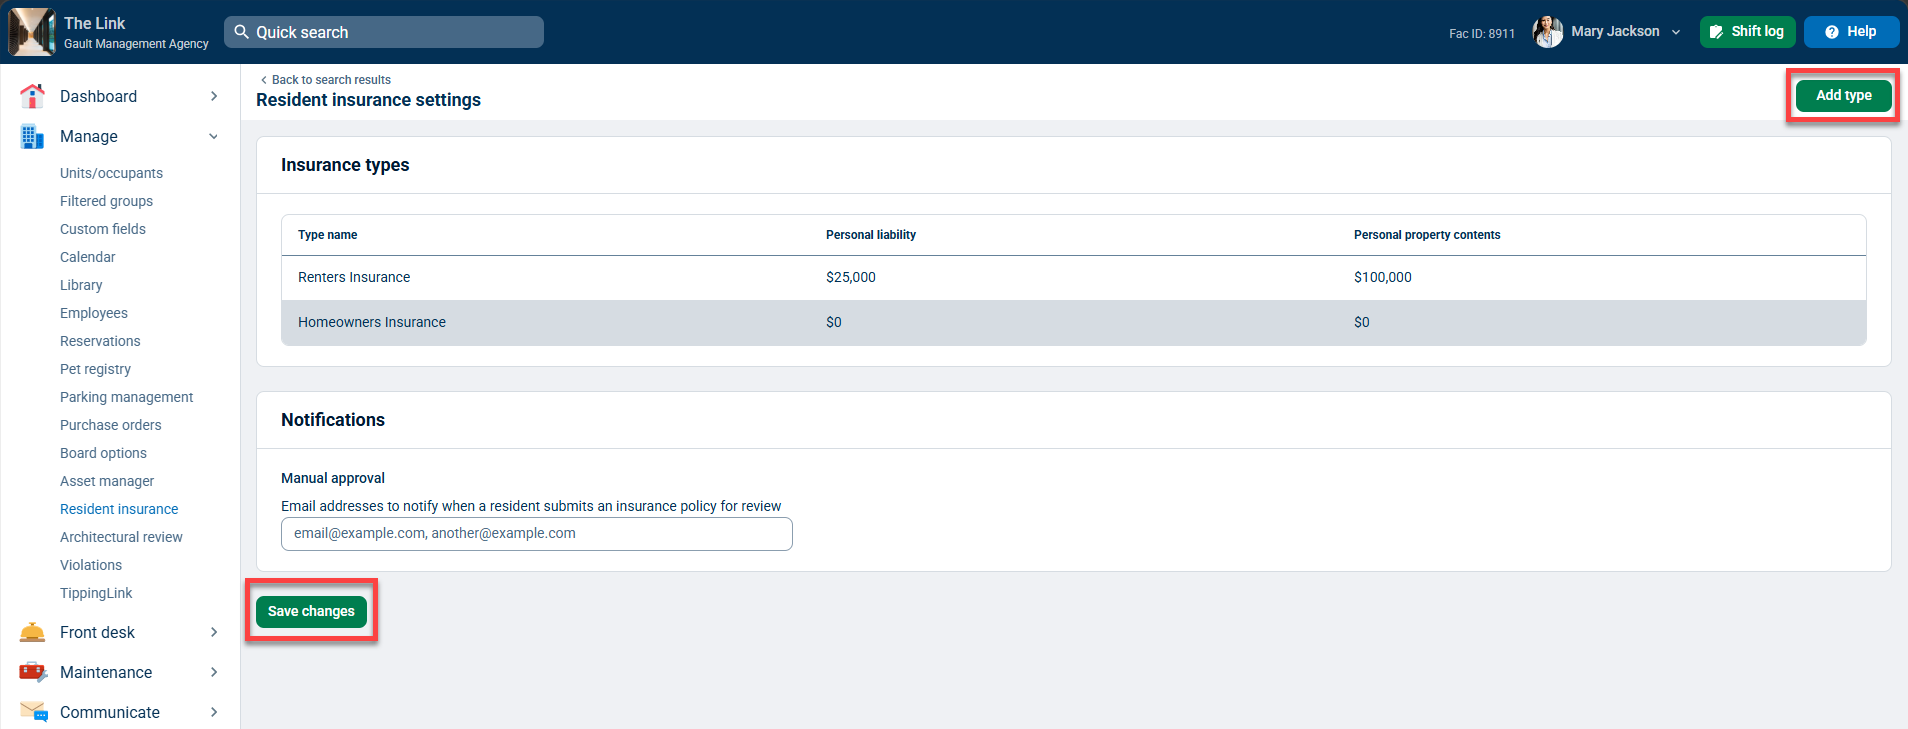
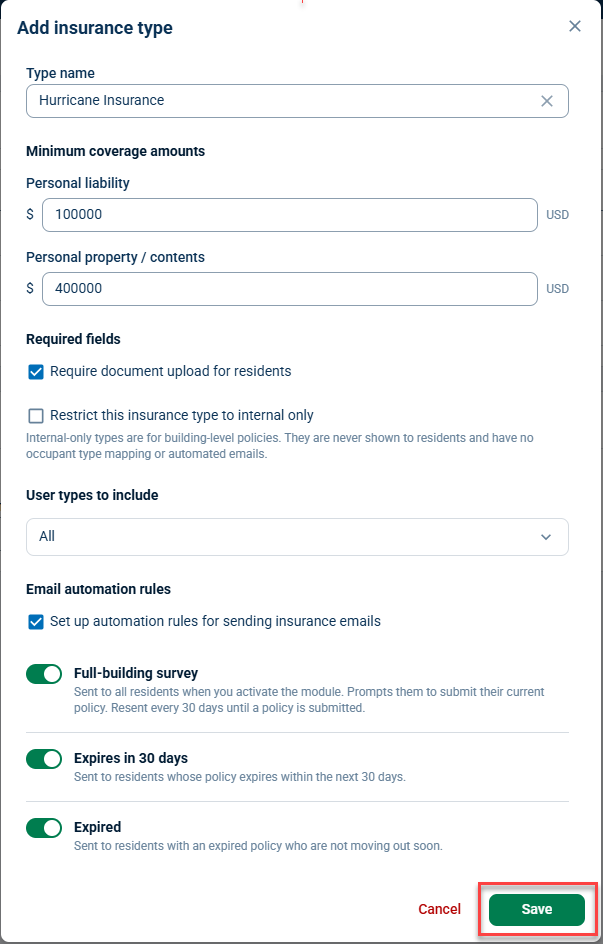
When adding a new insurance type, Name the insurance type, and set minimum coverage amounts for personal liability and personal property/contents.
Check the box next to Require document upload for residents to require residents to upload/attach their policy file when they submit their coverage.
Check the box next to Restrict this insurance type to internal only to make the insurance type internal for management view only. Internal-only types are for building-level policies. They are never shown to residents and have no occupant type mapping or automated emails.
Select which occupant types to include for this insurance type by clicking the drop-down menu below User types to include and checking off each occupant type required to have a policy of this type.
Check the box next to Set up automation rules for sending insurance emails to enable automatic email notifications. Use the toggle buttons next to each email type (Full-building survey, Expires in 30 days, and Expired) to enable/disable. (You can customize the text of the emails in the Insurance Templates tab on the main Resident Insurance page.)
Click Save to add your new insurance type.
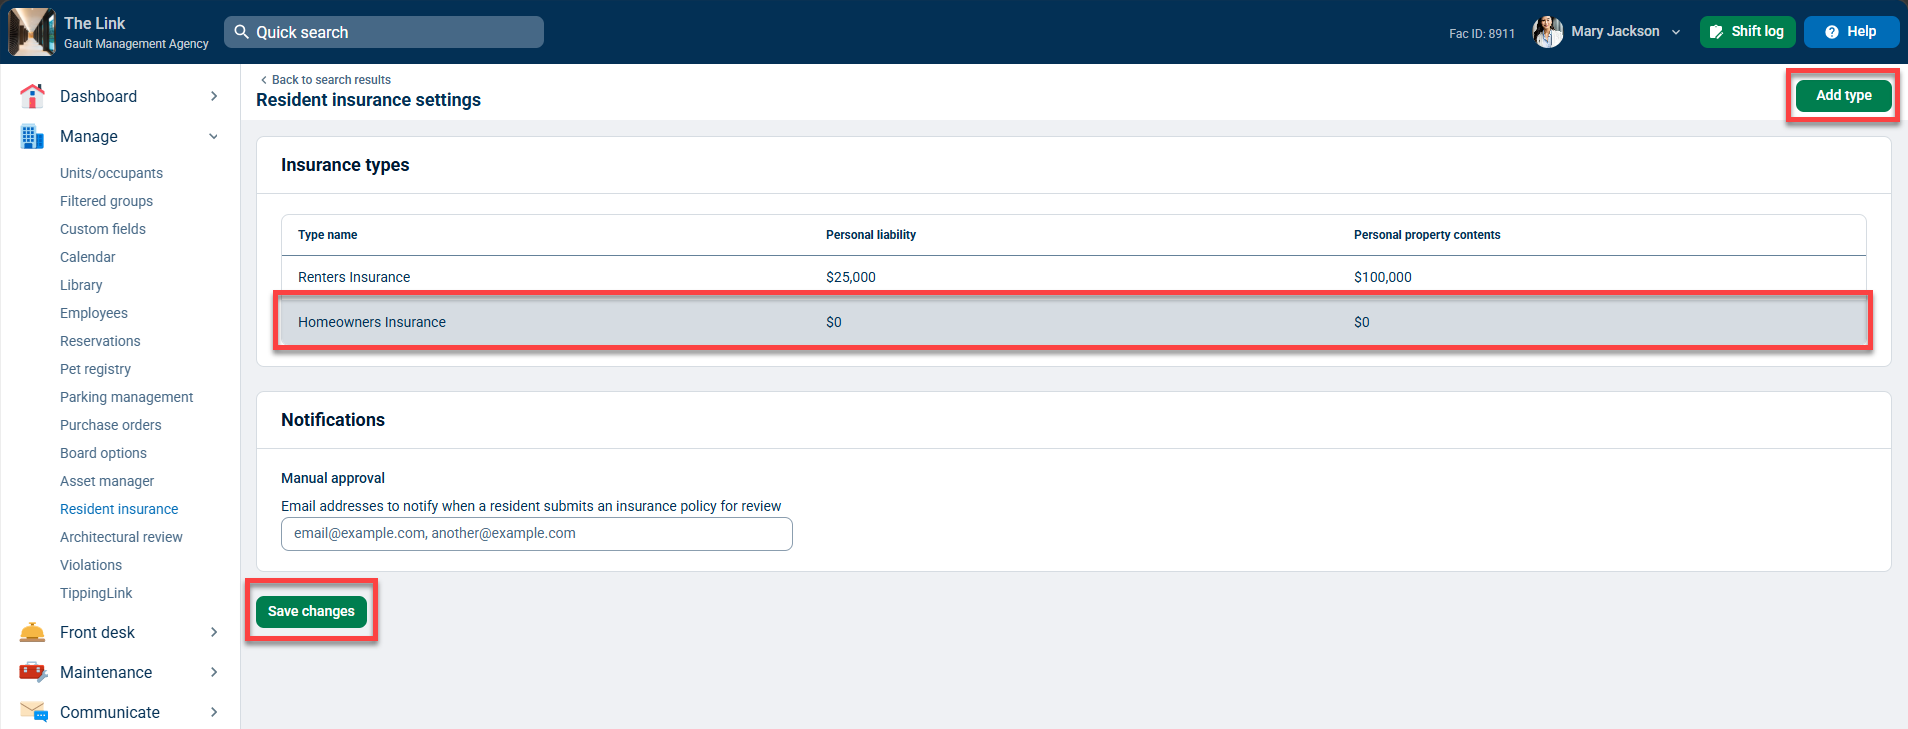
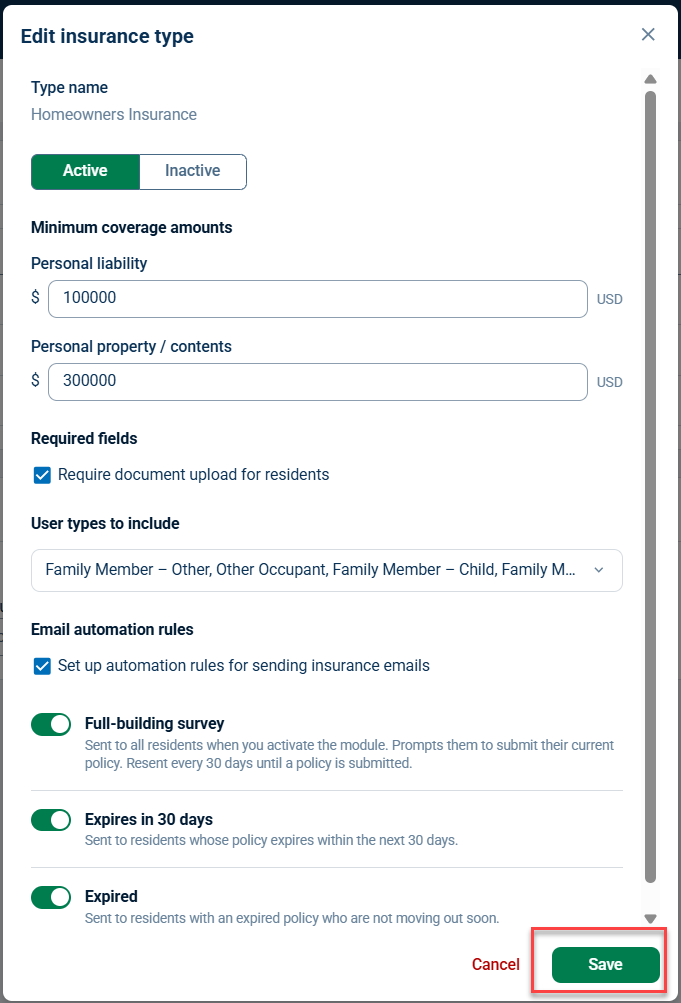
To edit an existing insurance type, click the specific insurance type in the list to view its settings and make any changes. Click Save to save the changes.
Click Save changes to finalize your insurance settings.
Customizing Insurance Templates
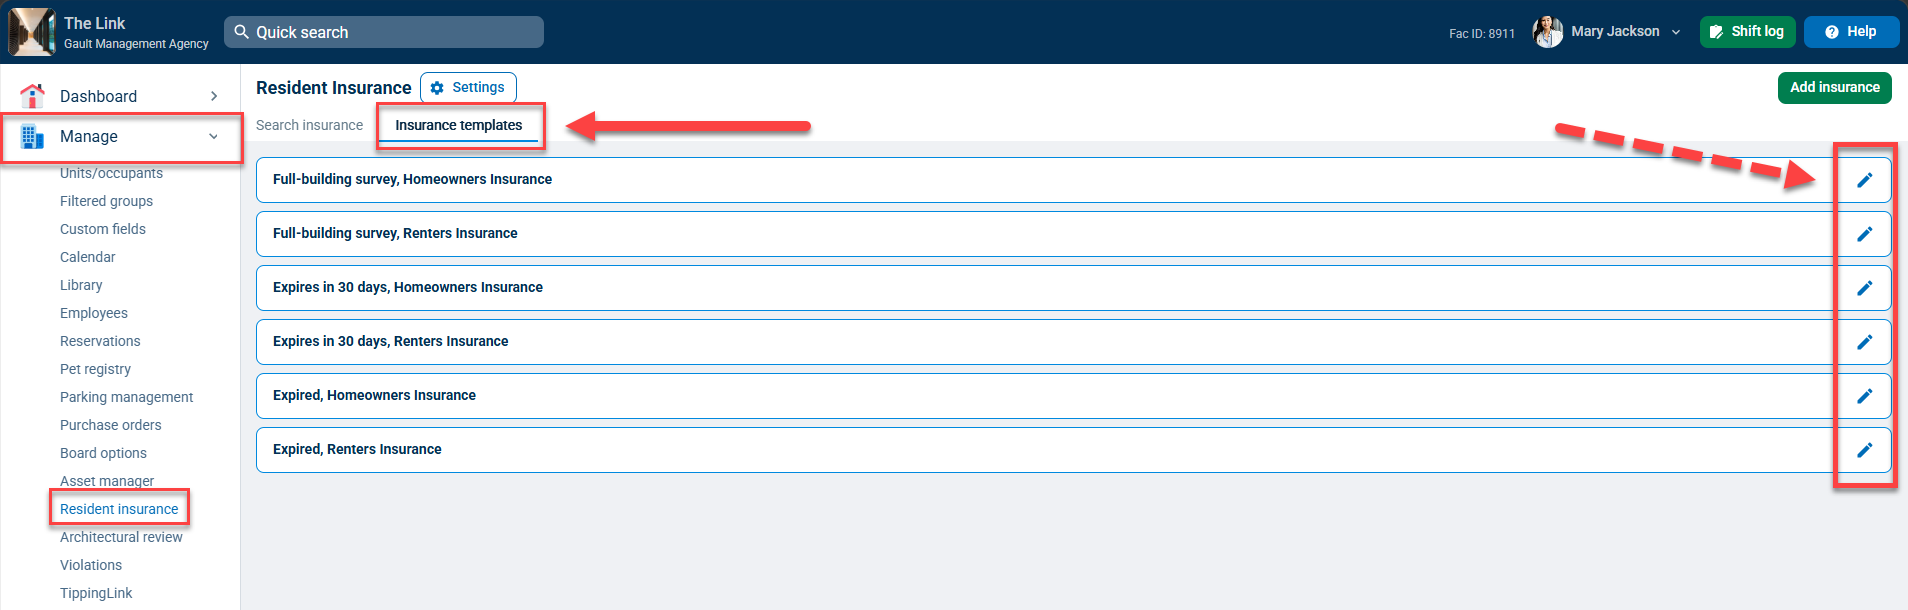
To customize the automated email notification templates, click the Manage tab and then click Resident Insurance. Click the Insurance Templates tab at the top of the page.
If enabled for the insurance type, these email notifications will be sent automatically based on the insurance policy status.
- Full-building survey: Sent to all residents when you activate the module. Prompts them to submit their current policy. Resent every 30 days until a policy is submitted.
- Expires in 30 days: Sent to residents whose policy expires within the next 30 days.
- Expired: Sent to residents with an expired policy who are not moving out soon.
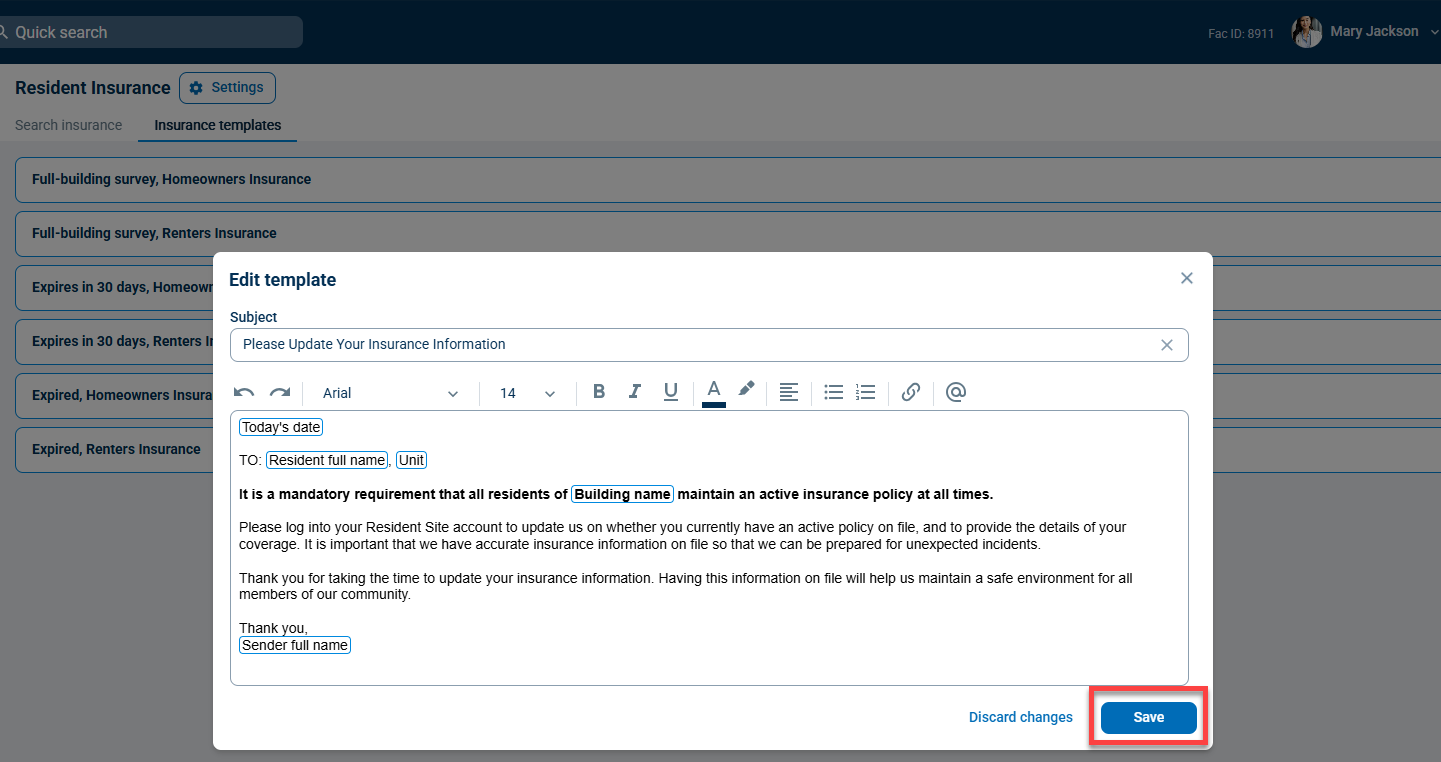
Each insurance type will have a customizable email template for a Full-building survey, Expires in 30 days, and Expired email notification. Click the  to edit that specific template.
Click the Save button to save your changes to the email template.
Searching and Managing Insurance Policies
Once you’ve customized the insurance settings for your property, Residents can start submitting their policies, and Management users can add or update policies on their behalf.
Compliance is tracked per resident per insurance type, not per unit. Residents can also add insurance covering other residents in their unit, not just themselves.
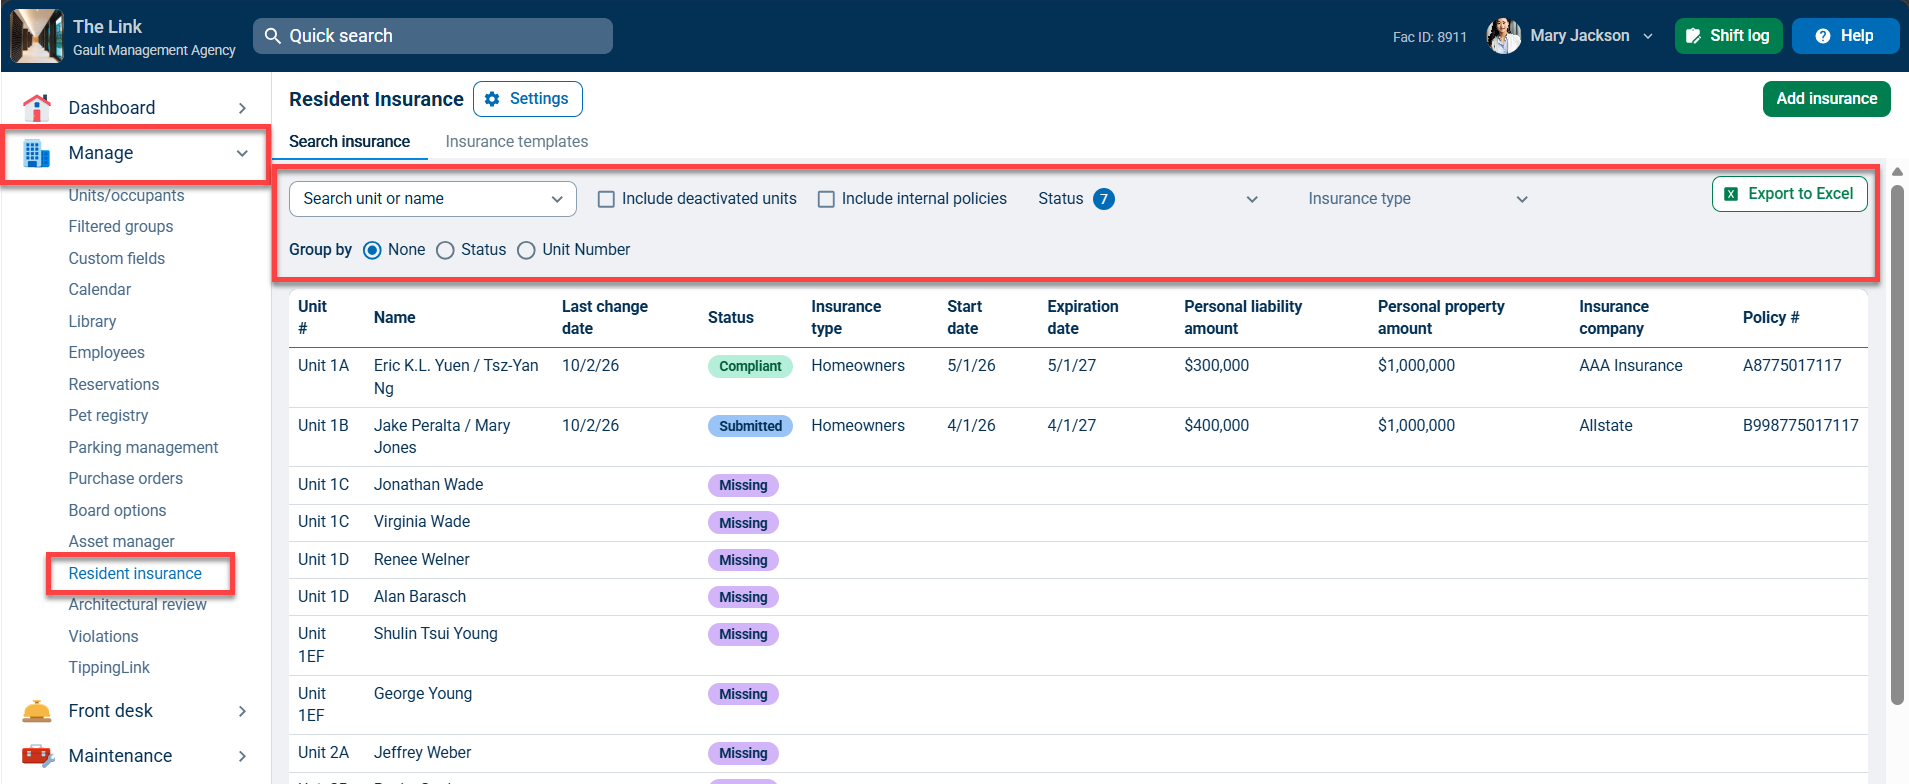
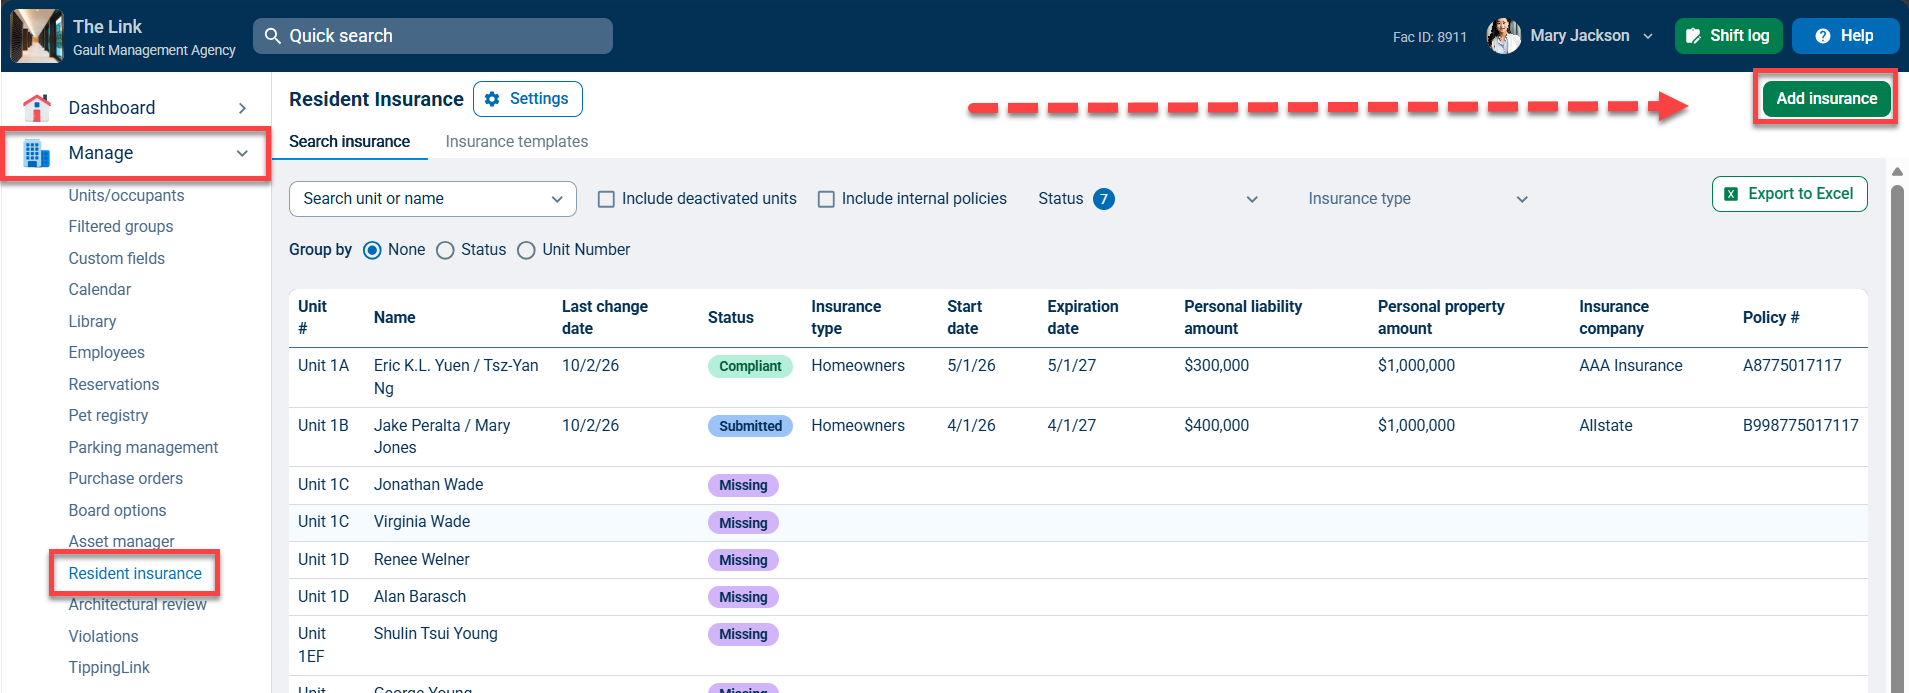
Click the Manage tab and then click Resident Insurance to view the list of insurance policies.
You can search specific policies by using the filter options at the top of the list. Search by unit or name, include deactivated units, and internal policies.
You can filter by Status and Insurance type. There are 10 possible statuses:
- Archived
- Cancelled
- Compliant
- Expired
- Expiring Soon
- Missing
- Rejected
- Submitted
- Superseded (automatically applied when policy A expires, and policy B takes over; policy A changes to Superseded, and B changes to Compliant.
- Upcoming (automatically applied to a policy that is uploaded before the policy start date; on the start date, the status changes to Compliant.)
Click Export to Excel to download an Excel spreadsheet of the current list being viewed.
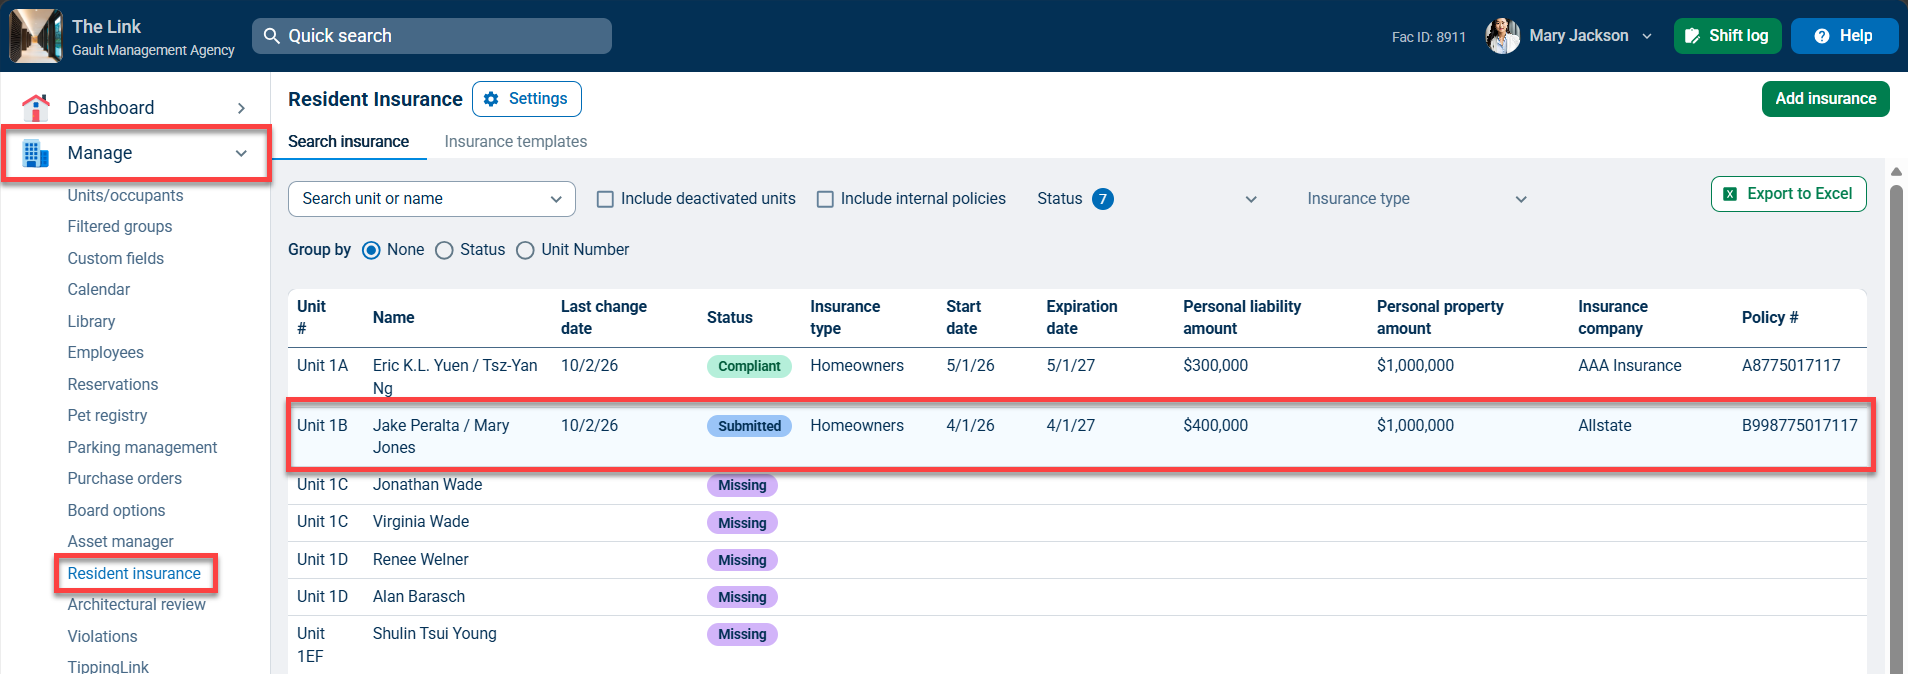
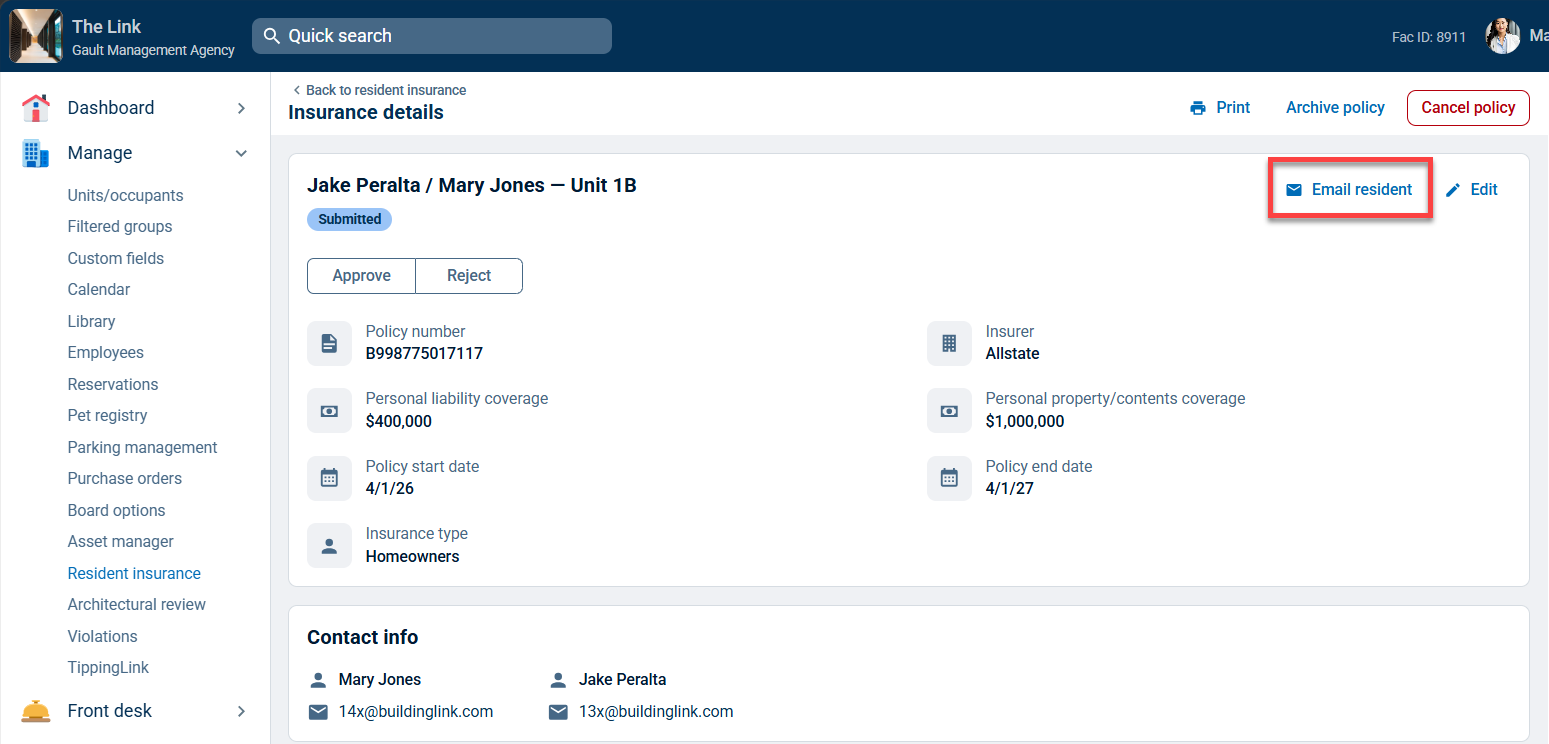
To Approve or Reject an insurance policy, click the Submitted policy in the list to view the Insurance details.
Click Approve to change the policy status to Approved.
Click Reject to change the policy status to Rejected.
Click Edit to edit the details of the policy.
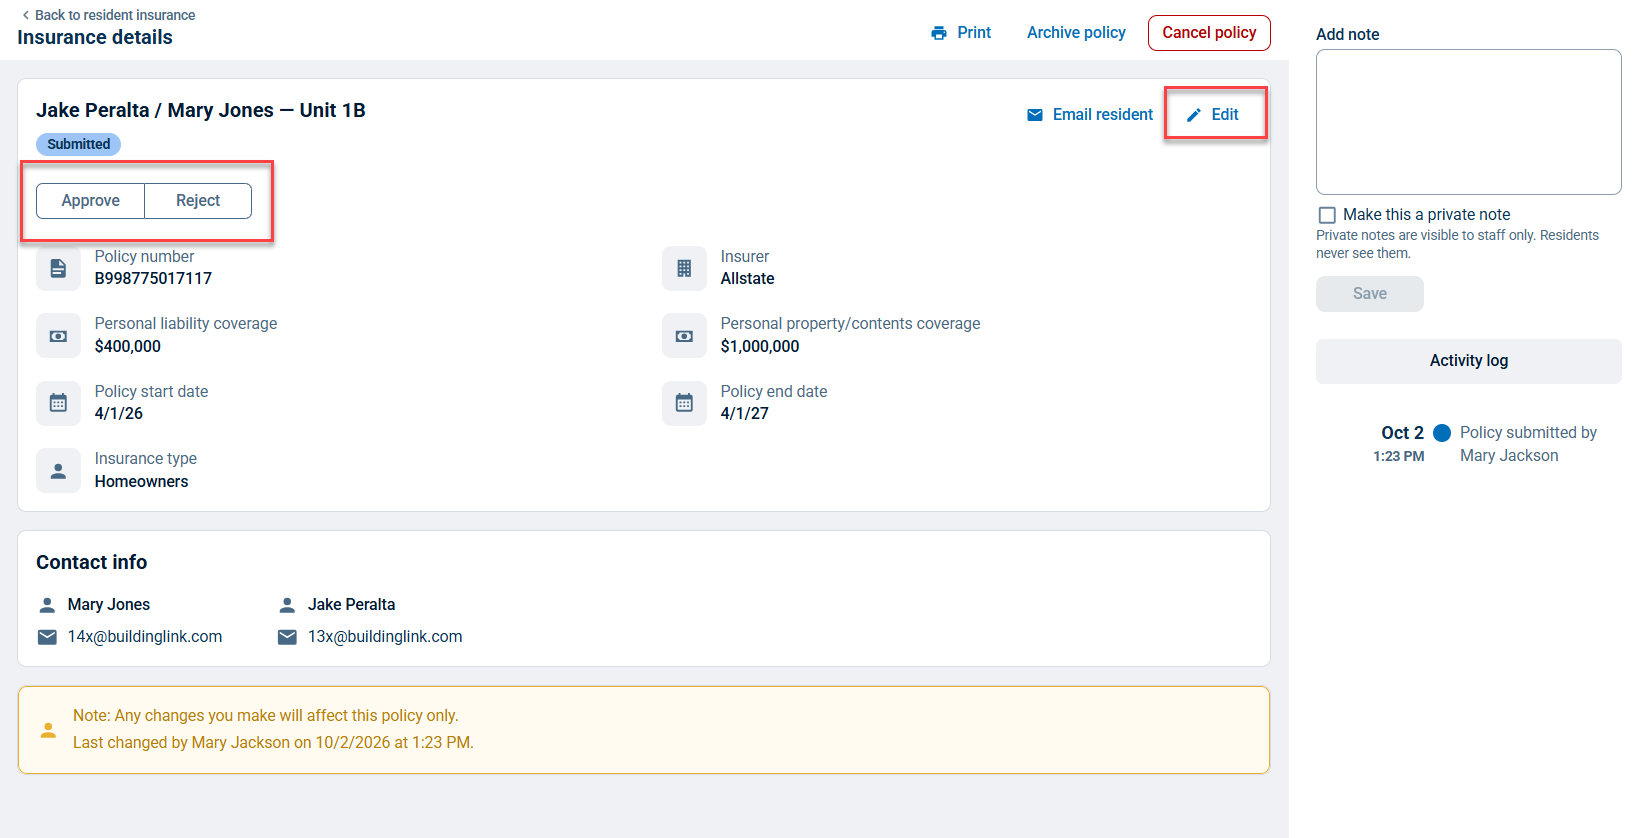
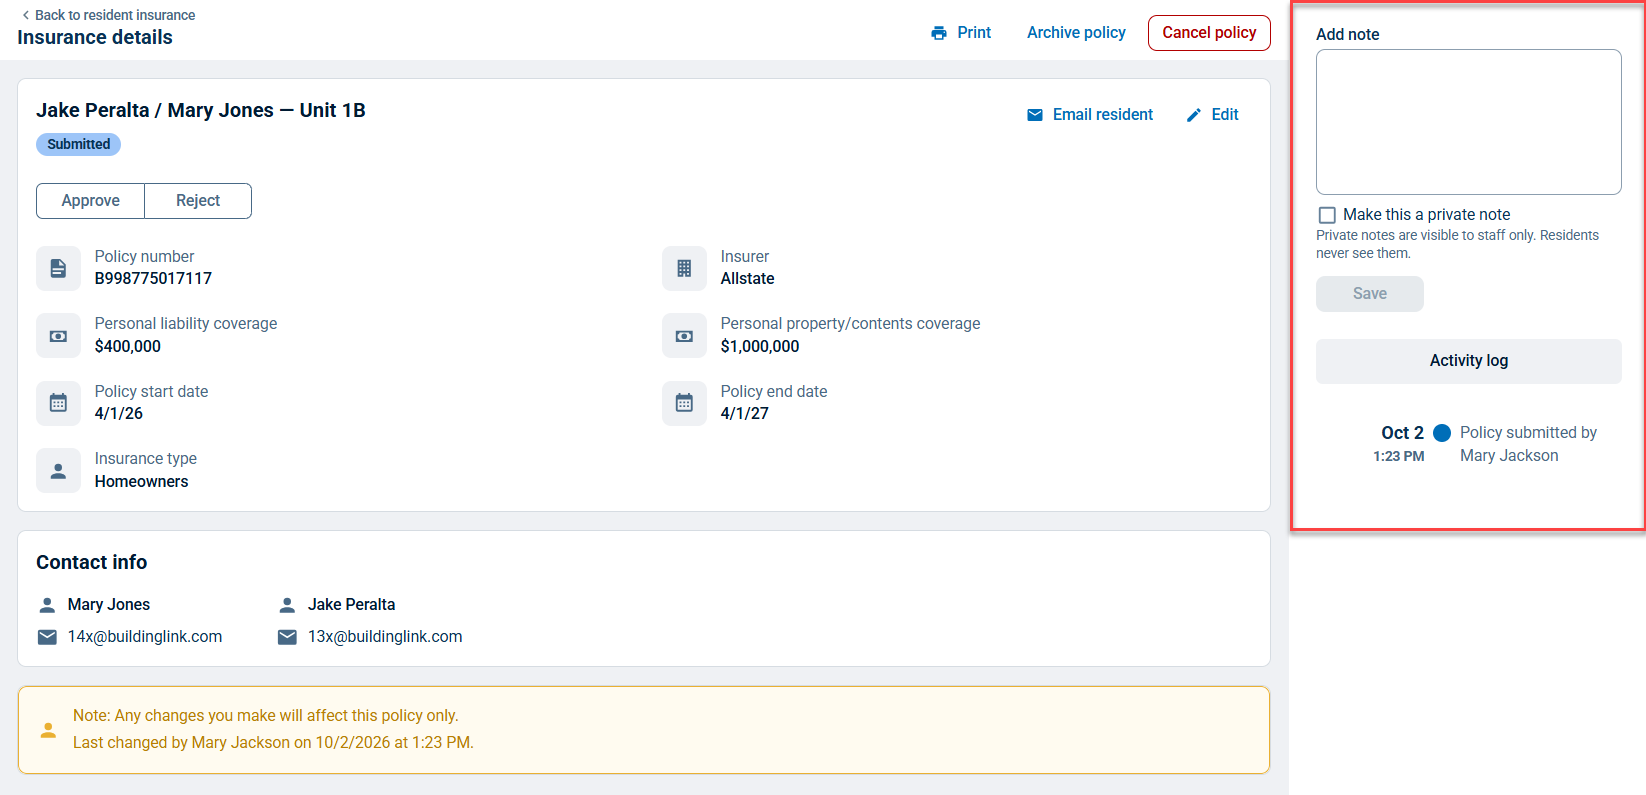
Every manual action and automatic status change is recorded in the Activity Log section to the right of the insurance details.
You can add notes to the Activity Log by clicking in the box below Add note, typing the note, and then clicking Save below the box.
By default, residents see these notes when viewing the insurance details, and you can add private (internal) notes if you don't want them to see them.
Check the box next to Make this a private note before clicking Save to add it as a private (internal) note that will only be visible to staff.
To resubmit a Rejected insurance policy, click the Rejected policy in the list to view the Insurance details.
Click Resubmit (top-right) on a Rejected policy to reopen the same insurance policy record.
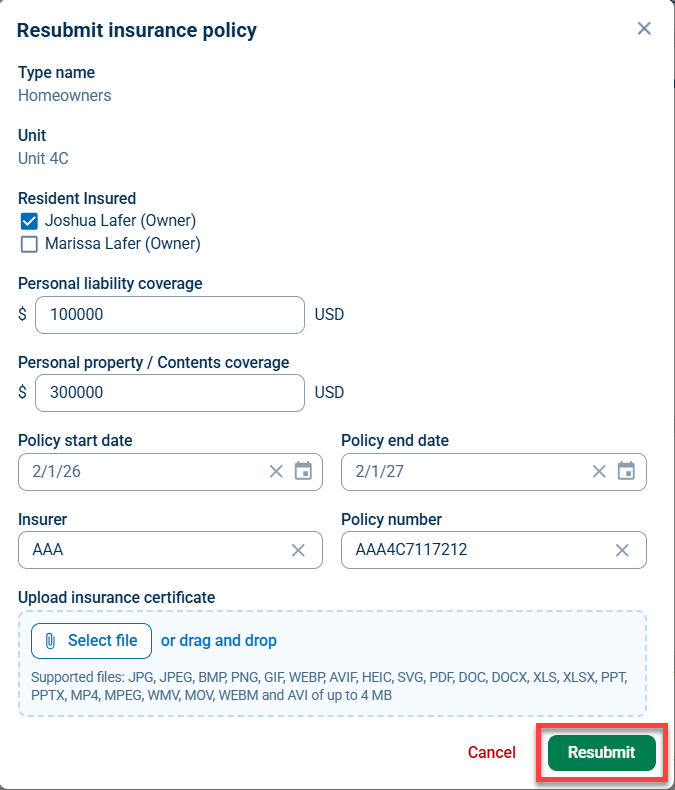
After updating the insurance details, click Resubmit at the bottom of the new insurance details to save the policy and follow through with the Approved/Rejected status.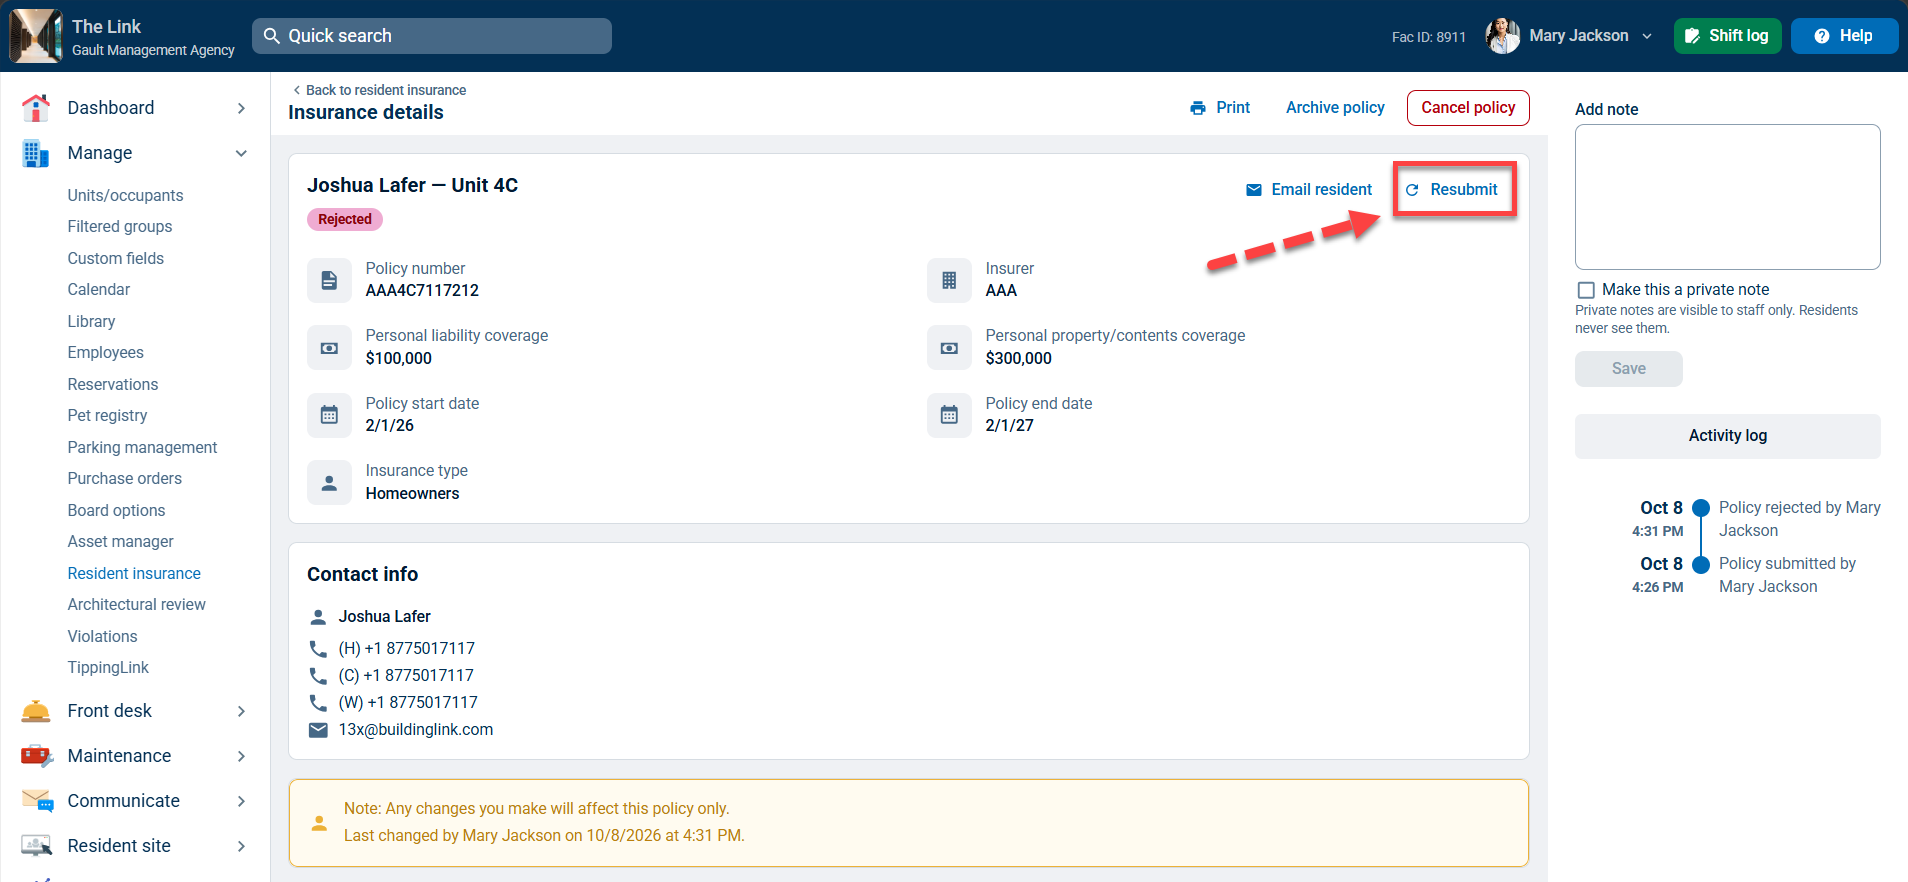
To renew an Expired insurance policy, click the Expired policy in the list to view the Insurance details.
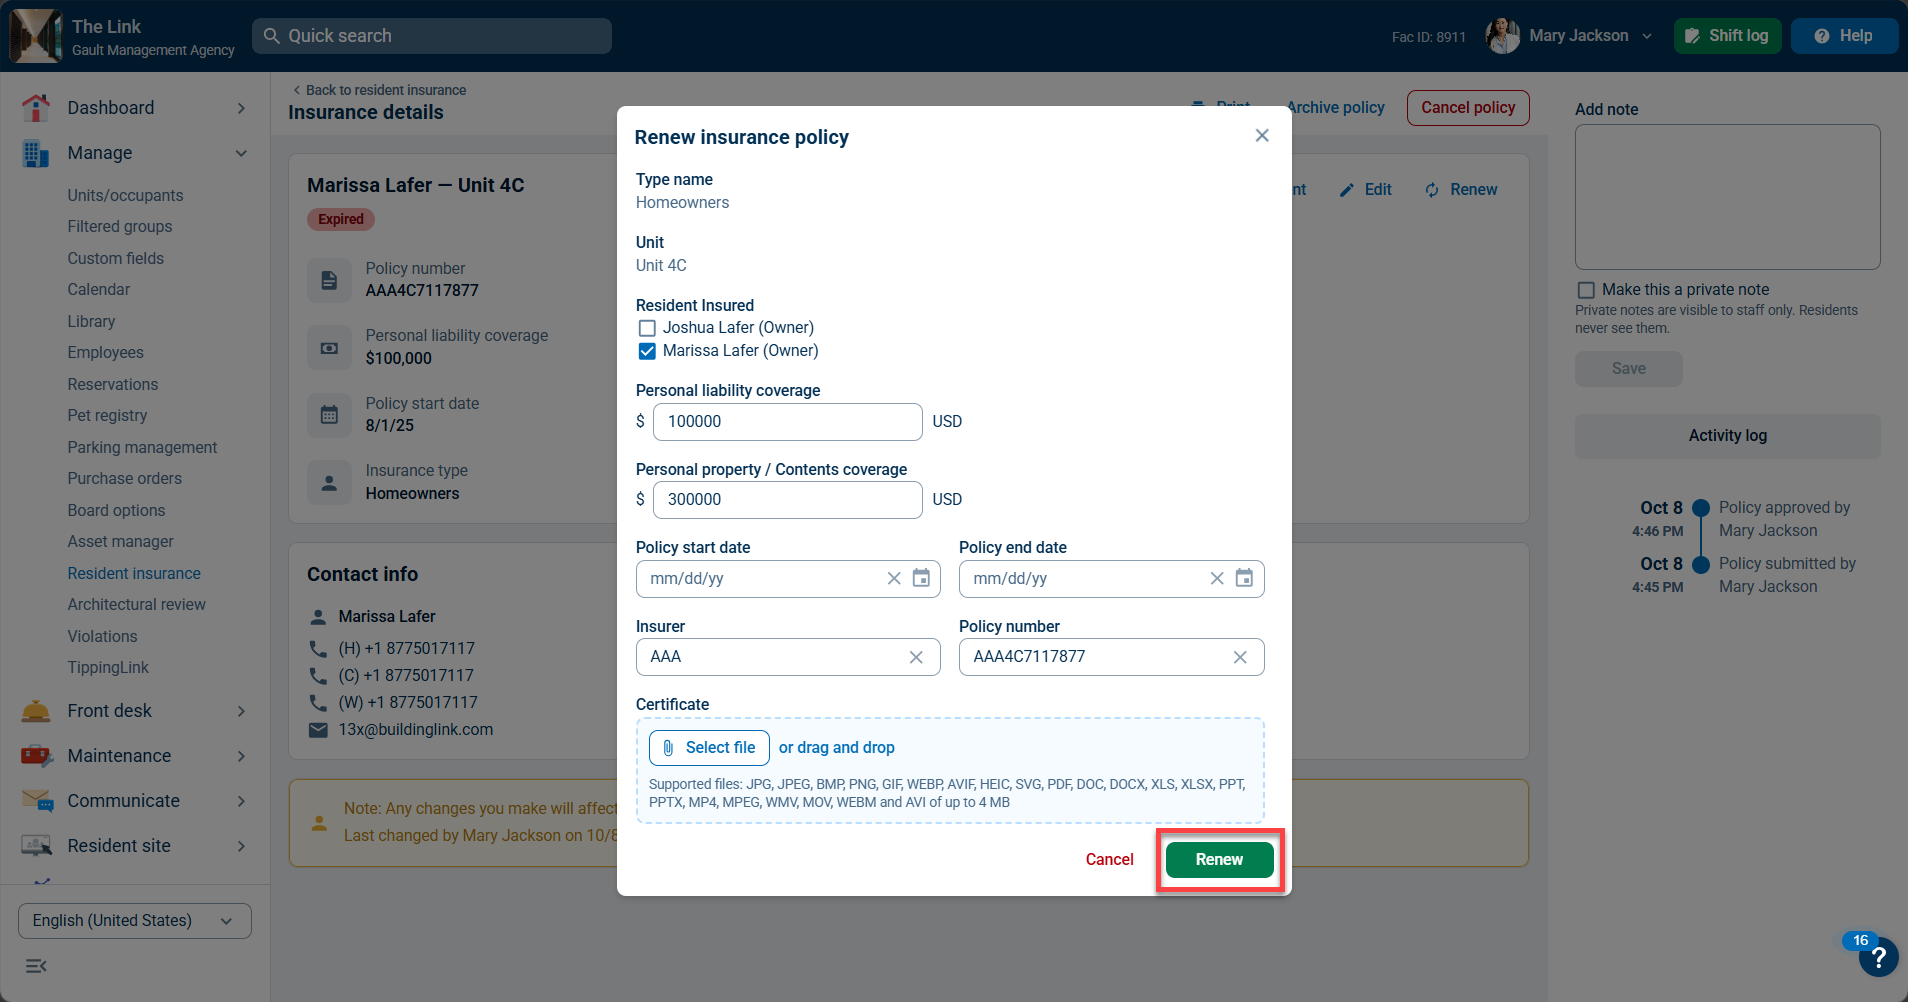
Click Renew (top-right) on an Expired policy to open a new record and save the new policy.
After updating the insurance details, click Renew at the bottom of the insurance details to save the policy and complete the Approved/Rejected status.
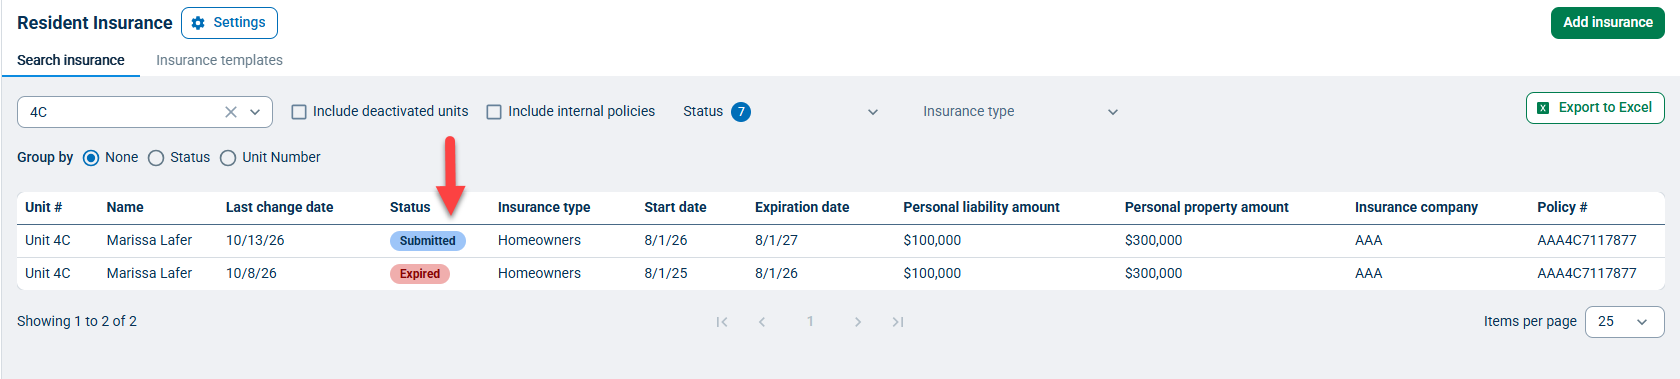
Note: Renewing a policy always creates a new record in Submitted status that still needs approval before it is considered compliant. 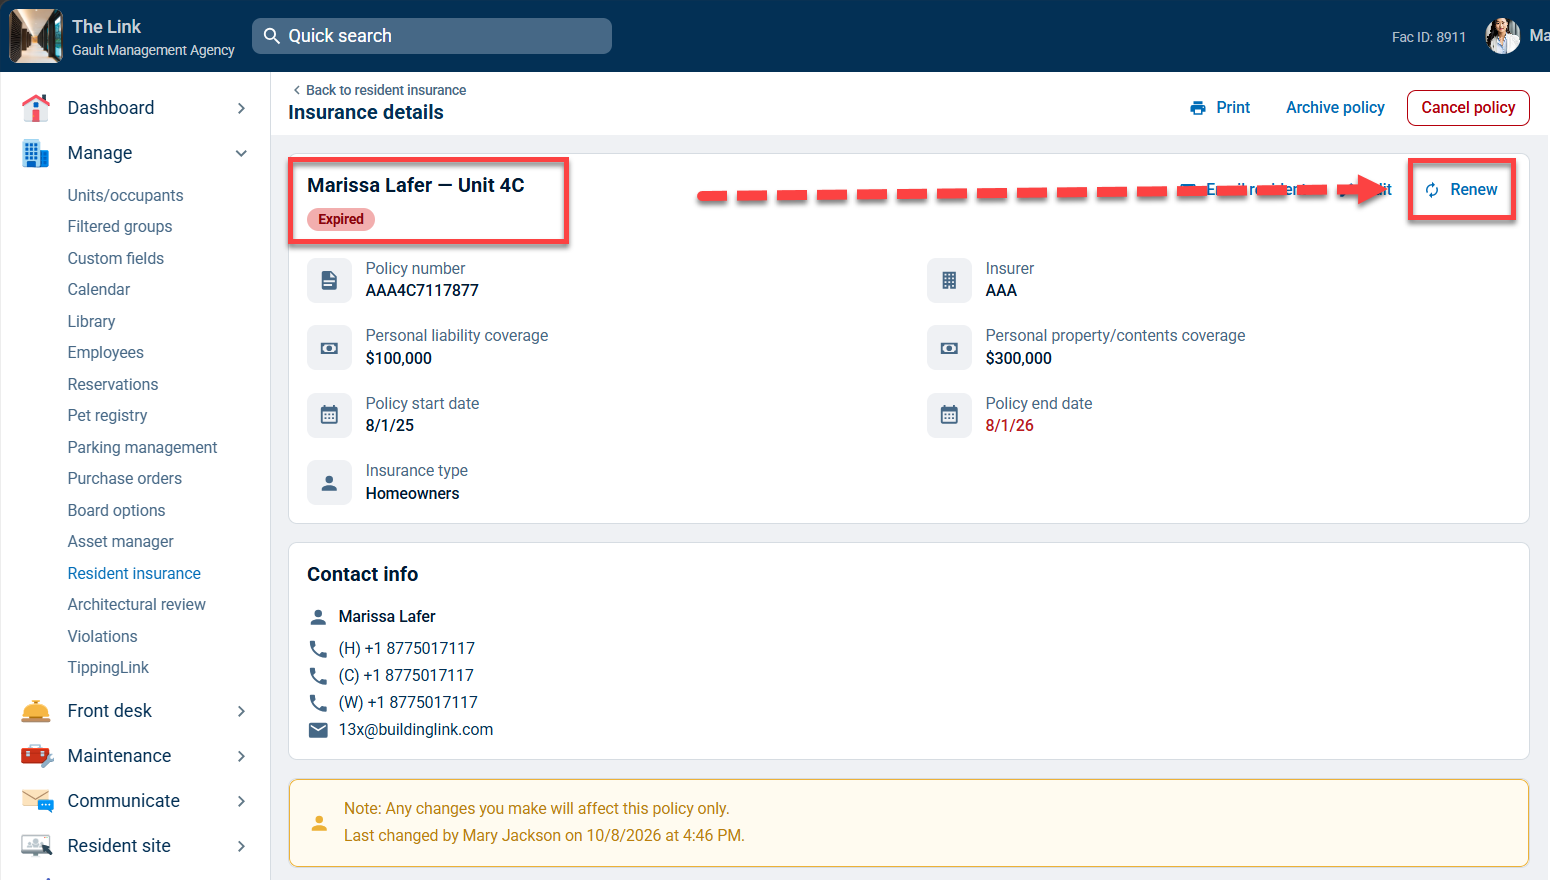
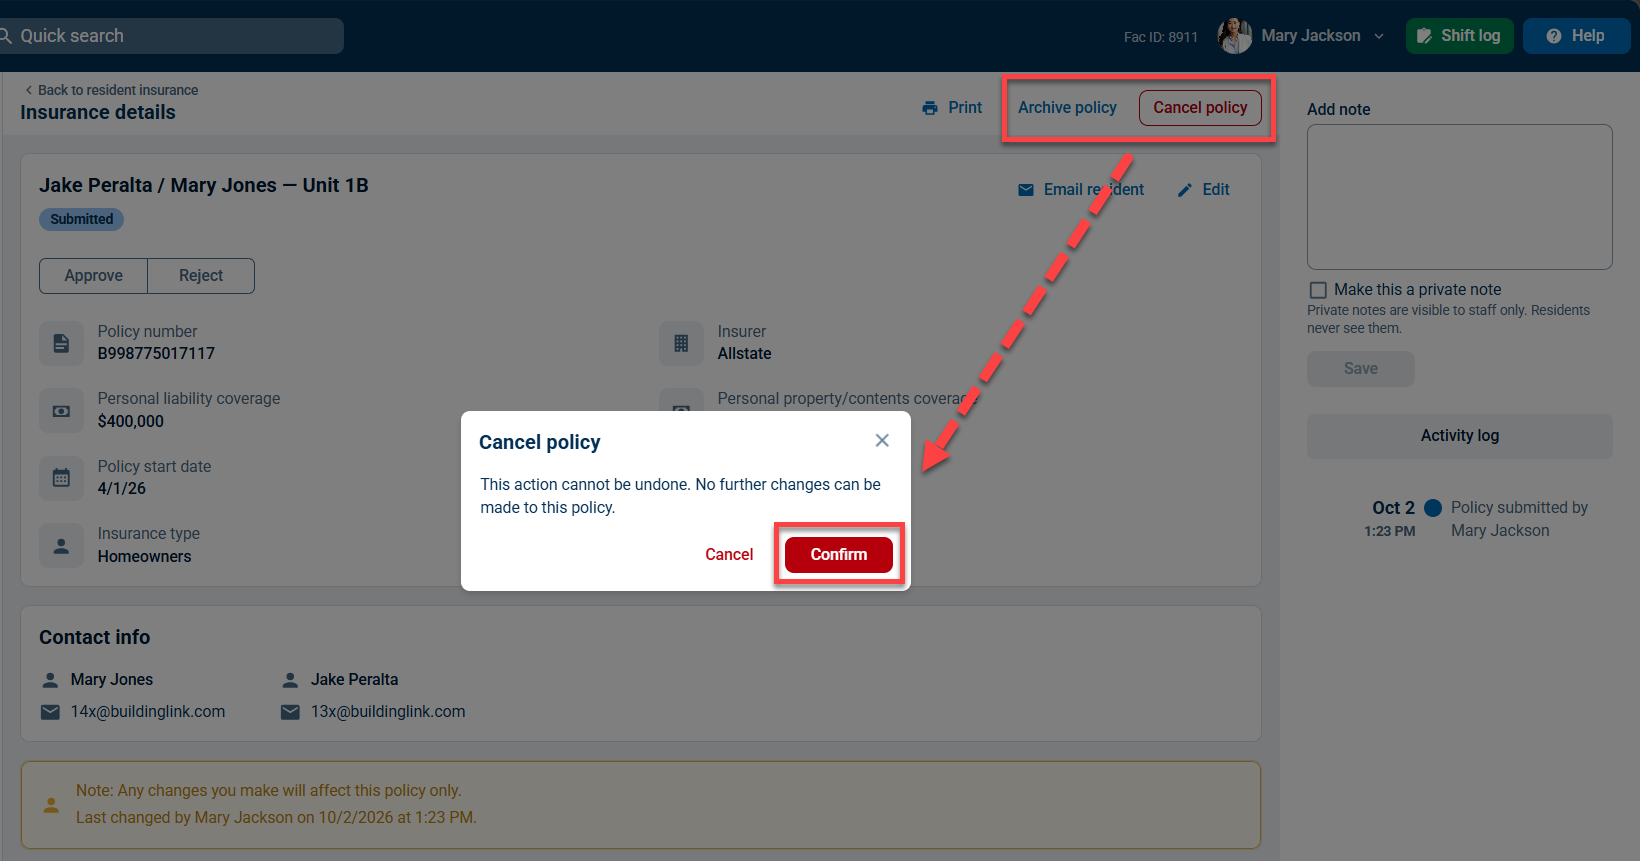
Click Cancel policy to change the policy status to Canceled.
Click Archive policy to change the policy status to Archived.
Click Confirm to save this status.
Management can also add insurance information on a resident’s behalf from the Resident Insurance page by clicking Add insurance at the top of the page.
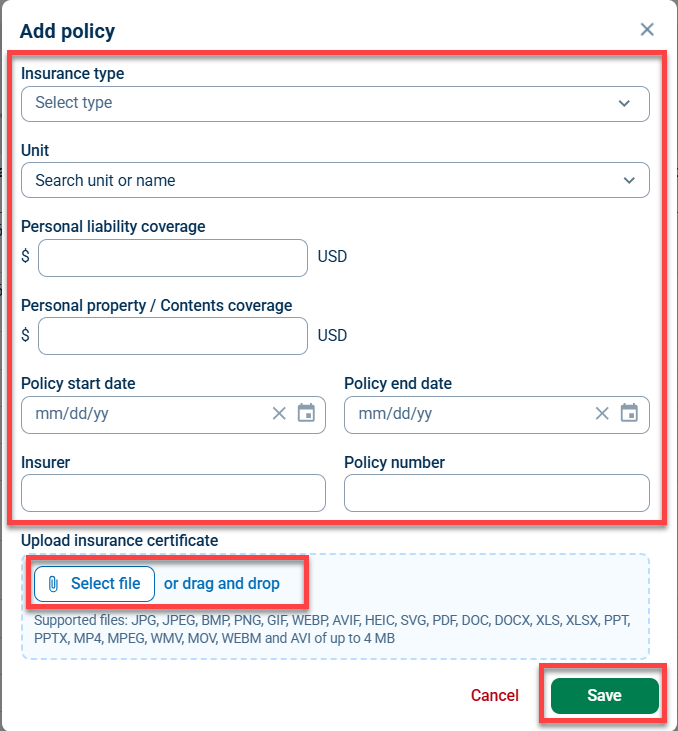
Fill out the insurance policy details (type, unit, occupants covered, coverage amounts, policy details), then upload the insurance document by clicking Select file to search your device for the document, or drag and drop the document to that section to attach the file. Finally, click Save to add the record as a Submitted insurance policy.
Note: Every policy needs manual approval before it's considered compliant, even if a manager entered it directly.
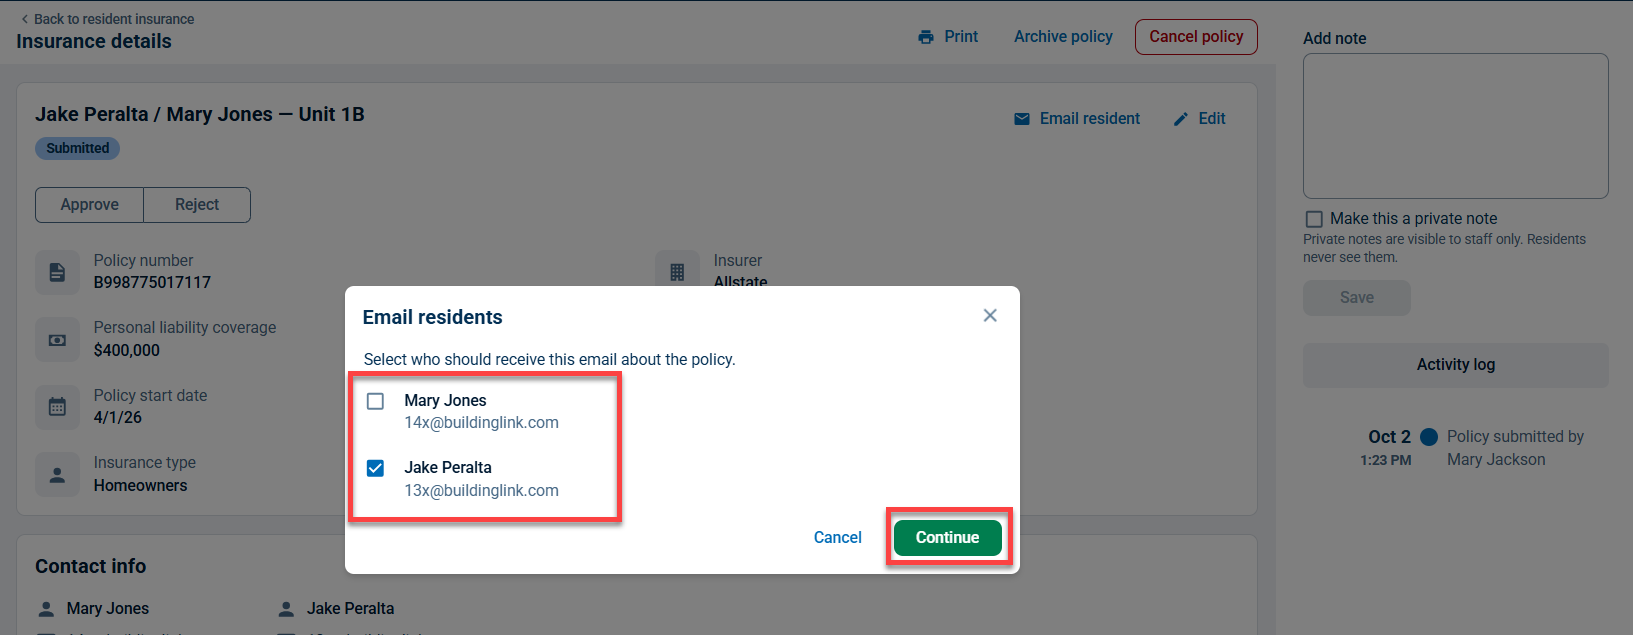
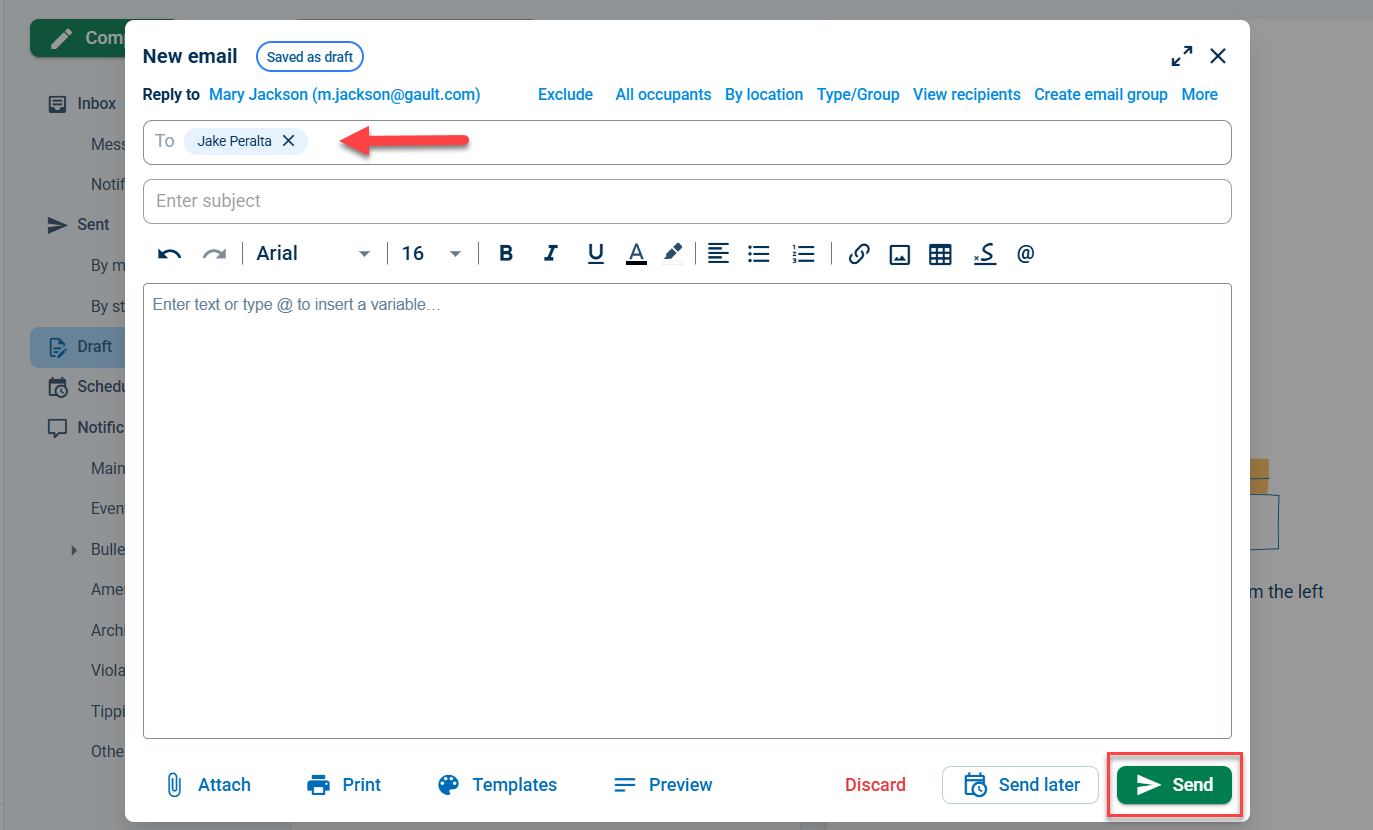
Click Email resident to email the occupants of that unit. Select the occupants in the unit to add them to the email recipient list, then click Continue to open the Send Email feature and draft your communication.
Note: You can view all your manually and automatically sent insurance notifications in the Sent section of your BuildingLink Mailbox.
Viewing and Managing Insurance on a Unit
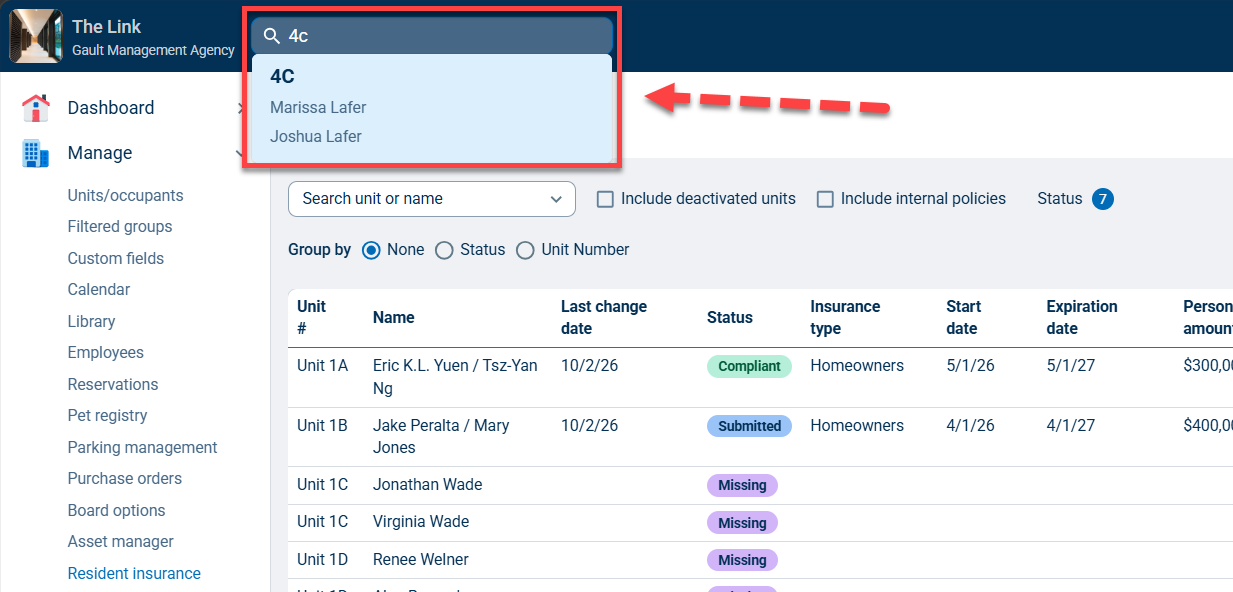
You can also go to a specific unit profile to manage resident insurance by using the Quick Search at the top to go to their Unit Overview.
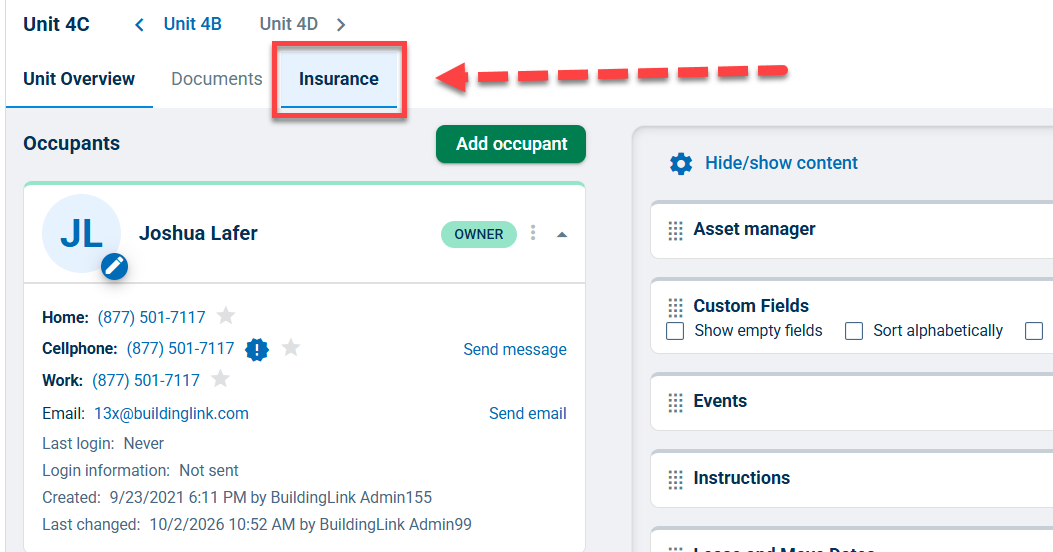
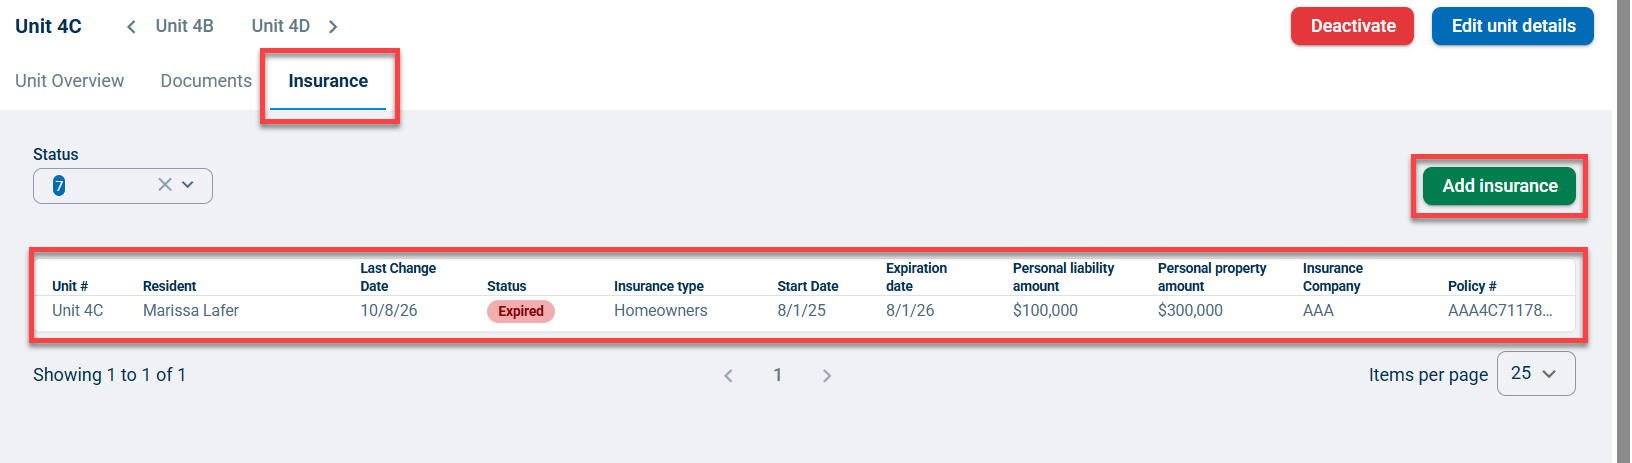
Click the Insurance tab at the top of the page. Manage their insurance policies here by clicking a policy to edit it, or click Add insurance to add a new record to the unit profile.