Note: This article is for the newly redesigned module. This updated module is in the process of being rolled out and may only be available to some users.
Overview
TimeTracker is an application that provides management with a way to efficiently track employee time and attendance using fingerprint authentication.
Note: Click on the images to enlarge them.
Table of Contents
- TimeTracker Demo Video
- Setting up and Installing TimeTracker
- Configuring TimeTracker Settings
- Enrolling Employees in TimeTracker
- Clocking In/Out Using the TimeTracker Console
- Employee Time Management Reports
TimeTracker Demo Video
Below is our classic video demonstration of BuildingLink's TimeTracker program.
Setting up and Installing TimeTracker
To install TimeTracker, you must have a fingerprint reader and a computer with internet access (this can be the same computer the front desk staff uses to access BuildingLink). Fingerprint readers can be purchased from BuildingLink using the Equipment Order Forms.
After purchasing a fingerprint reader, either follow the steps on our Fingerprint Reader Installation Article or contact BuildingLink Support.
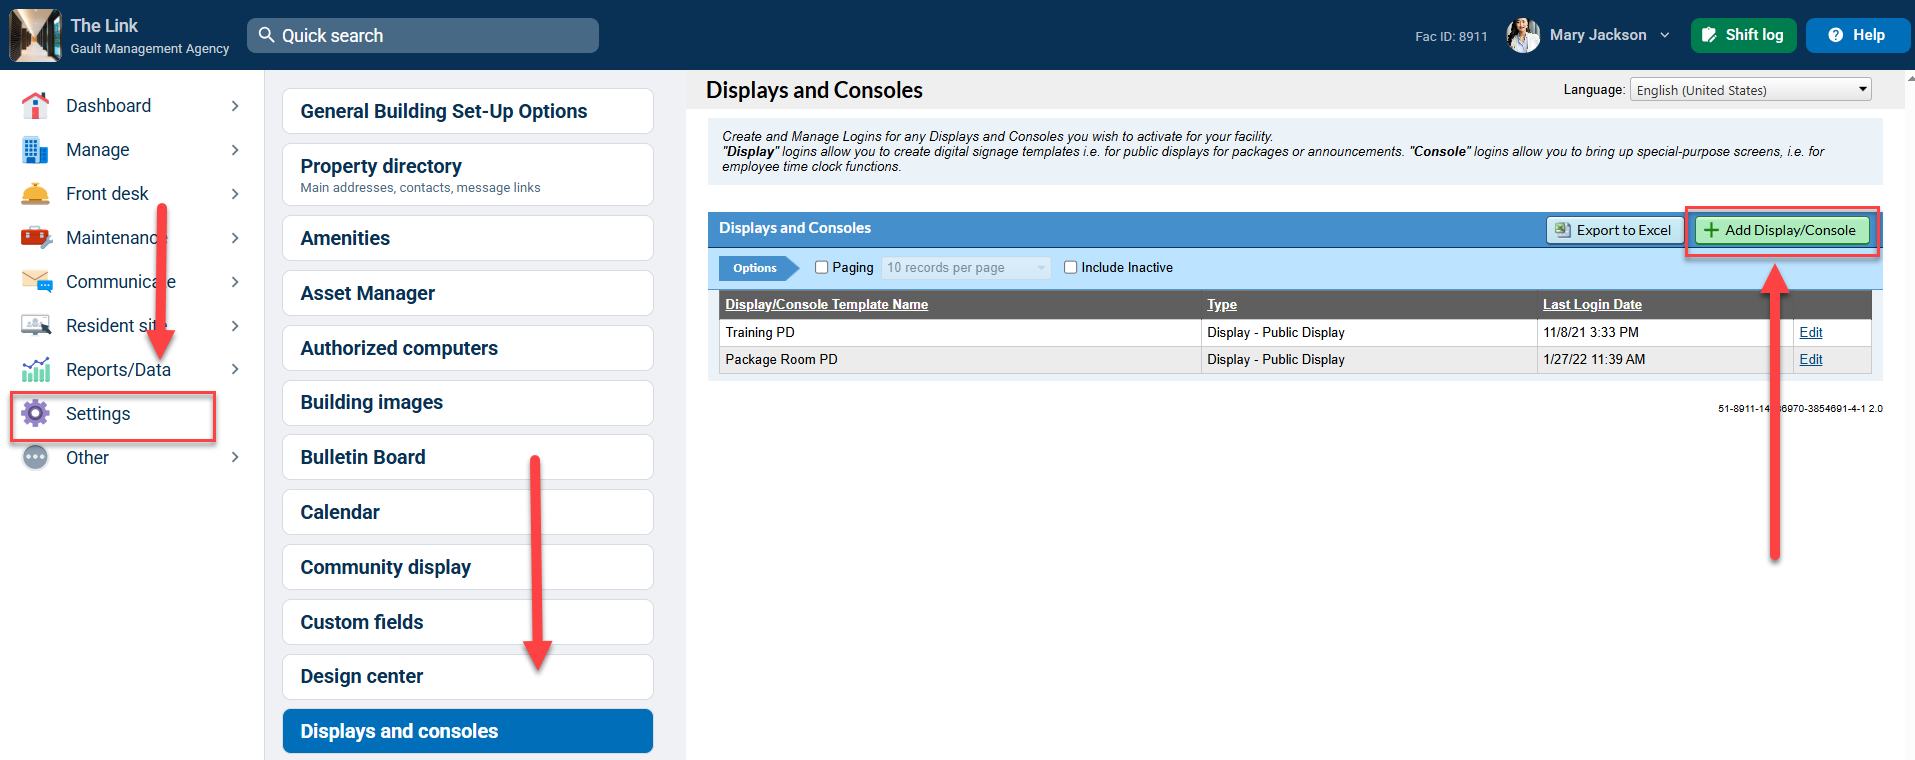
Once the fingerprint reader is installed, you will need to create a TimeTracker console. To do so, log in to BuildingLink, click your Settings tab, and select Displays and consoles.
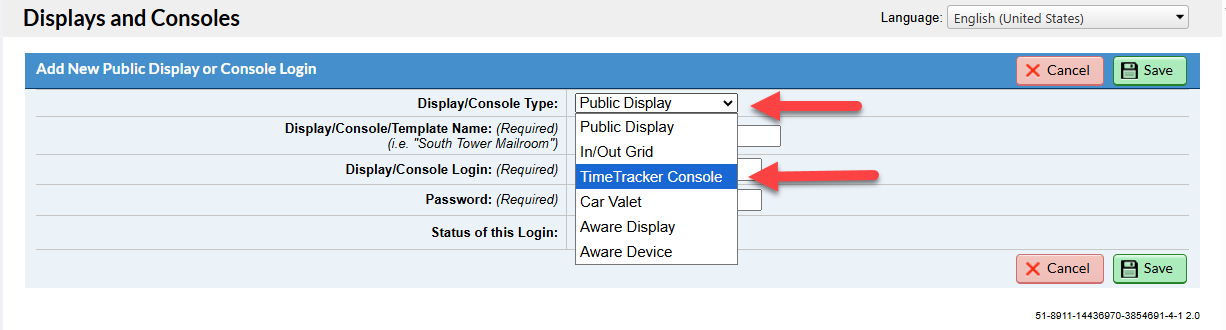
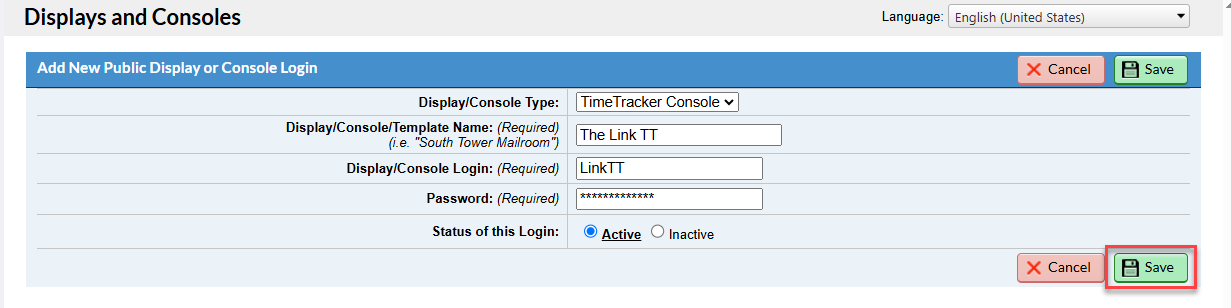
Click Add Display/Console. Under Console Type, select TimeTracker Console. (If you don't see this option, the Employee Time Management module has not been turned on for your property. Contact BuildingLink Support to turn it on.)
Create a Console Name (Ex. TimeTracker) and then a Login name (Ex. Name of Property TT) and Password. Click Save to save your console.
Next, click here to download TimeTracker through our Universal Installer.
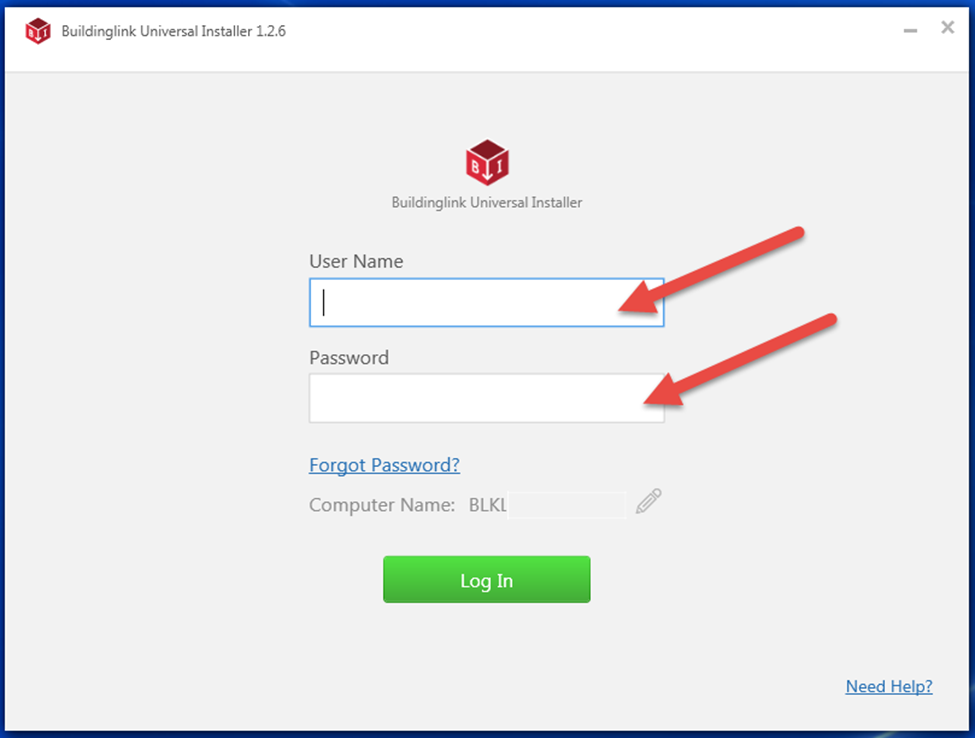
Sign in using your BuildingLink username and password. If you like, you can change the name of your computer by clicking the pencil icon.

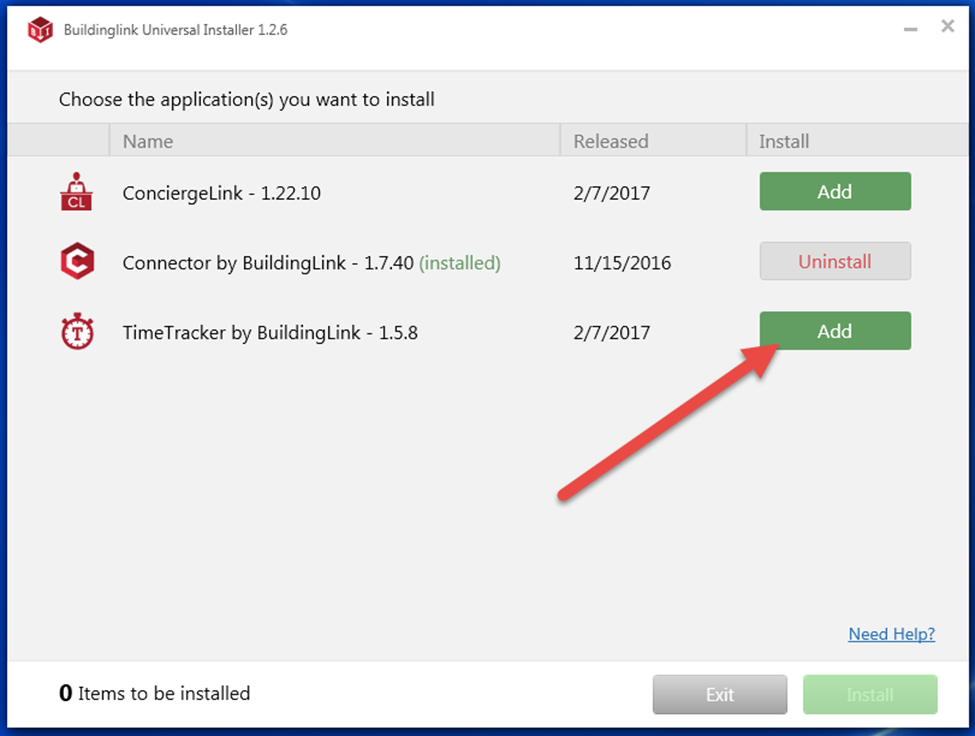
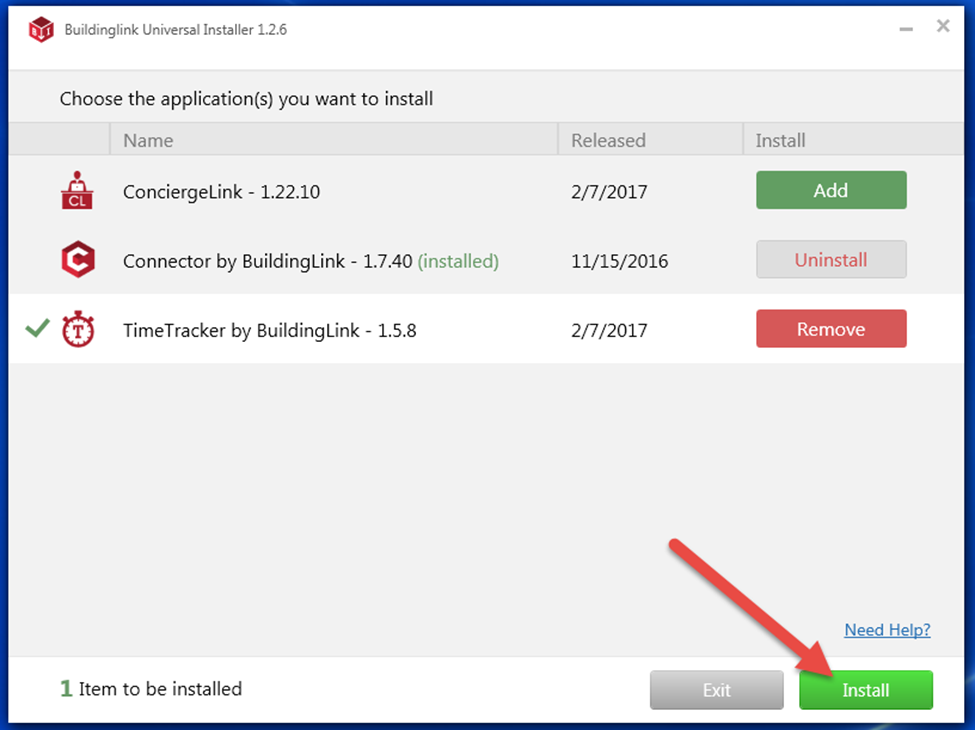
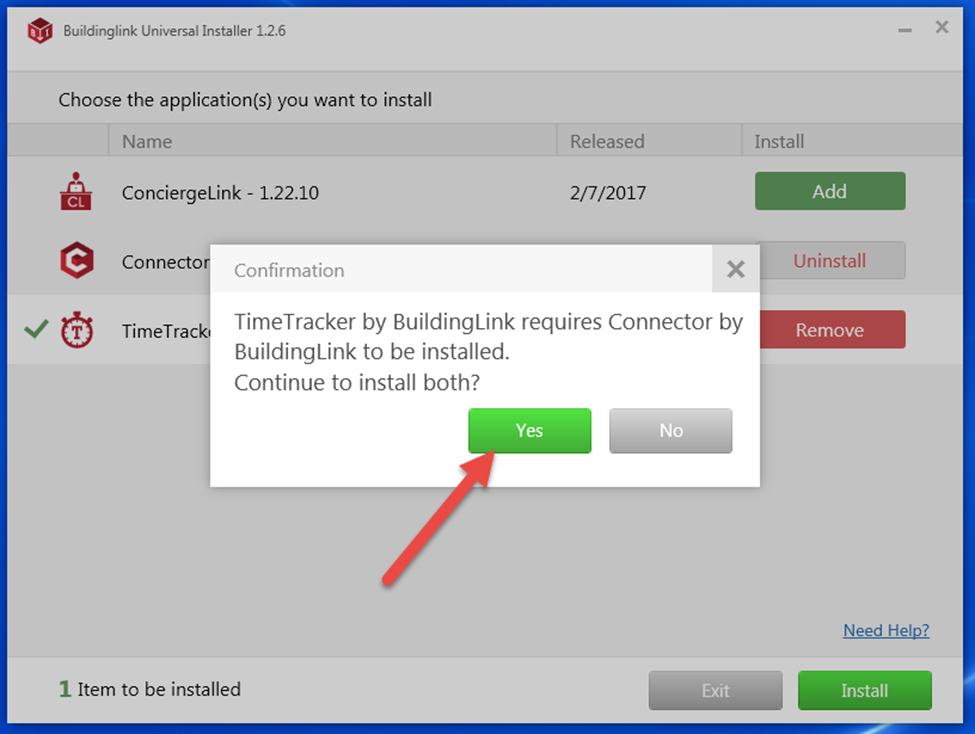
Select Add next to TimeTracker and then click Install.
If you don't have BuildingLink Connector installed on your computer, the system will prompt you to install Connector as well.
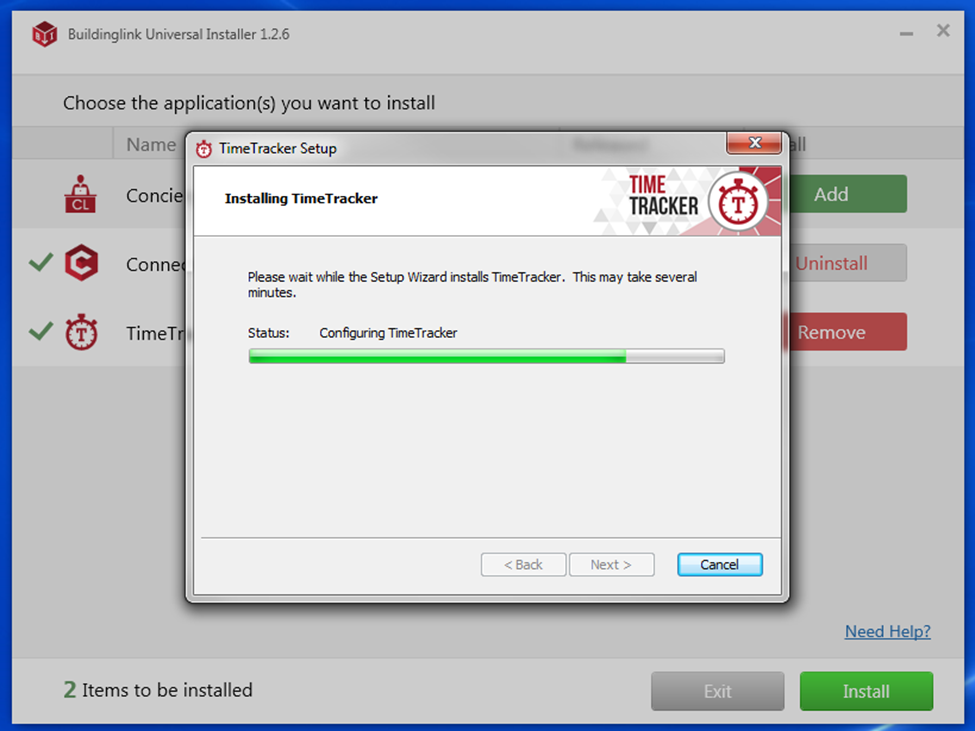
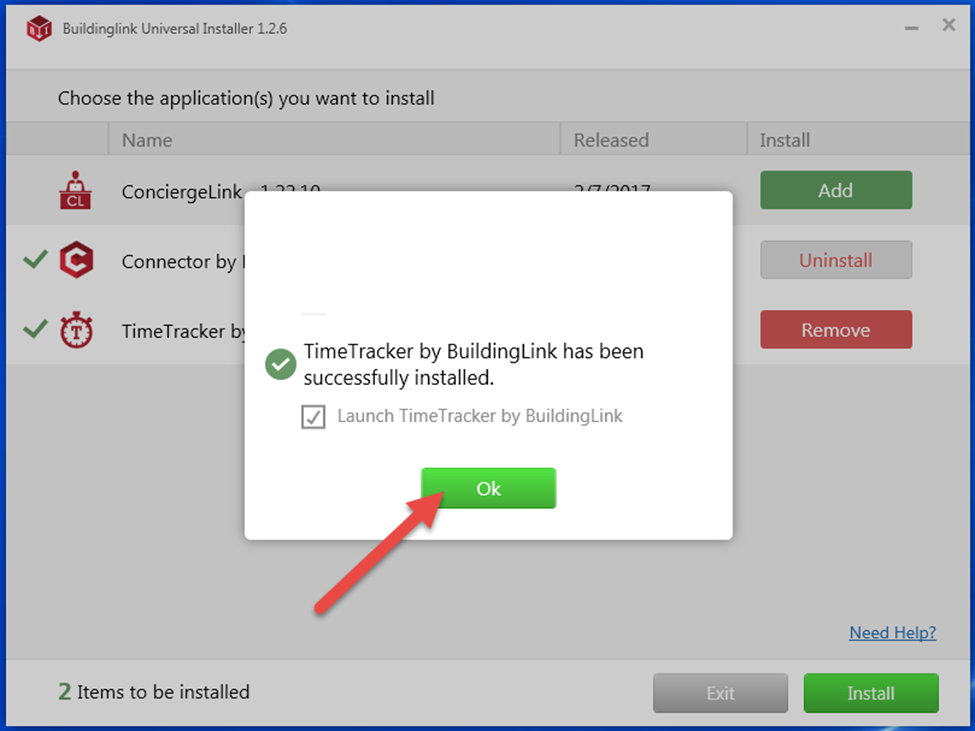
Click Yes and follow the prompts to install Connector and TimeTracker. (For Connector installation screenshots, visit our Connector help article.)
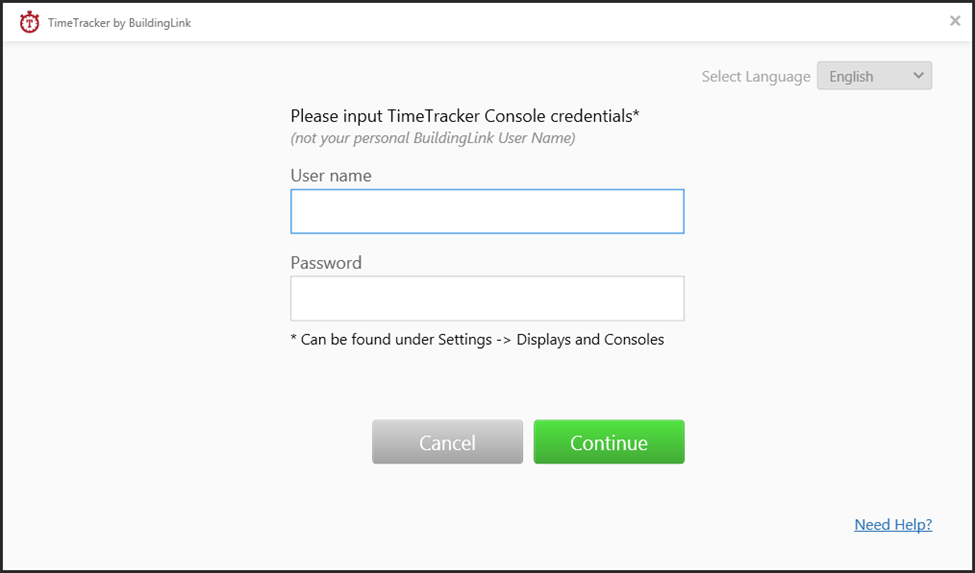
Once TimeTracker finishes installing, log in with the TimeTracker console login name and password you created and click Continue.
Configuring TimeTracker Settings
A Security Officer user can edit TimeTracker settings in BuildingLink. To do so, log in to your building’s website, click on the Manage tab, and select Employees.
At the top of the Employees screen, choose the Settings section under Employee time mgmt.
This screen lets you set the start day and time of your payroll week, and pay cycle (weekly or bi-weekly), and determine how employee breaks are handled.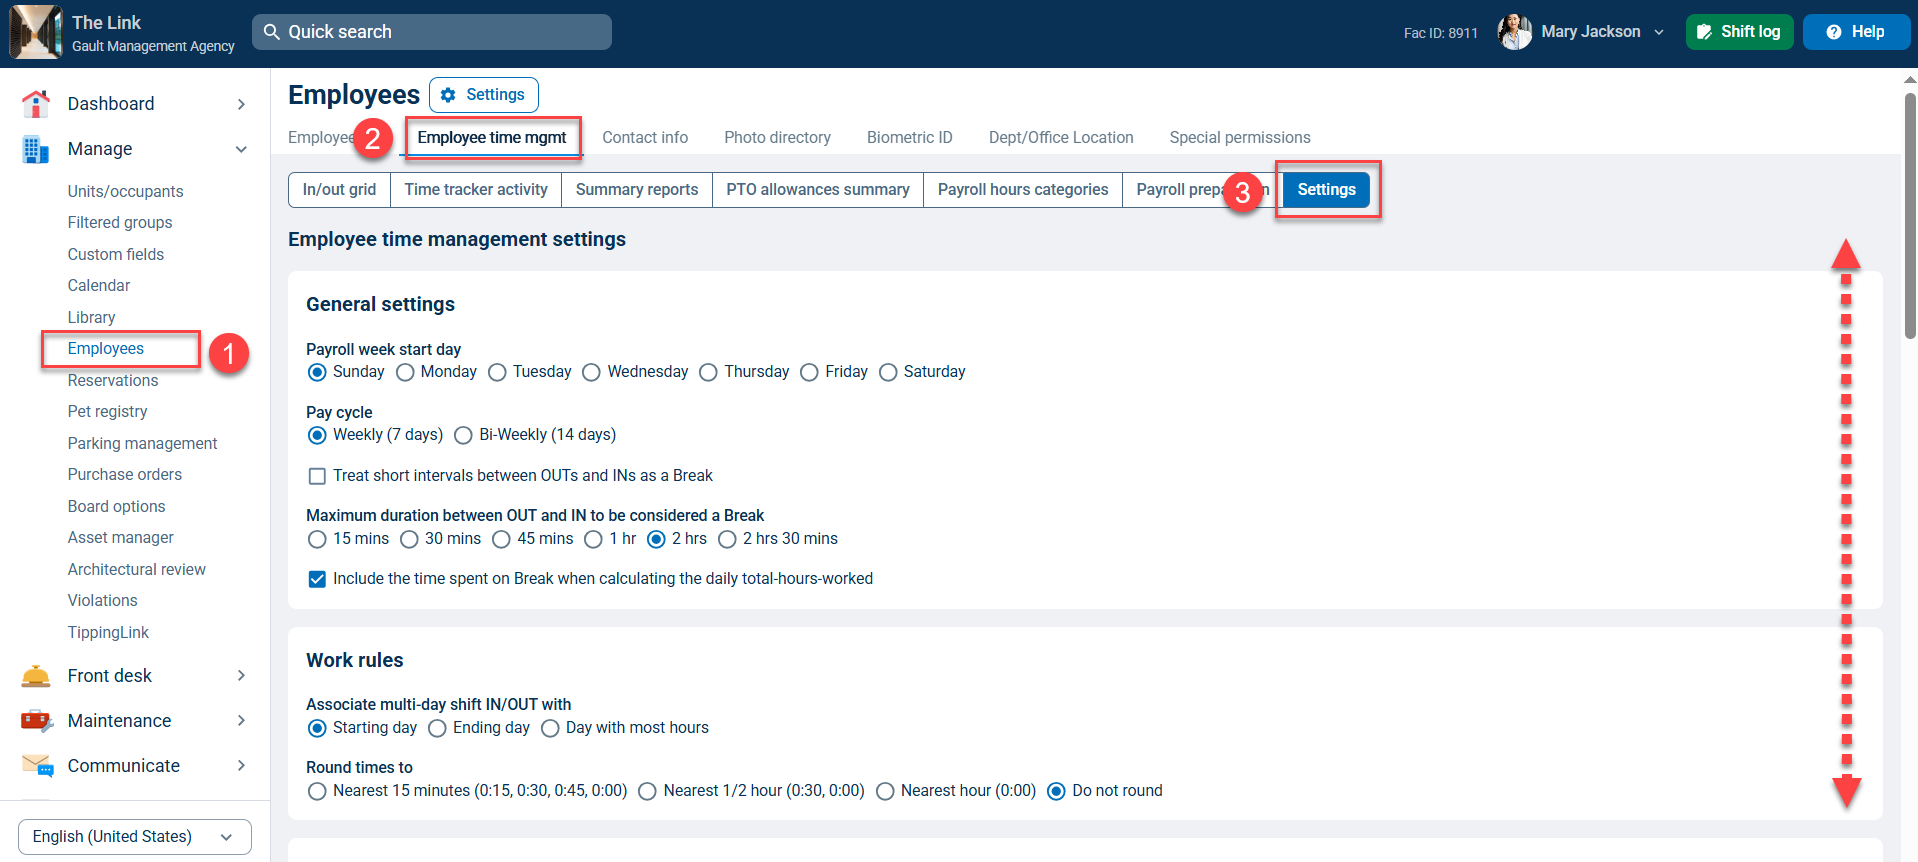
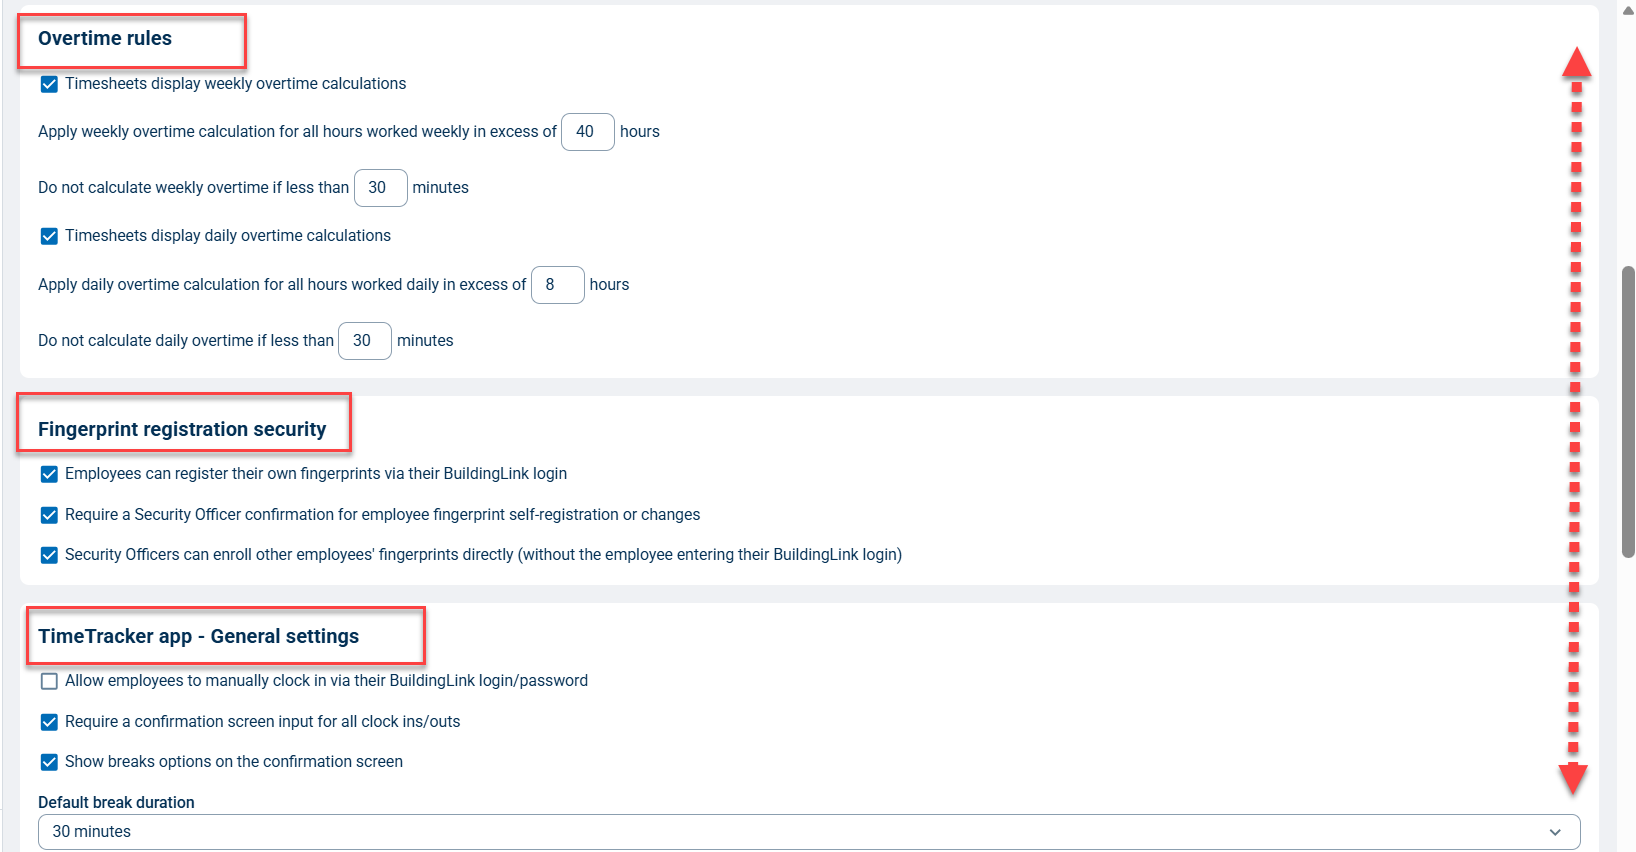
You can also set rules for how overtime is handled in payroll reports, and decide whether a Security Officer's approval is needed to register all staff fingerprints.
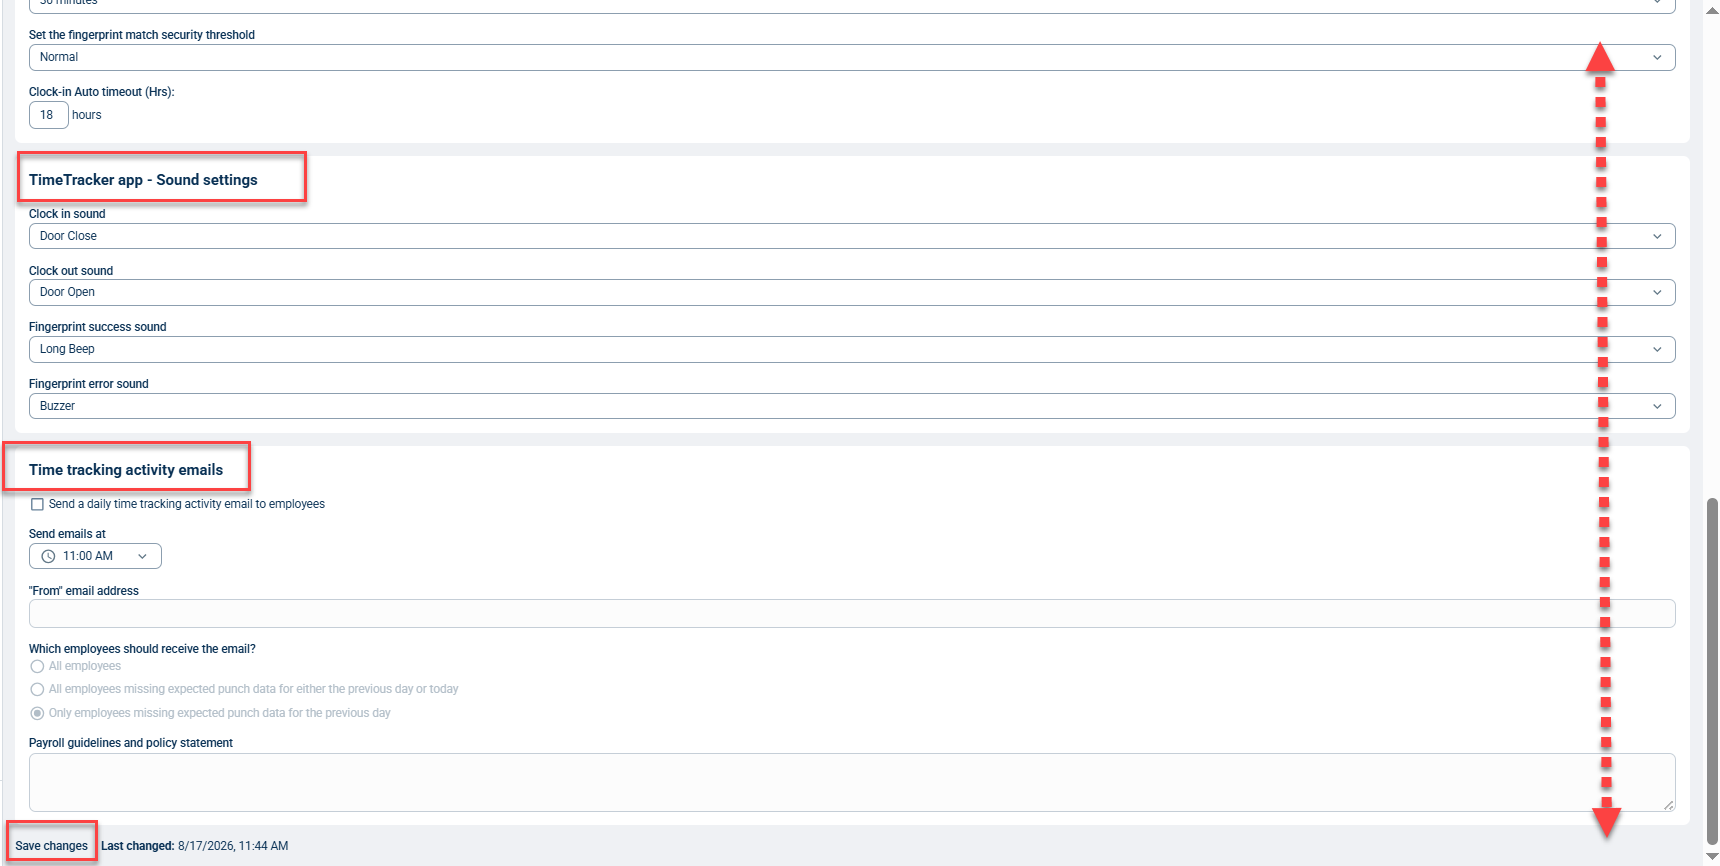
You can also set general timing, breaks, and sound settings, as well as notification options. If you’d like to receive an email notification every time a user clocks in or out, enter the correct email address on this screen. Be sure to click Save changes when you're done.
Before clocking in, first make sure that TimeTracker is open and running. There are three places where the TimeTracker program may appear on your computer:
- On the Start Menu, under "All Programs"
- As a shortcut on your Desktop
- As a small icon in the lower-right corner of your screen, on the Taskbar.


If the TimeTracker icon is showing on the Taskbar (bottom-right corner of the screen), the program is already running. To see the TimeTracker console, double-click the small icon. The console should appear on your screen as a large white box and is ready to use.
If you do not see the TimeTracker icon on your Taskbar, click on the Start Menu. Select “All Programs,” find the folder titled “BuildingLink,” then click on TimeTracker. After you open the program, you should see the TimeTracker icon on your taskbar, and the TimeTracker console should appear on your screen.
Enrolling Employees in TimeTracker
By default, only users with Security Officer Authority can enroll other employees. You can change this setting when configuring TimeTracker. Please contact BuildingLink Support for additional help.
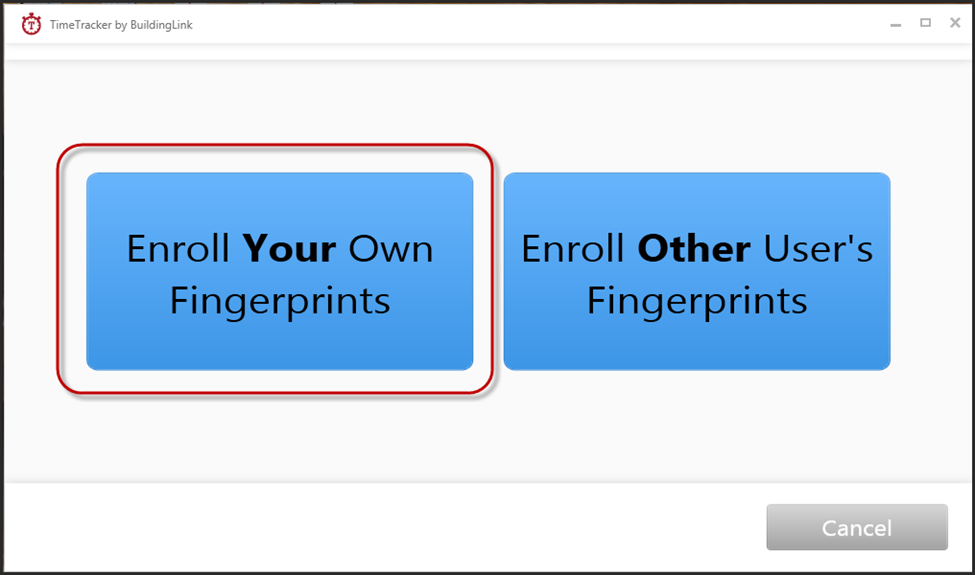
To begin, enroll your own fingerprints. Launch the TimeTracker Console and click the Enroll button.
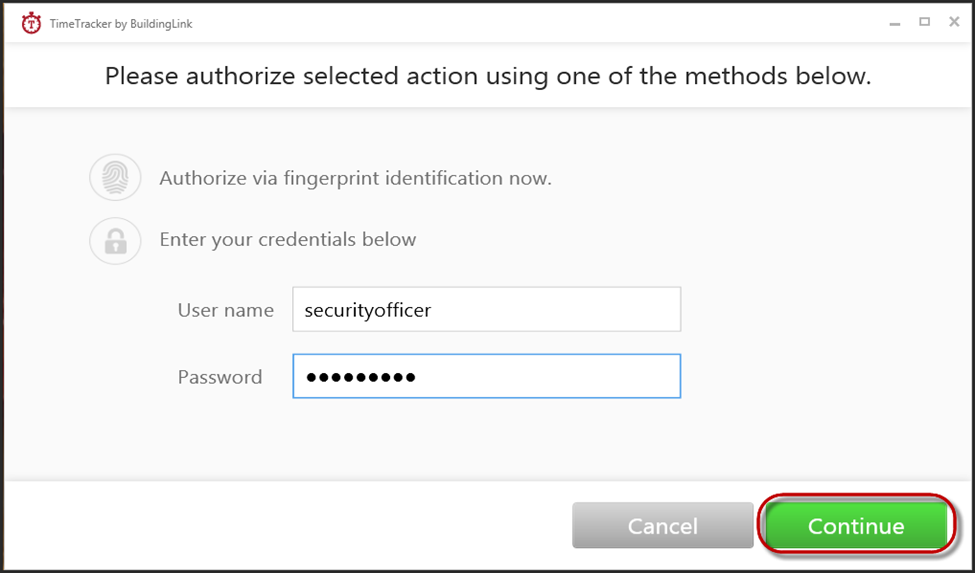
Sign in with your BuildingLink credentials.
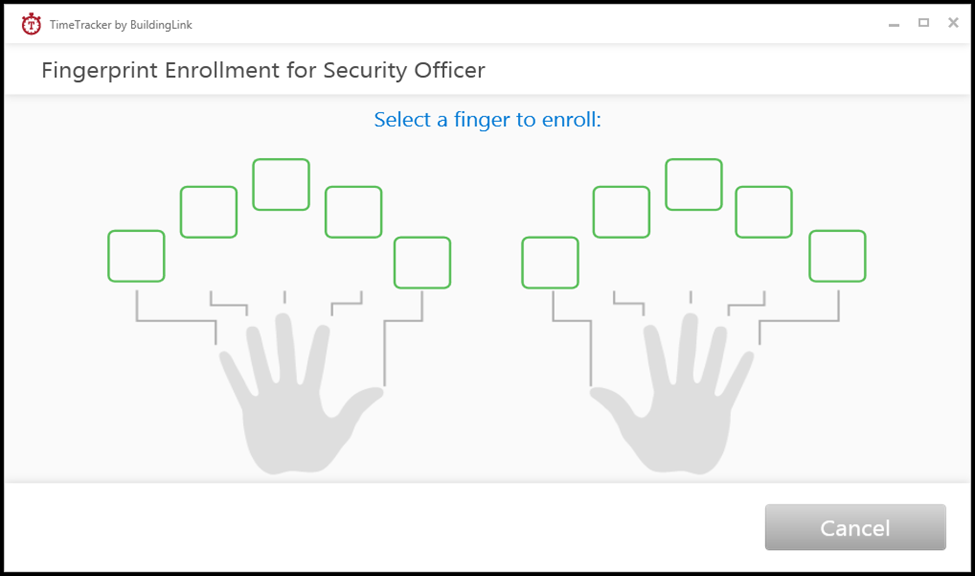
On your screen, you will see two hands.
Click on the green square that corresponds to the specific finger you plan on using with the reader.
Any finger should work, although we find that thumbs are very occasionally problematic.
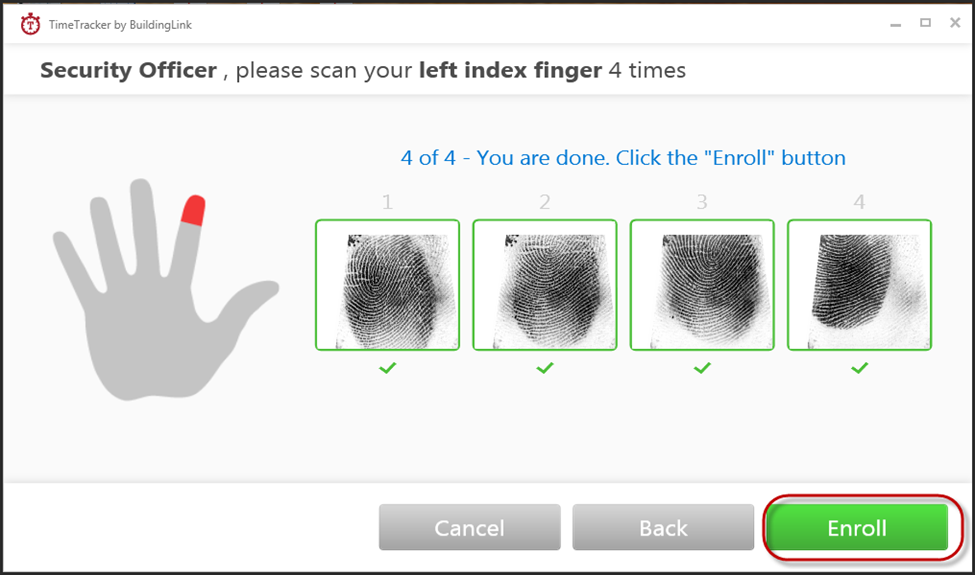
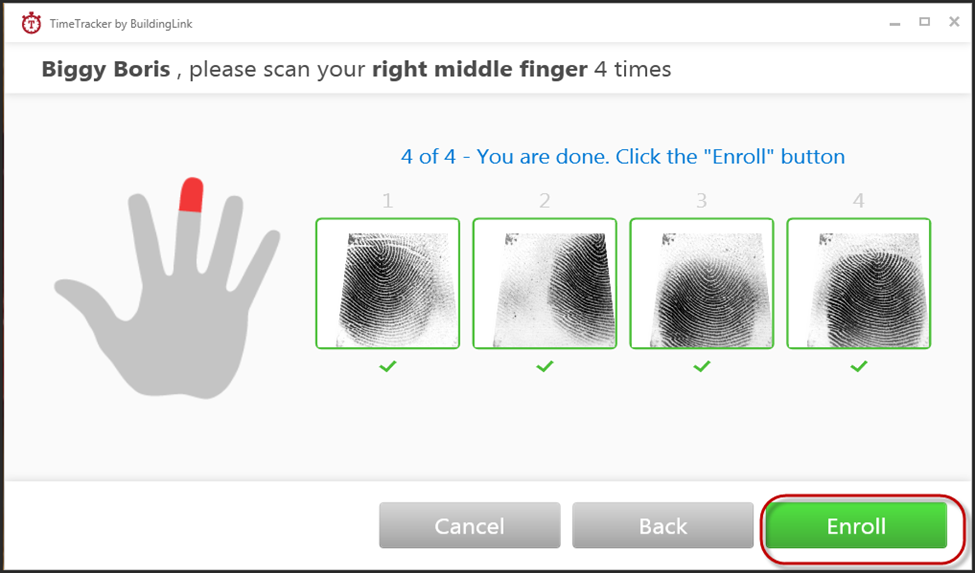
Next, place your finger on the fingerprint reader and remove it once the black fingerprint image appears in the first green box. Repeat this three more times, then click Enroll again.
Please note that it’s important to do this quickly, as the screen may time out for security reasons and go back to the beginning without saving your fingerprint. If this happens, simply repeat the steps.
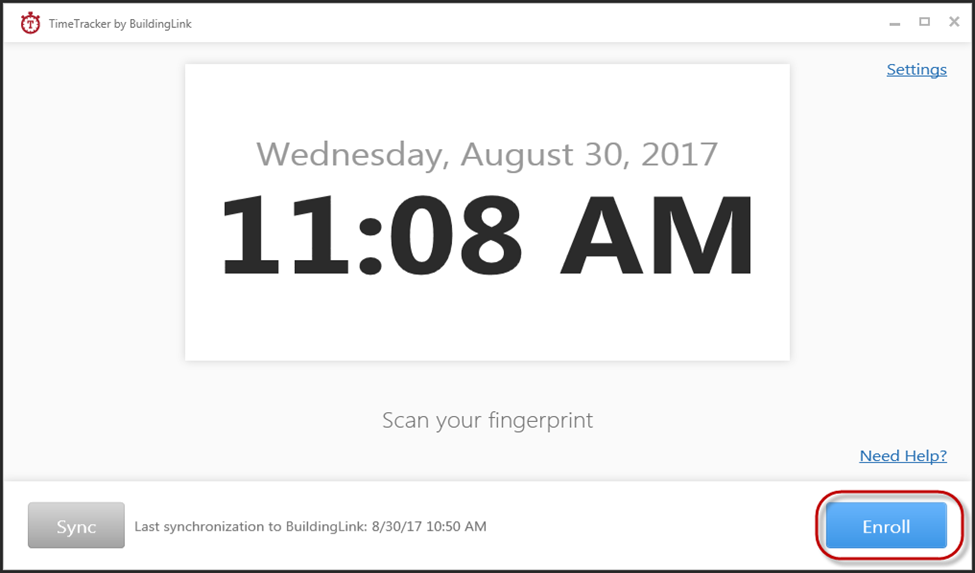
Once your own fingerprint has been enrolled, you can start enrolling other employees. Launch the TimeTracker console and click the Enroll button. You may sign in with your BuildingLink credentials or place your registered finger on the fingerprint reader.
Click Enroll Other User's Fingerprints and select an employee from the list. The list will pull from the Employees section of BuildingLink; if a specific employee does not show up on the list, he/she has not yet been added to the BuildingLink employee list and must be added before a fingerprint can be registered. (Click here for help adding a BuildingLink employee.)
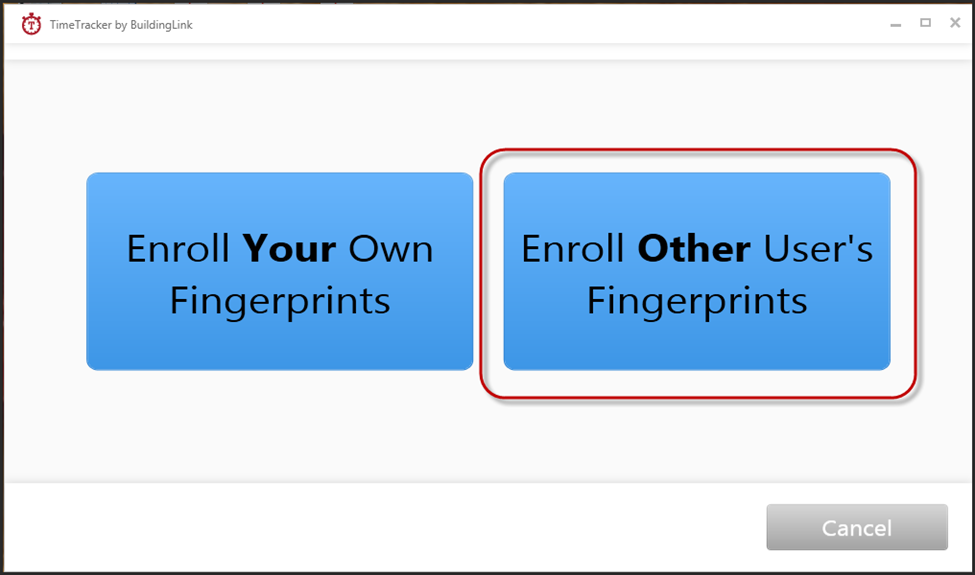
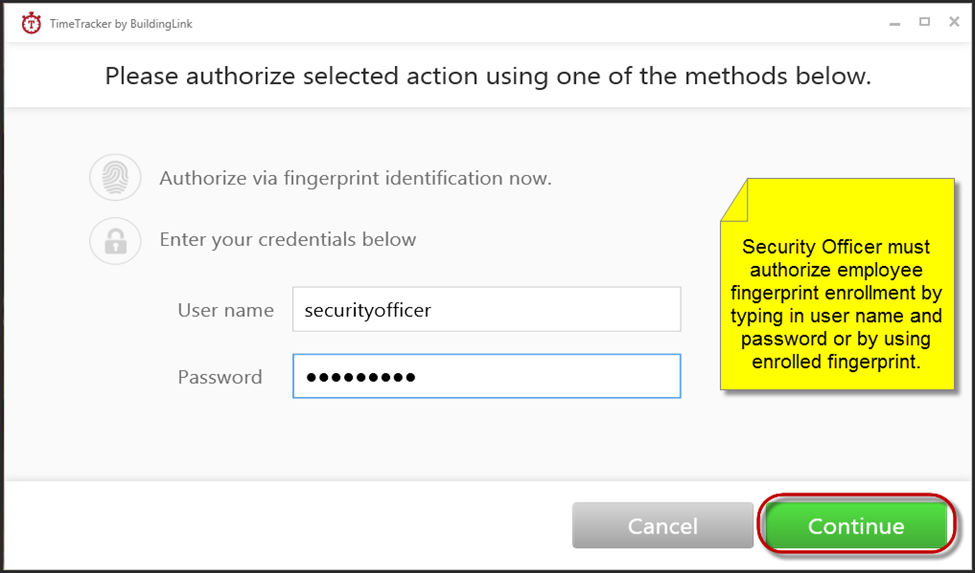
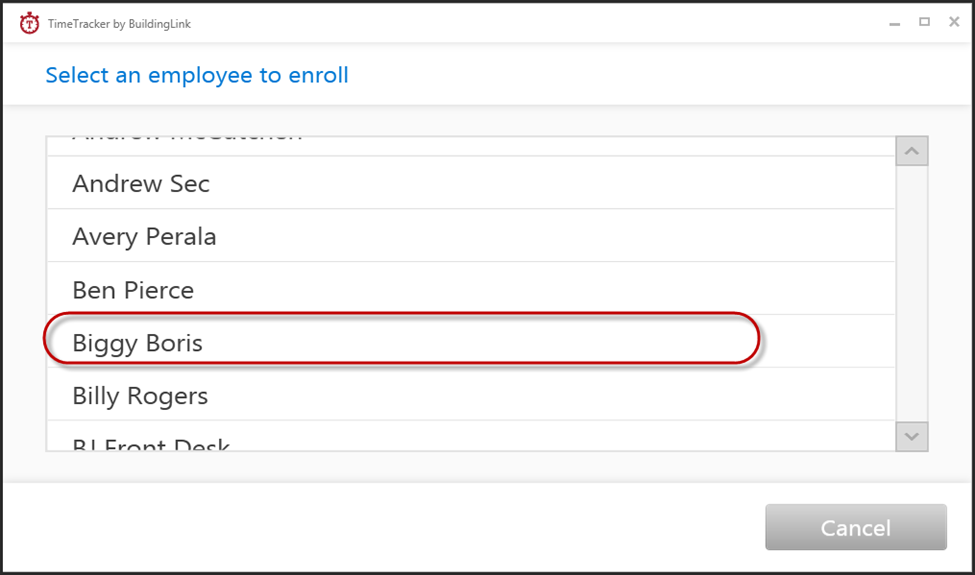
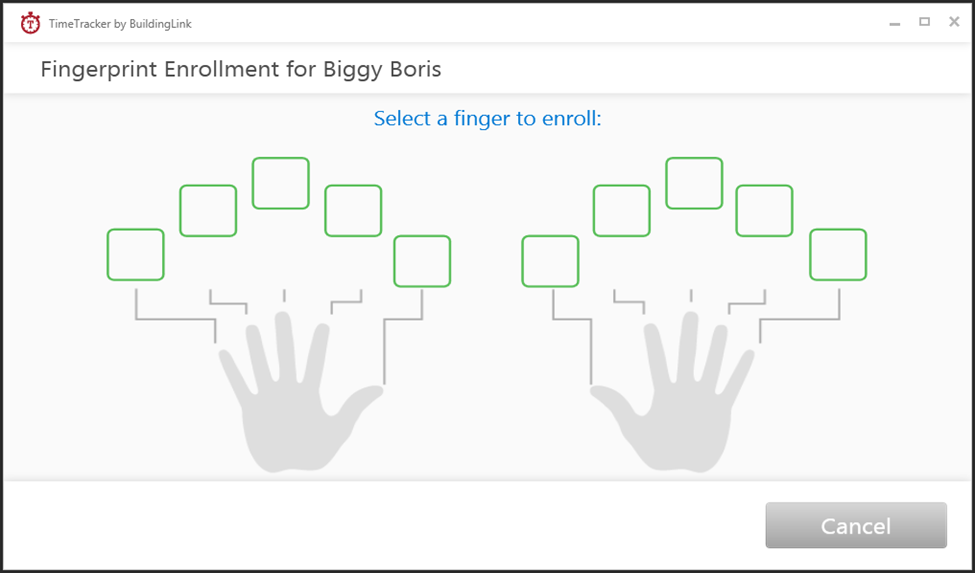
After clicking on the employee’s name, you will see two hands on the screen. Click the green square that corresponds to the finger your employee plans on using with the fingerprint reader.
Now, ask the employee to place his/her finger on the fingerprint reader and remove it after 2-3 seconds. Repeat this three more times, then click Enroll again. Try to do this quickly, as the screen may time out for security reasons and go back to the beginning without saving your fingerprint. If this happens, simply repeat the steps.
Note: The fingerprint reader is a sensitive device and sometimes has trouble getting good reads from users with dry skin. If you have trouble with this step, try rubbing your finger against your forehead or nose to get a bit of extra moisture on your fingerprint.
Clocking In/Out Using the TimeTracker Console
Clocking In
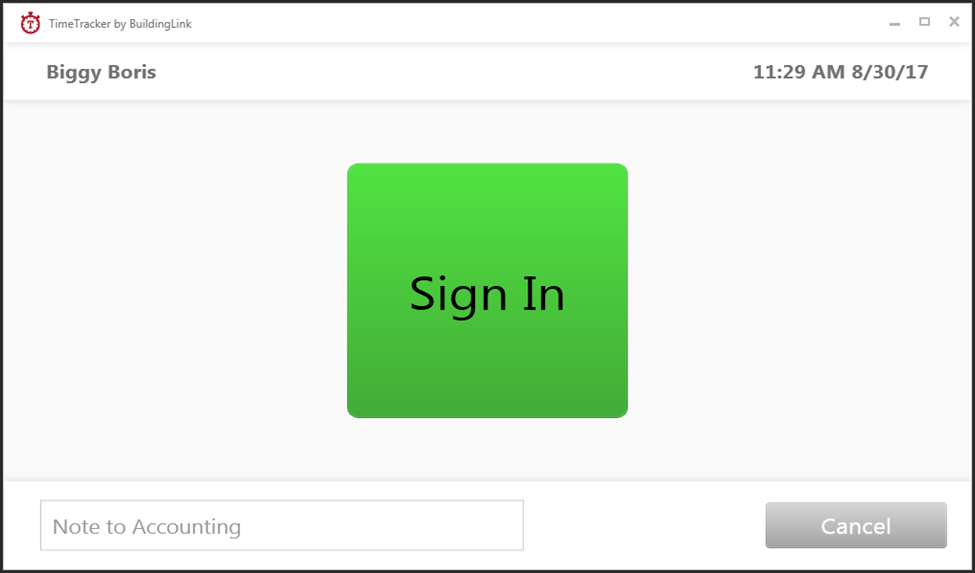
Once your fingerprint has been registered, all you need to do to clock in is place the registered finger on the reader. Even if the console is not currently visible on the screen, TimeTracker is running in the background, and when the reader recognizes the user, the console will reappear and prompt you to Sign In or Sign Out.
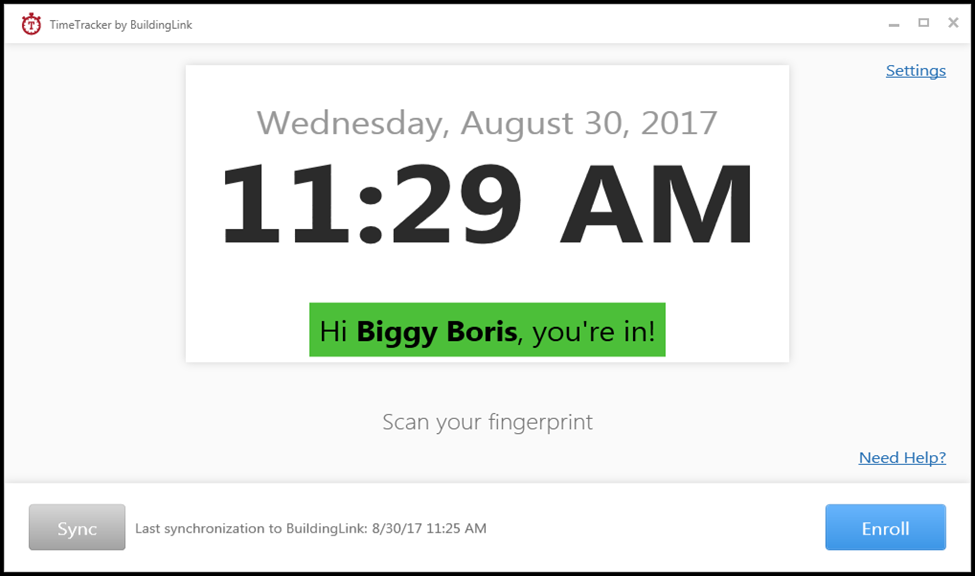
After you click on Sign In, a small pop-up will let you know that you have successfully signed in and will disappear after a few seconds. Depending on your building's settings, you may see the pop-up without needing to click the Sign In button.
Breaks
When configuring the TimeTracker Console, Security Officer Level Users may decide to track breaks. To sign out for a break, make sure you have already clocked in for the day.
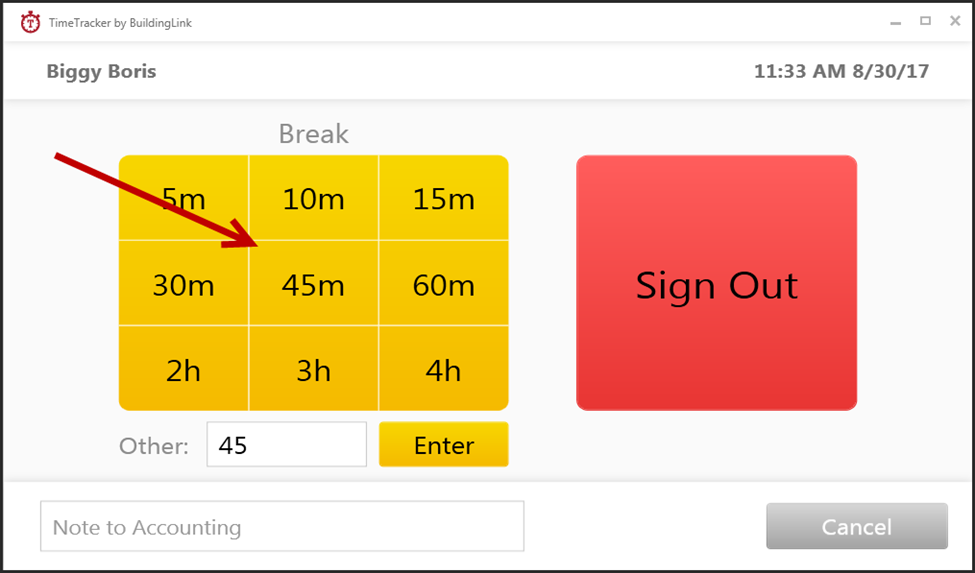
With the TimeTracker Console on the screen, place your registered finger on the fingerprint reader. The console’s screen will change to a grid of time-length options.
Click on the appropriate time length for the break. On this screen, you may also type in any notes that relate to the break. A small pop-up will let you know that you are now on break and will disappear after a few seconds.
Clocking Out
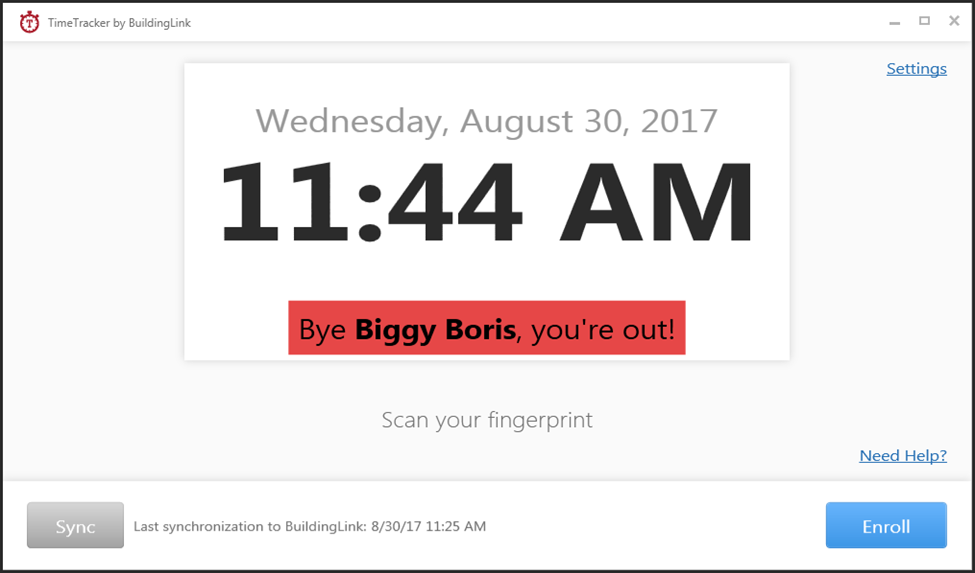
With the TimeTracker console on the screen, place your registered finger on the fingerprint reader. The console’s screen will change to a Sign In / Sign Out screen, where you can click Sign Out. On this screen, you may also type in any notes that relate to this clock-out (e.g., a reason why you’re leaving early).
A small pop-up will let you know that you are now clocked out and will disappear after a few seconds. Depending on your building's settings, you may get the pop-up without needing to click the Sign Out button.
Adjusting an Employee’s Time
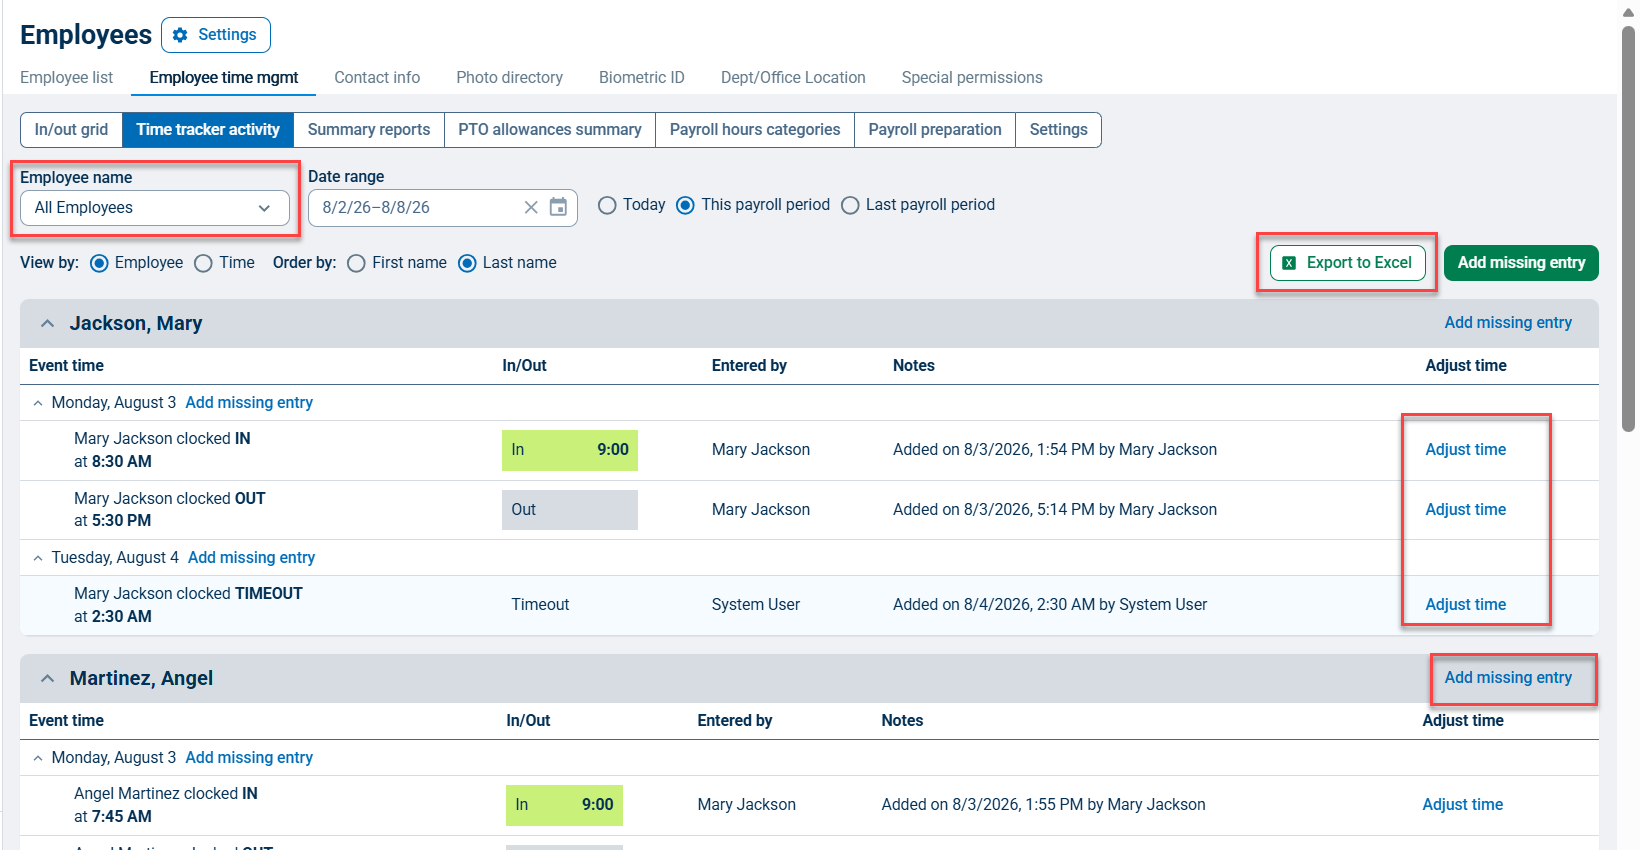
Anyone with Security Officer authority can adjust an employee’s time if an employee forgets to clock in or out. To do so, click on Time tracker activity under the Employee Time Mgmt tab.
This will show you all clock-ins and outs within your search period. Click Adjust time next to the record you’d like to change.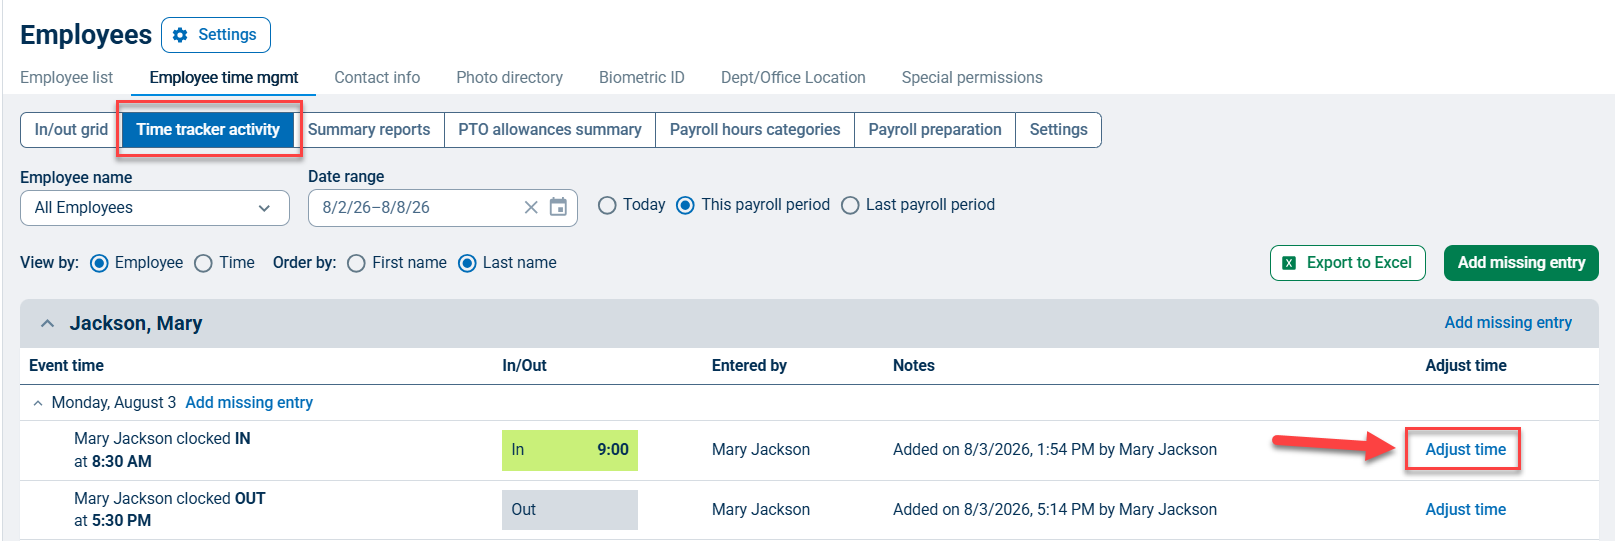
A pop-up will appear, allowing you to change the date or time and add additional notes to the record. Make sure to click Update when done.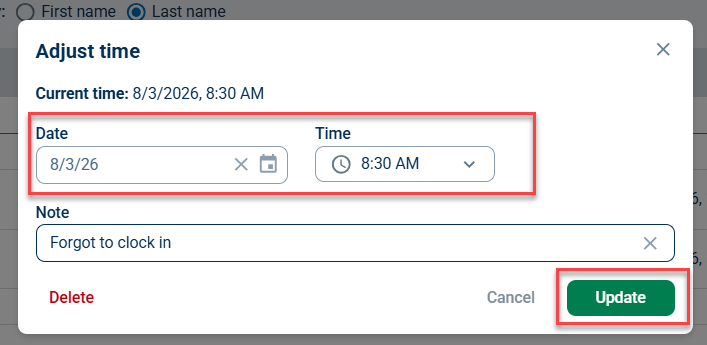
Employee Time Management Reports
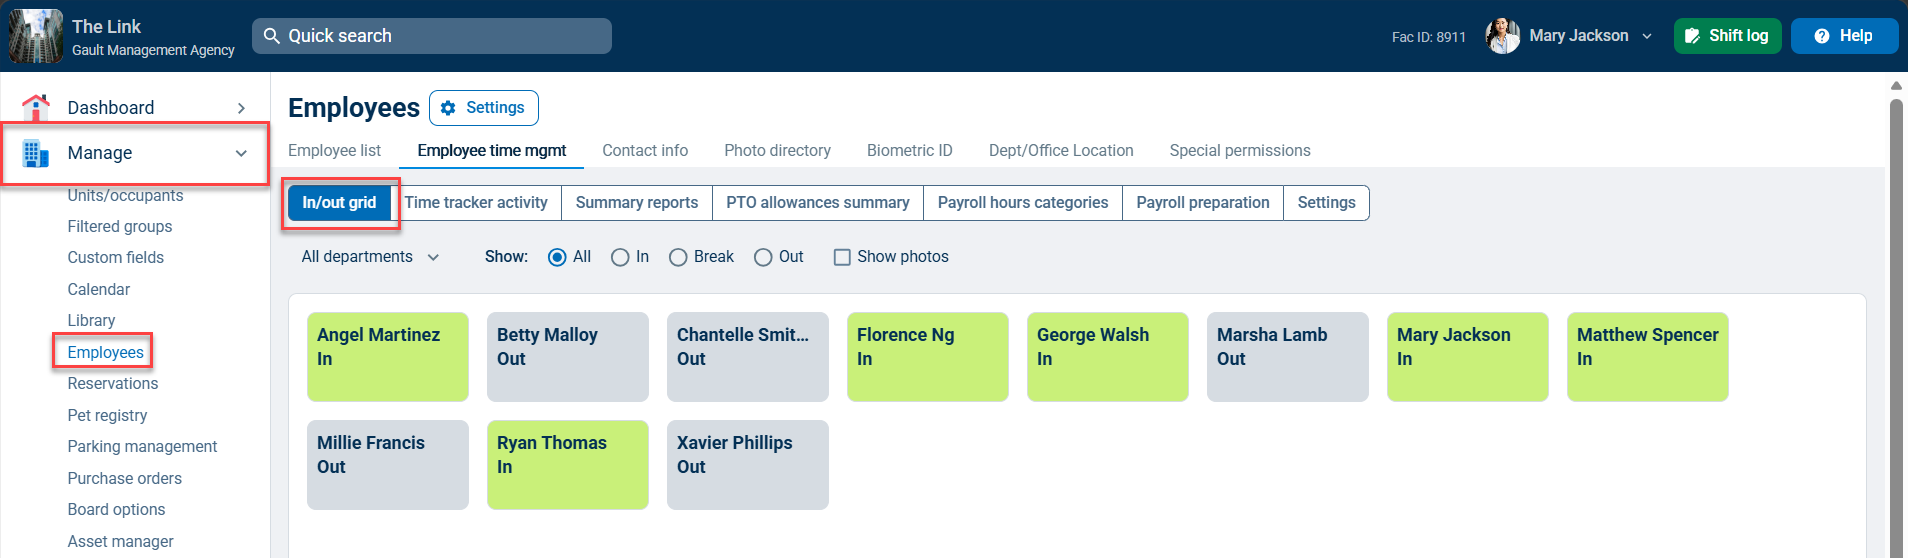
TimeTracker integrates with BuildingLink to provide several features to manage your employees’ time and attendance. To see these features, you must have Security Officer level in BuildingLink. These features are found under your Manage Tab in the Employees Section. Once you’ve clicked on Employees, make sure Employee Time Management is selected.
In/Out Grid
The grid shows you which of your employees are currently clocked in, on break, or not clocked in.
TimeTracker Activity
This section displays clock ins/outs and breaks over a selected period of time. You may choose to see only one employee or all and select any date range. From this screen, you may also adjust times and add missing entries. Finally, you may export the information on this screen to Excel.
Summary Reports
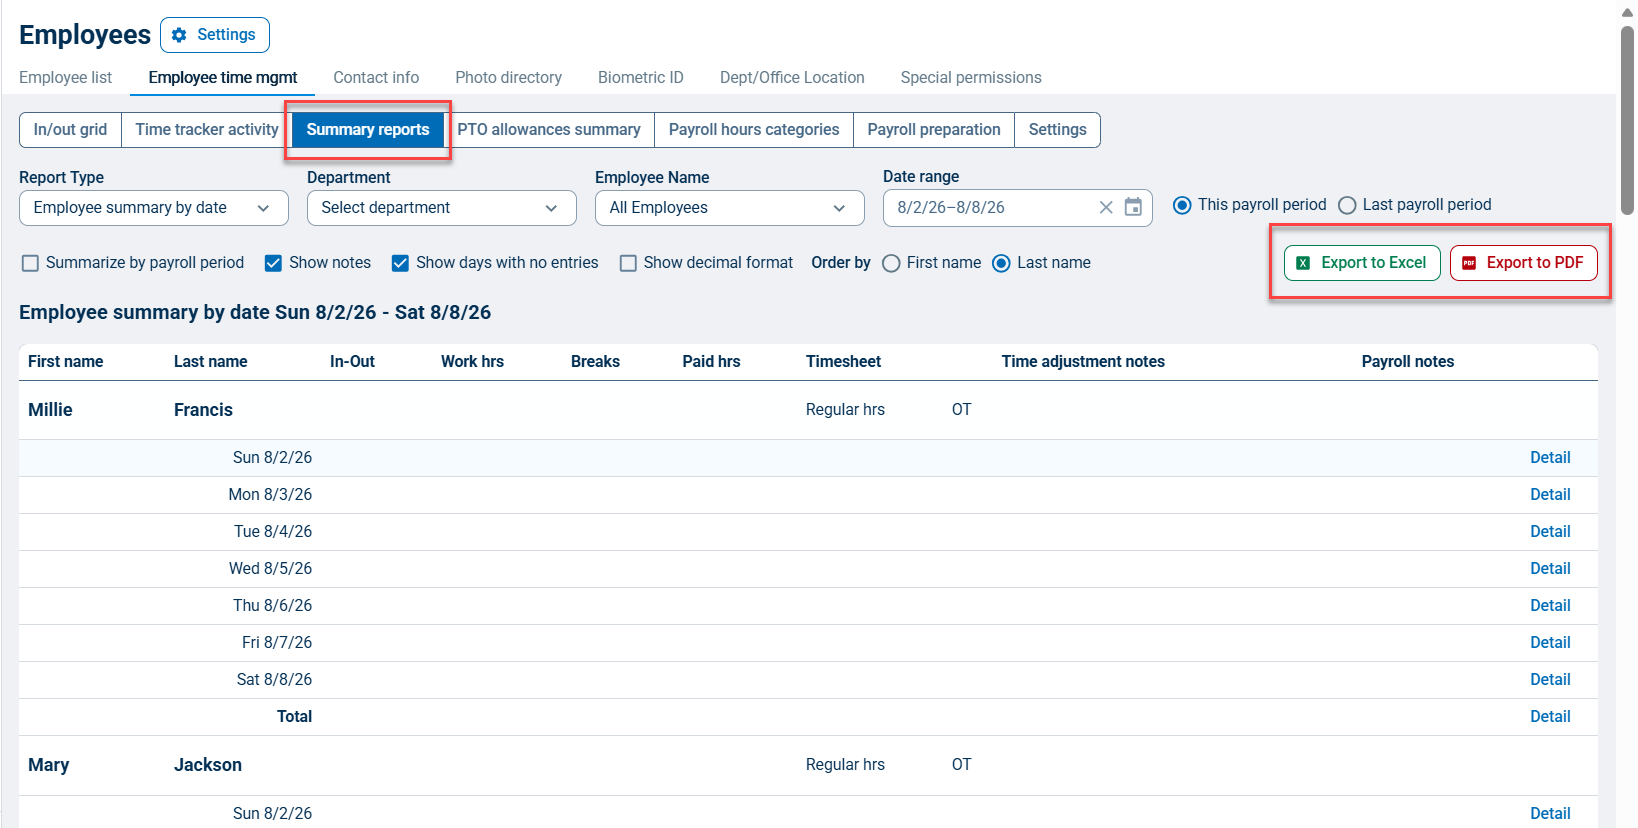
This section shows a summary of hours worked over a selected date range for timesheet preparation. You can select to see one or all employees and export the report to an Excel or PDF file.
PTO Allowances Summary
This section shows employee PTO allowances and tracks the current payroll balance based on active Payroll hours categories. From this screen, you can view each employee's payroll balance and history, and edit the allowed amounts for each employee.
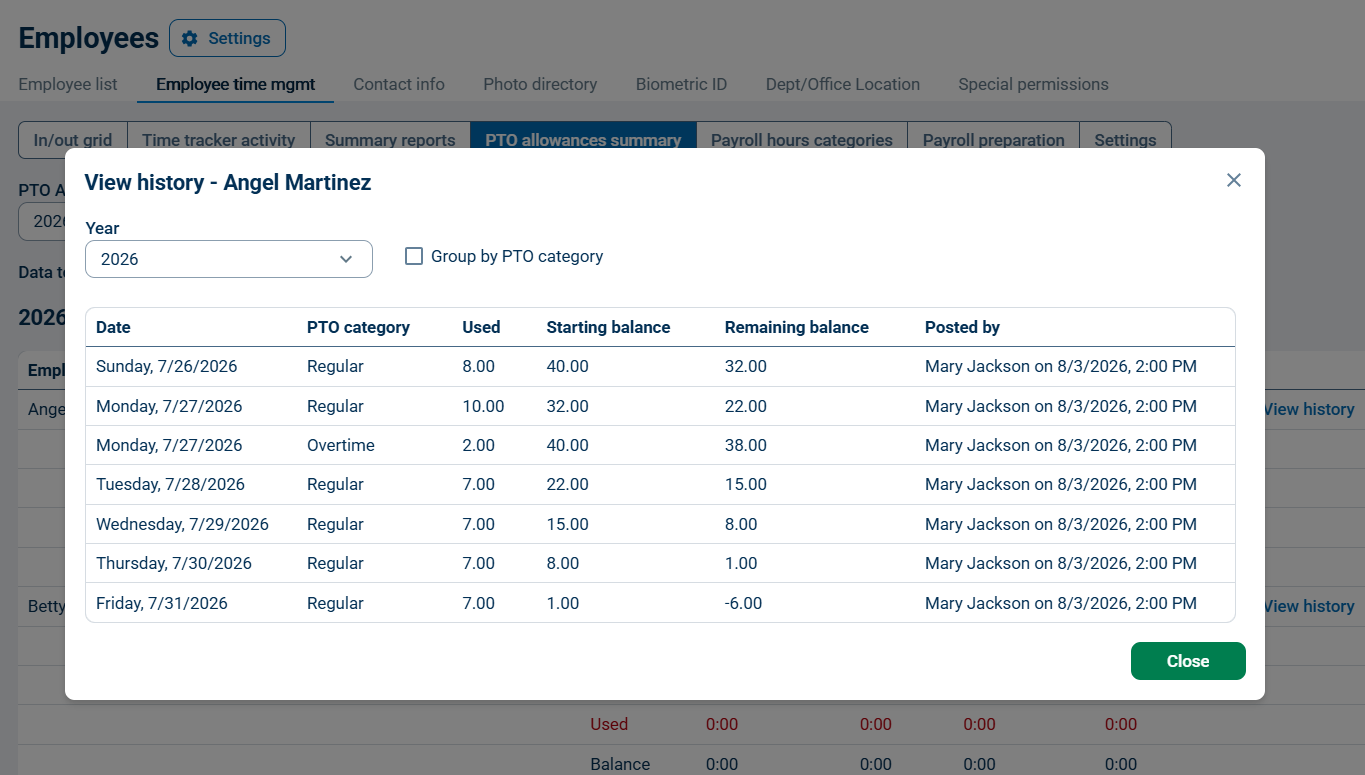
Click View history to view the employee's payroll activity for the year.
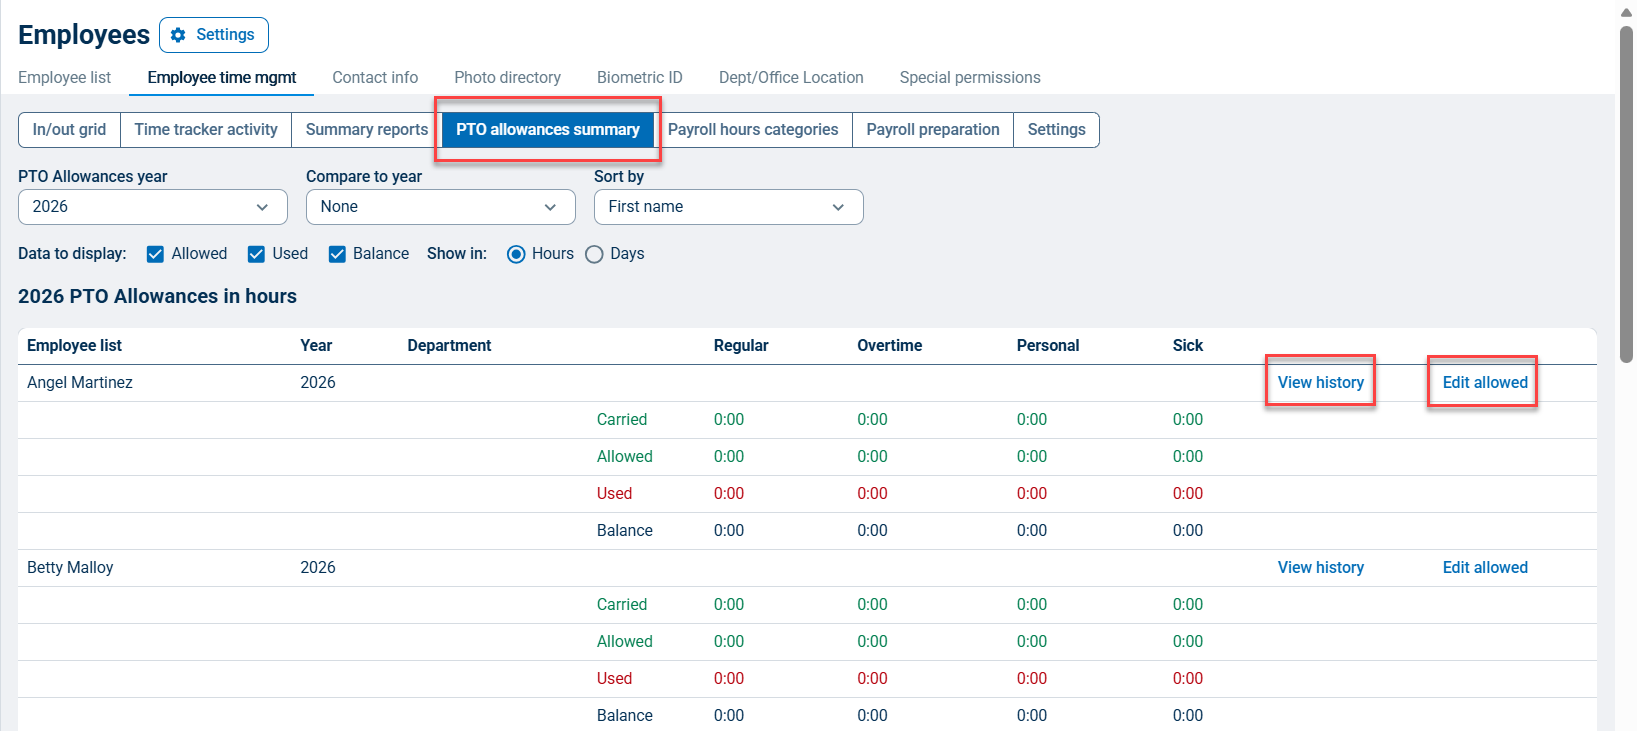
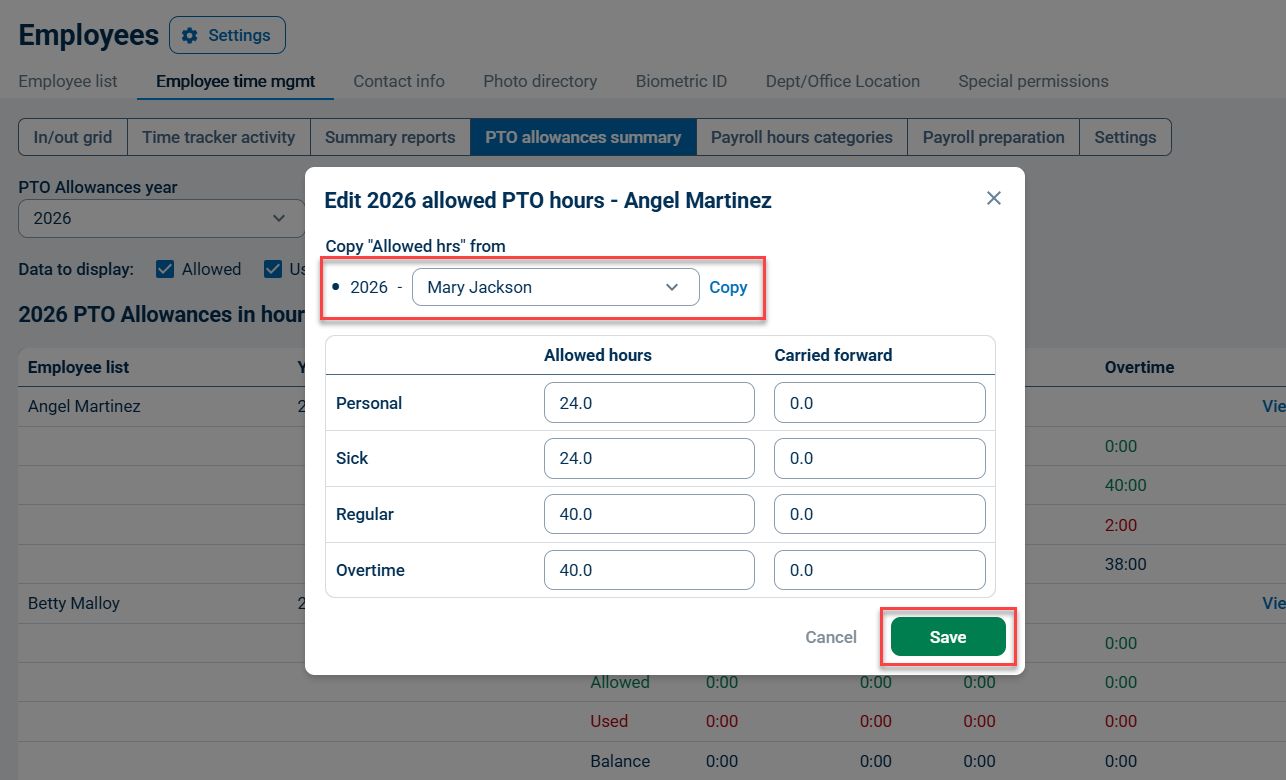
Click Edit allowed to edit the amount of hours allotted to that employee for each active payroll hours category.
You can copy the number of hours from one employee profile to another by selecting the employee from the Copy "Allowed hrs" from dropdown menu whose hours you want to copy, then clicking Copy to fill the fields with the values copied from the selected employee. Click Save when you're done.
Payroll Hours Categories
This section lists your Payroll hours categories. From this screen, you may view a list of active and inactive payroll hours categories.
Click Activate in the list of Inactive payroll hours categories to activate the category for tracking.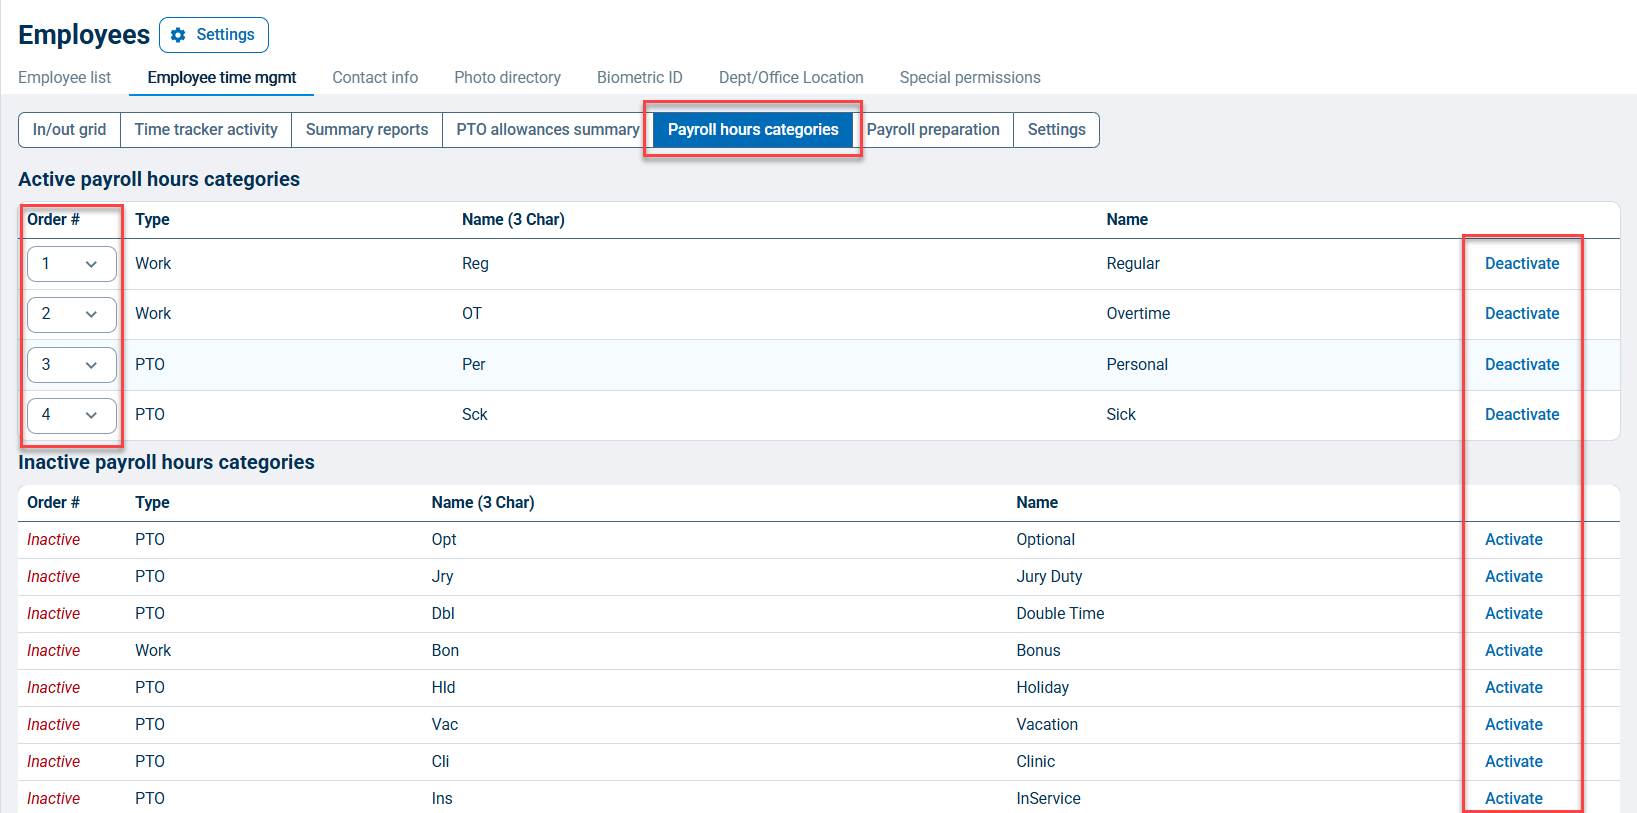
Payroll Preparation
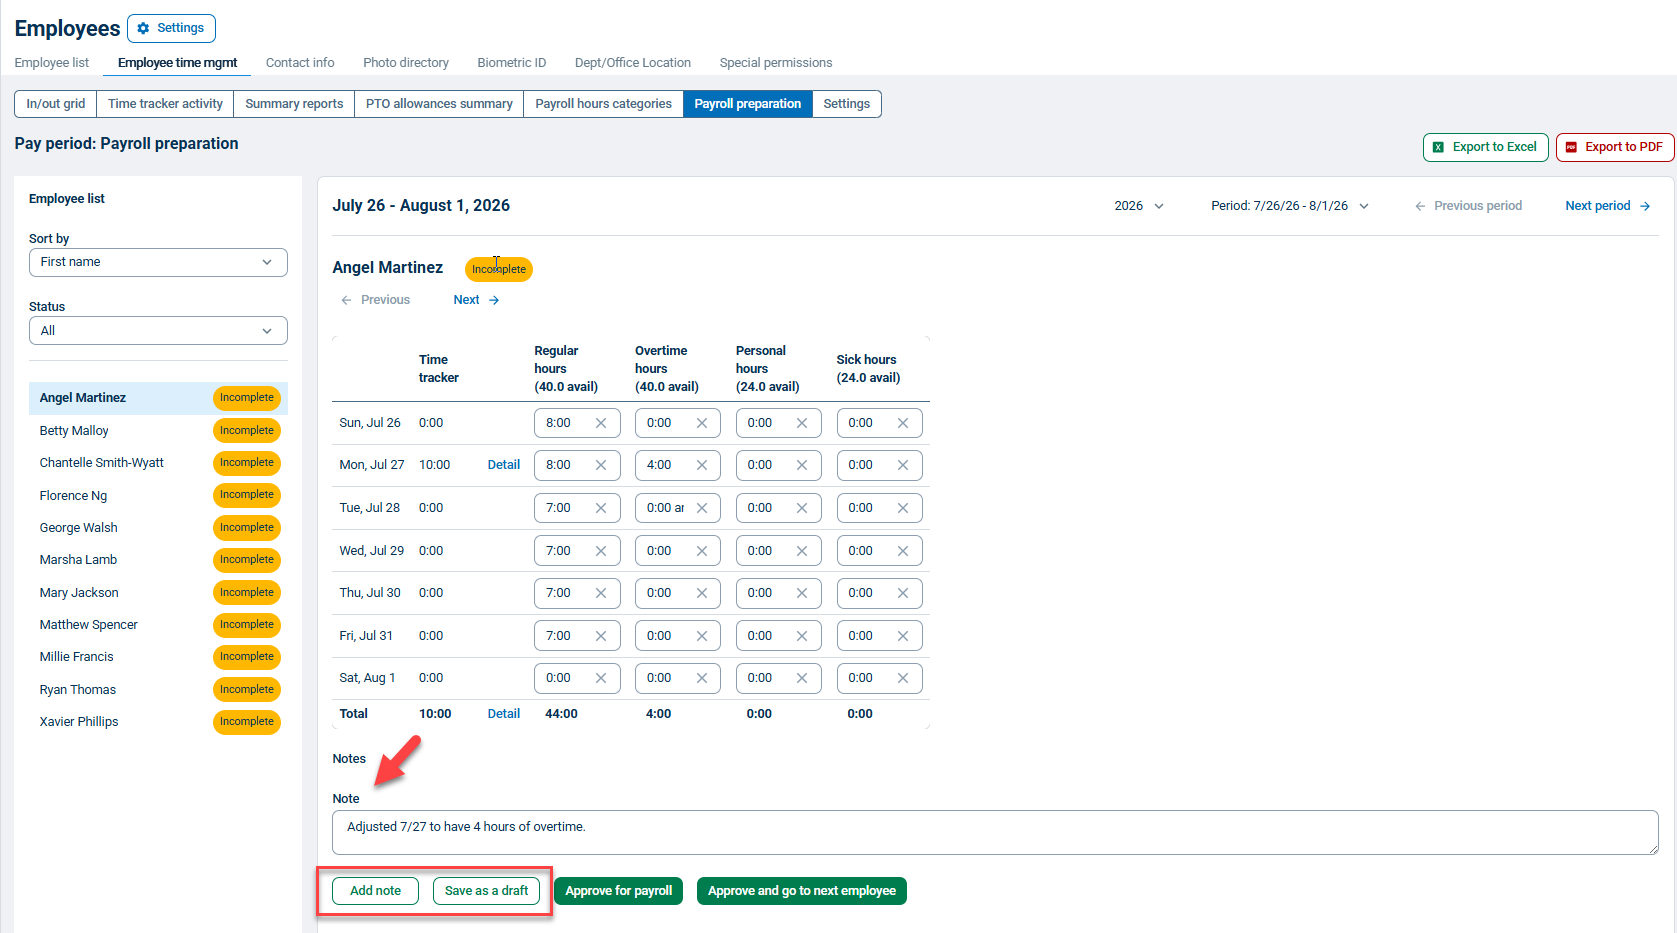
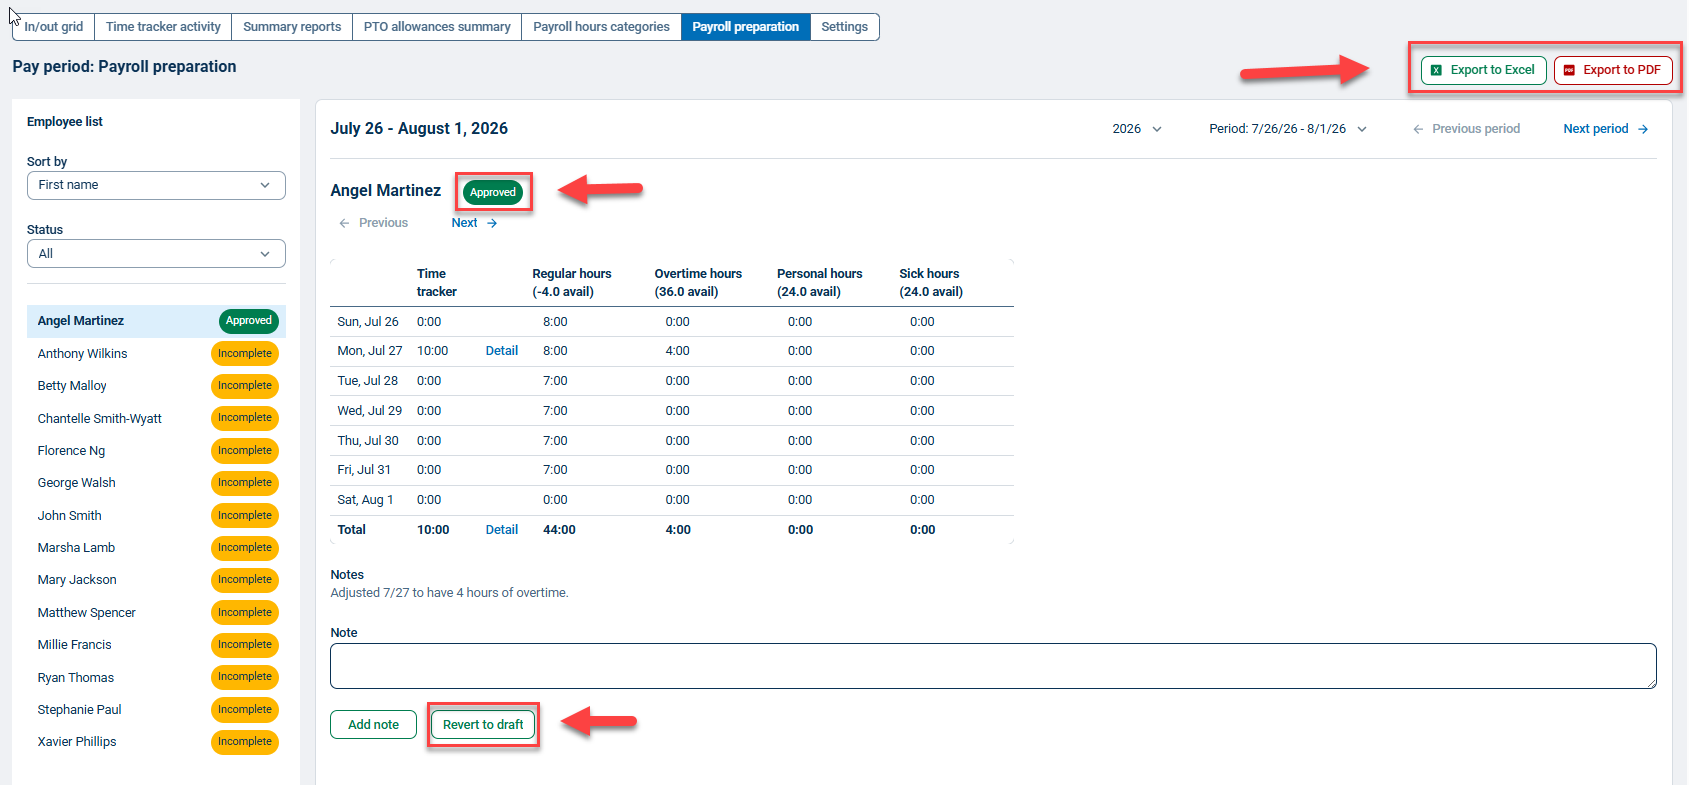
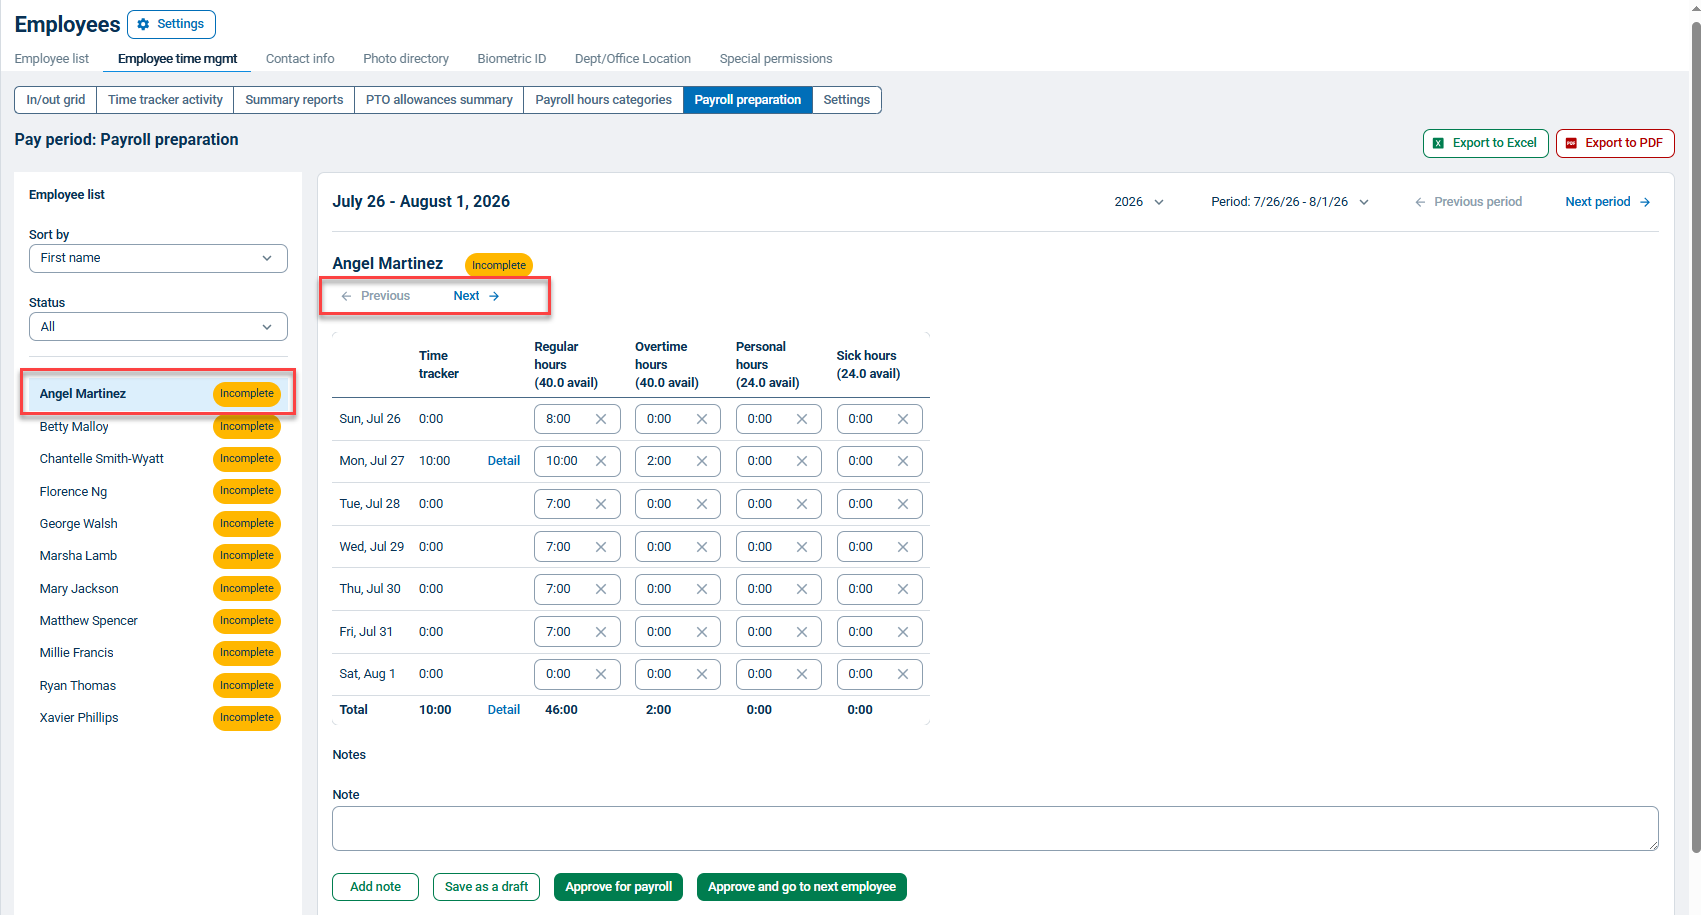
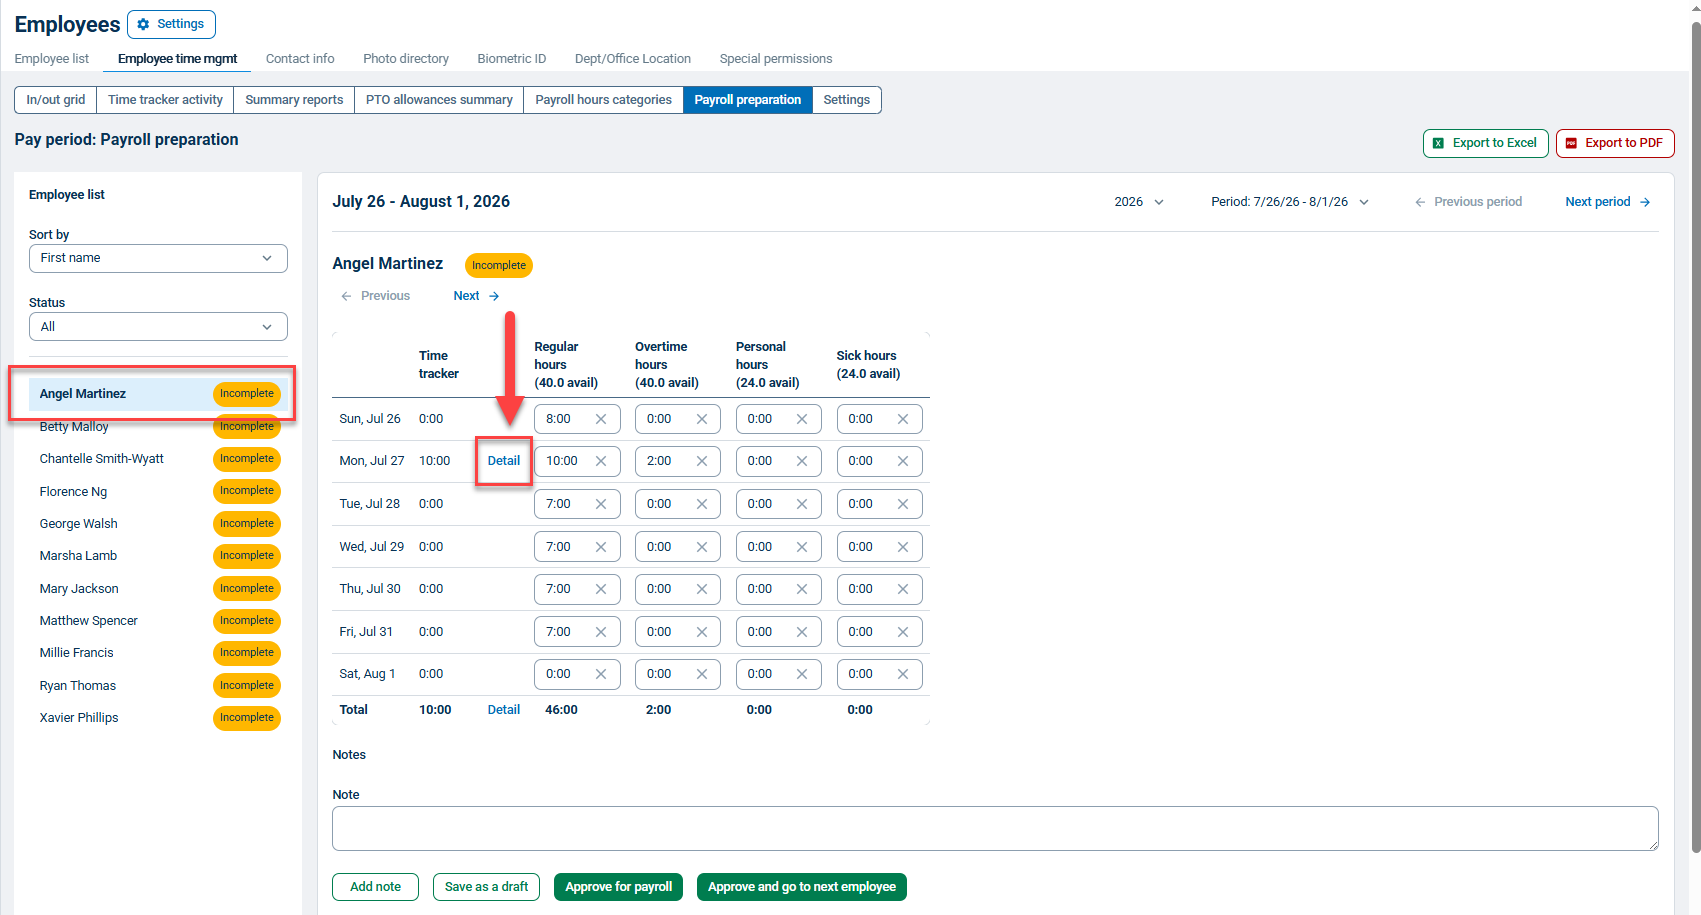
This section shows the current Pay period and allows payroll preparation for accurate timesheets. From this screen, you may select an employee, view their time tracked for the current pay period, and export to Excel or PDF reports.
Click the employee name from the Employee list on the left to view their data. Click Next below the employee name to view the next employee, or Previous to go back on the list.
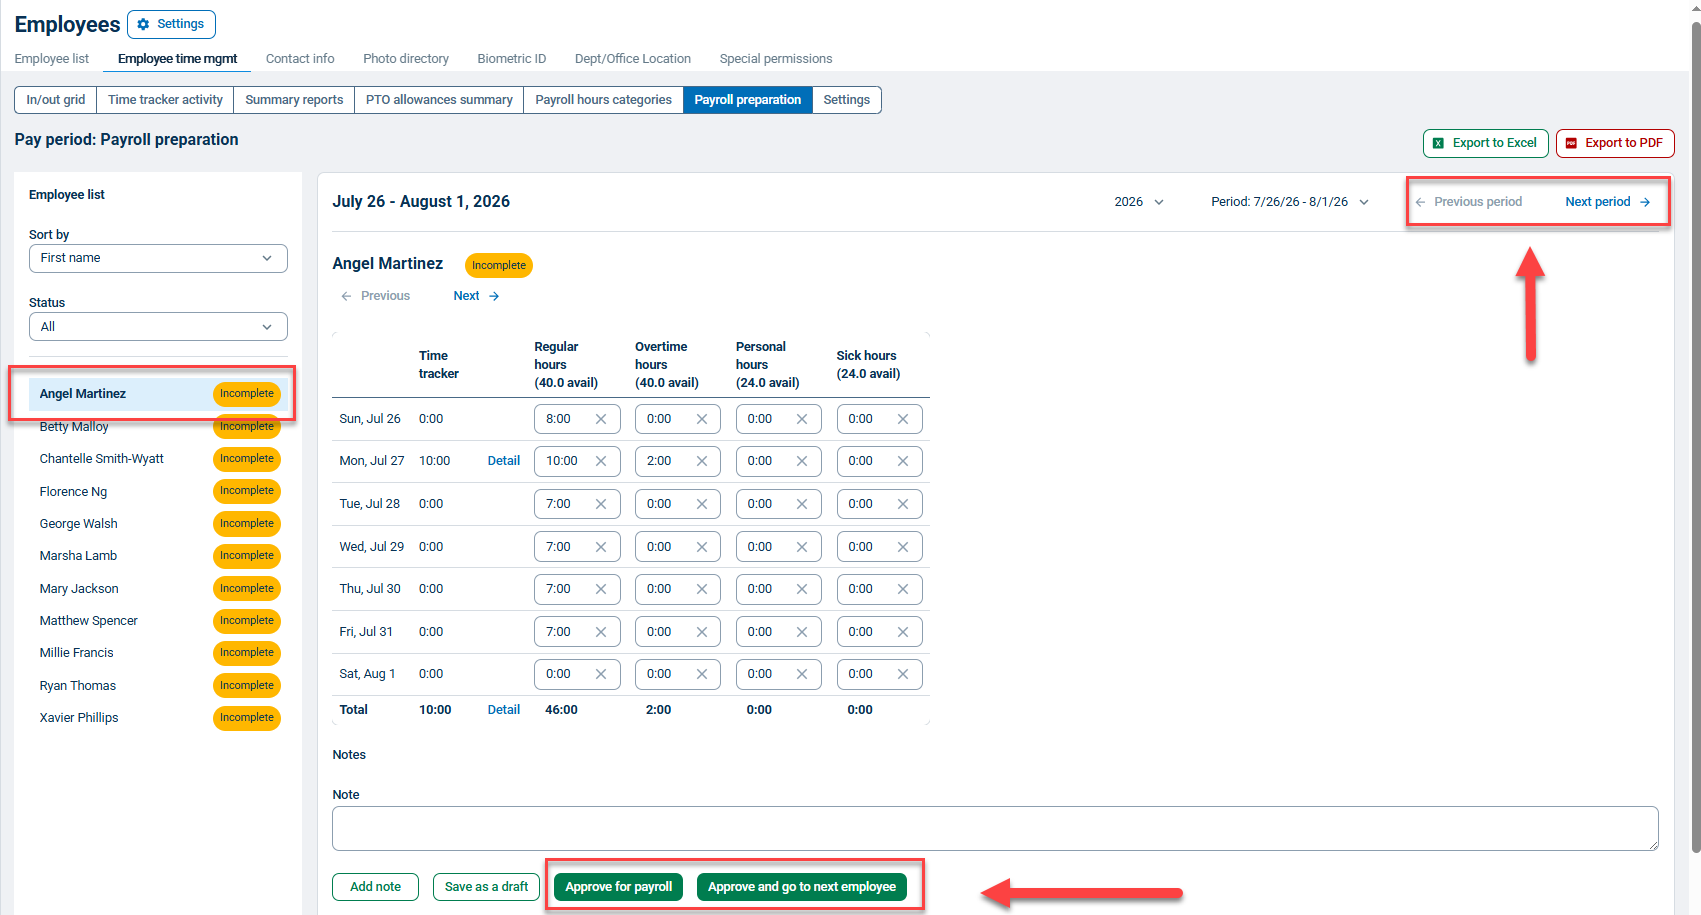
Click Next period to view the upcoming pay period data, and click Previous period to view the previous pay period data for the same employee.
Scroll down and click Approve for payroll to approve the employee timesheet for the pay period.
Click Approve and go to next employee to approve the employee timesheet for the pay period and view the next employee profile for payroll preparation.
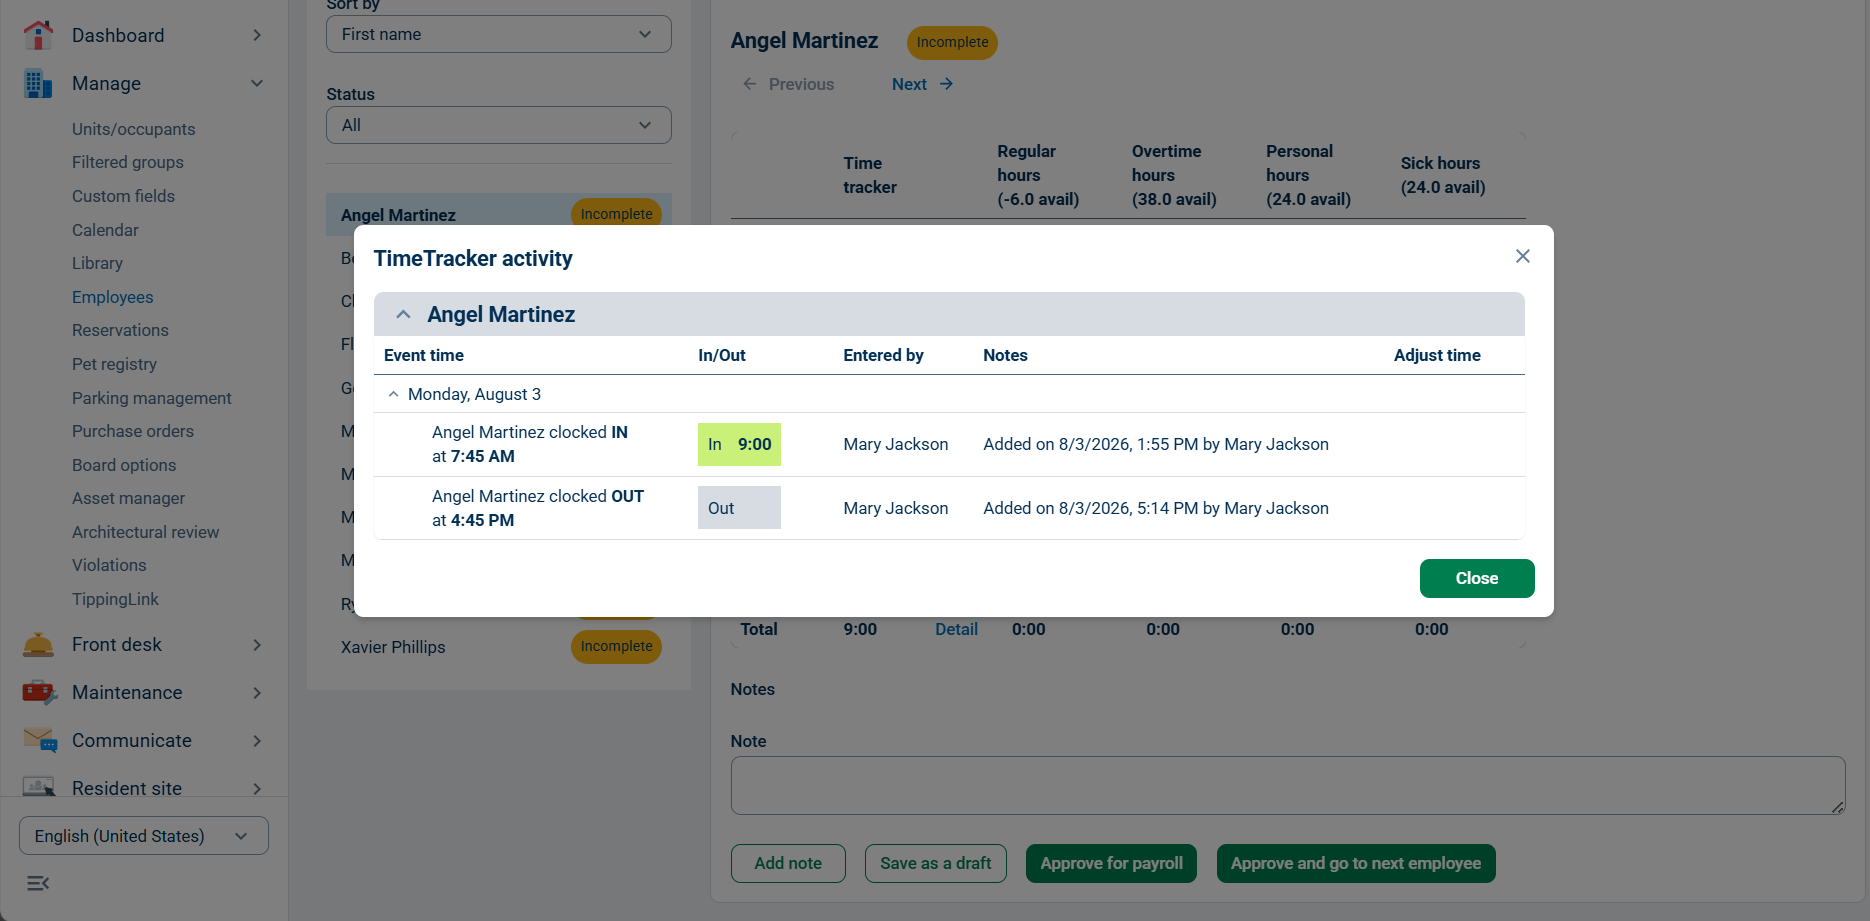
Click Detail next to a date entry in the employee's timesheet to view specific details of those logged hours.
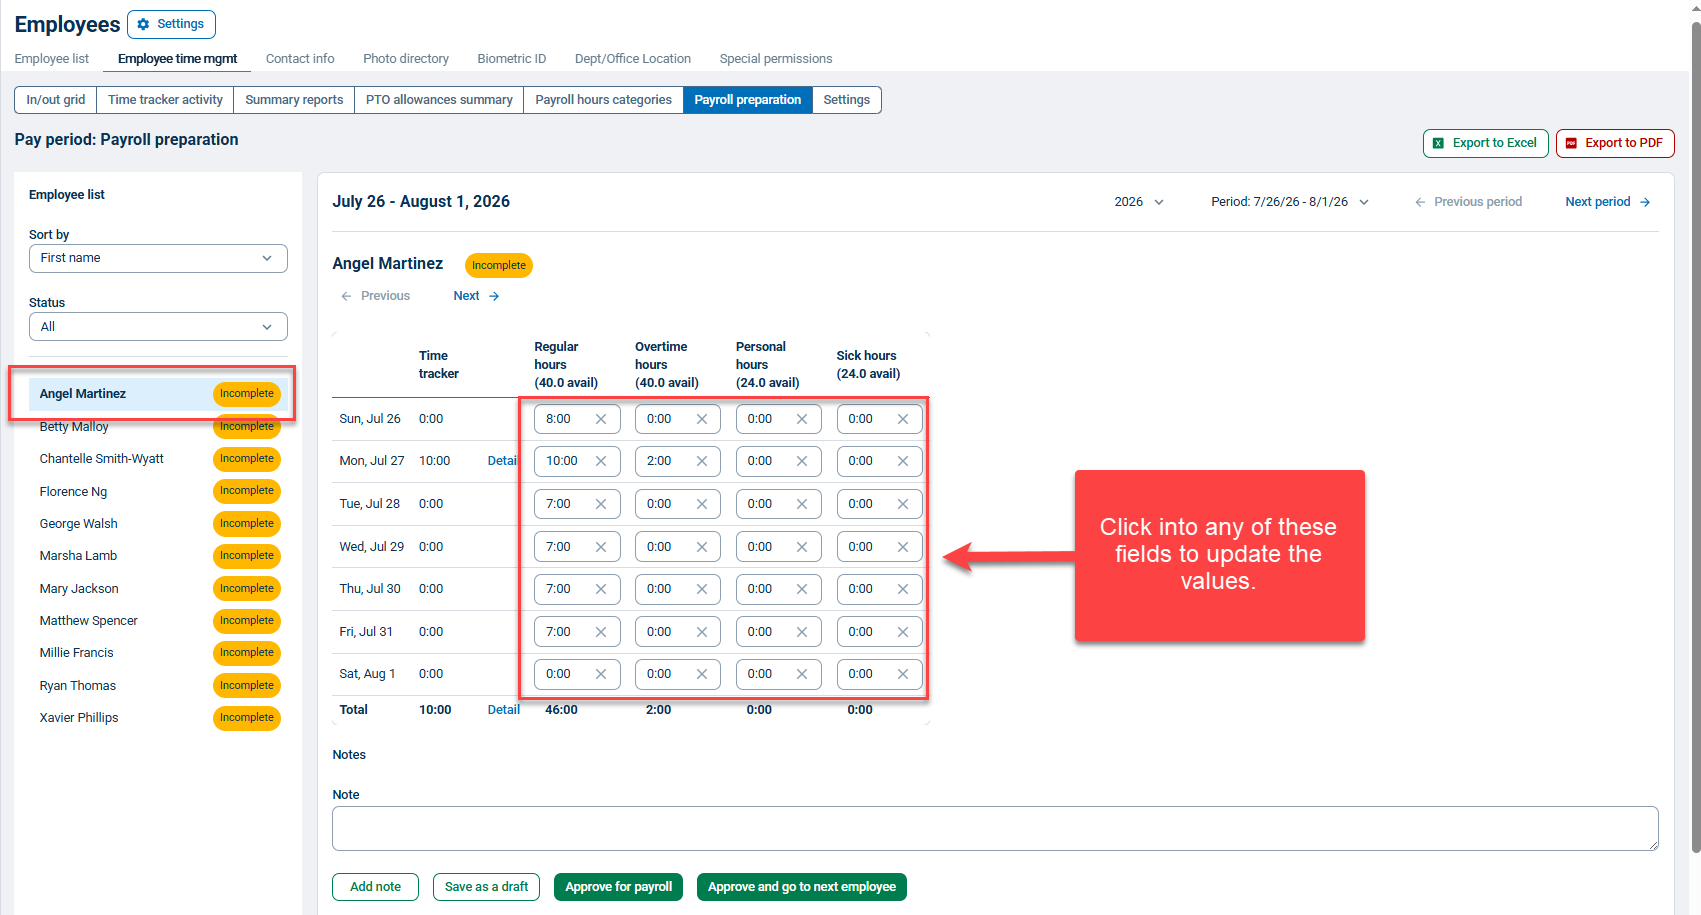
Manually edit hours as needed for each payroll category by clicking into the field and updating the value.
Click Add note to leave a custom note on the employee's timesheet for that pay period, visible in the Notes section.
Click Save as a draft to save any changes before approving the report.